
Introduction to ServiceNow Client Scripts
In the dynamic world of ServiceNow development, ServiceNow Client Scripts serve as powerful tools that enable developers to create interactive, user-friendly experiences directly within the ServiceNow platform. Whether you’re automating form validations, controlling field visibility, or enhancing user workflows, understanding how to effectively implement Client Scripts is essential for any ServiceNow professional.
This comprehensive guide will walk you through 10 real-time examples of ServiceNow Client Scripts, covering everything from basic implementations to advanced scenarios. By the end of this article, you’ll have practical knowledge that you can immediately apply to your ServiceNow instance, regardless of whether you’re a beginner or an experienced developer.
What Are ServiceNow Client Scripts?
ServiceNow Client Scripts are JavaScript code snippets that execute on the client-side (in the user’s browser) to dynamically control forms and fields. Unlike server-side Business Rules, Client Scripts provide immediate feedback to users without requiring a round trip to the server, resulting in a more responsive and intuitive user experience.
Key Characteristics of Client Scripts:
- Execution Environment: Run in the user’s browser
- Primary Object: GlideForm (g_form) API
- Purpose: Form manipulation, field validation, and user interaction
- Performance Impact: Minimal server load since processing occurs client-side
- User Experience: Instantaneous feedback without page reloads
Client Scripts are particularly valuable when you need to:
- Validate form data before submission
- Show or hide fields based on user selections
- Set default values dynamically
- Provide real-time feedback to users
- Control mandatory field requirements
Types of ServiceNow Client Scripts:
Understanding the different types of ServiceNow Client Scripts is crucial for selecting the right approach for your specific use case. Each type has a unique execution context and purpose.
1. onLoad Client Scripts
Execution Context: Runs when a form loads and after the form and its fields have been populated.
Best Used For:
- Setting default field values
- Hiding/showing fields based on initial conditions
- Setting fields to read-only
- Displaying informational messages
Performance Note: onLoad scripts can impact form load time, so keep them lightweight.
2. onChange Client Scripts
Execution Context: Executes when the value of a specified field changes.
Best Used For:
- Cascading field updates
- Dynamic field validations
- Conditional field visibility
- Auto-populating related fields
Important: Only applies to the specific field defined in the script.
3. onSubmit Client Scripts
Execution Context: Runs when a user submits a form, before data is sent to the server.
Best Used For:
- Final form validations
- Confirming user actions
- Preventing form submission based on conditions
- Displaying warning messages
Return Value: Must return true to allow submission or false to prevent it.
4. onCellEdit Client Scripts
Execution Context: Executes when a user changes a field value in a list editor.
Best Used For:
- List view validations
- Updating related list fields
- Providing immediate feedback in list views
Scope: Limited to list editing scenarios.
10 Real-Time Examples of ServiceNow Client Scripts
Now let’s dive into practical, real-world examples that you can implement immediately in your ServiceNow instance. Each example includes complete code, explanations, and use cases.
Example 1: Auto-Populate Description Based on Category (onChange)
Use Case: When a user selects a category on an Incident form, automatically populate the description field with a template.
Type: onChange Client Script
Table: Incident [incident]
Field: Category
JavaScriptfunction onChange(control, oldValue, newValue, isLoading, isTemplate) {
if (isLoading || newValue == '') {
return;
}
// Get the category value
var category = g_form.getValue('category');
// Define templates based on category
var templates = {
'hardware': 'Hardware Issue:\n\nDevice Type:\nSerial Number:\nIssue Description:\nSteps to Reproduce:',
'software': 'Software Issue:\n\nApplication Name:\nVersion:\nError Message:\nSteps to Reproduce:',
'network': 'Network Issue:\n\nLocation:\nDevices Affected:\nIssue Description:\nStart Time:'
};
// Set description if template exists for category
if (templates[category]) {
g_form.setValue('description', templates[category]);
}
}
Key Takeaways:
- Always check
isLoadingto prevent execution during form load - Validate that
newValueexists before processing - Use clear, structured templates for better user guidance
Example 2: Mandatory Field Based on Condition (onLoad & onChange)
Use Case: Make the “Justification” field mandatory when Priority is set to “Critical” or “High”.
Type: onChange Client Script
Table: Change Request [change_request]
Field: Priority
JavaScriptfunction onChange(control, oldValue, newValue, isLoading, isTemplate) {
if (isLoading || newValue == "") {
return;
}
var priority = g_form.getValue('priority');
// Priority 1 = Critical, 2 = High
if (priority == '1' || priority == '2') {
g_form.setMandatory('justification', true);
g_form.showFieldMsg('justification', 'Justification is required for high-priority changes', 'info');
} else {
g_form.setMandatory('justification', false);
g_form.hideFieldMsg('justification');
}
}
Companion onLoad Script:
JavaScriptfunction onLoad() {
var priority = g_form.getValue('priority');
if (priority == '1' || priority == '2') {
g_form.setMandatory('justification', true);
}
}
Key Takeaways:
- Use both onLoad and onChange to ensure consistency
- Provide user feedback with
showFieldMsg() - Remember that priority values are stored as numbers
Example 3: Prevent Form Submission with Validation (onSubmit)
Use Case: Prevent users from submitting an Incident without selecting a Configuration Item when the category is “Hardware”.
Type: onSubmit Client Script
Table: Incident [incident]
JavaScriptfunction onSubmit() {
var category = g_form.getValue('category');
var configItem = g_form.getValue('cmdb_ci');
// Check if category is hardware and CI is empty
if (category == 'hardware' && configItem == '') {
g_form.addErrorMessage('Please select a Configuration Item for hardware-related incidents.');
g_form.flash('cmdb_ci', '#FF0000', 0); // Flash the field in red
return false; // Prevent form submission
}
return true; // Allow form submission
}
Key Takeaways:
- Always return
falseto prevent submission,trueto allow it - Use
addErrorMessage()for clear user communication - Use
flash()to draw attention to problematic fields - Keep validation logic simple and fast
Example 4: Hide/Show Fields Based on Selection (onChange)
Use Case: Show additional fields only when “Other” is selected in a dropdown.
Type: onChange Client Script
Table: Incident [incident]
Field: Close Code
JavaScriptfunction onChange(control, oldValue, newValue, isLoading, isTemplate) {
if (isLoading || newValue == "") {
return;
}
var closeCode = g_form.getValue('close_code');
if (closeCode == 'other') {
// Show and make mandatory
g_form.setVisible('close_notes', true);
g_form.setMandatory('close_notes', true);
g_form.showFieldMsg('close_notes', 'Please provide detailed closure notes', 'info');
} else {
// Hide and clear
g_form.setVisible('close_notes', false);
g_form.setMandatory('close_notes', false);
g_form.setValue('close_notes', '');
}
}
Key Takeaways:
- Clear hidden field values to prevent data confusion
- Remove mandatory status when hiding fields
- Always provide context to users about why fields appear
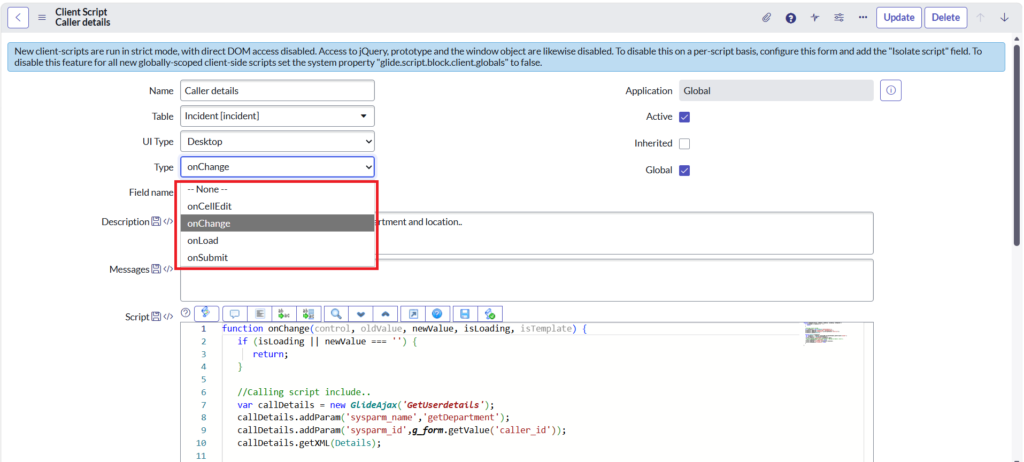
Example 5: Copy Values Between Fields (onChange)
Use Case: When “Use Caller’s Location” checkbox is selected, copy the caller’s location to the incident location.
Type: onChange Client Script
Table: Incident [incident]
Field: Custom field (use_caller_location)
JavaScriptfunction onChange(control, oldValue, newValue, isLoading) {
if (isLoading || newValue == 'false') {
return;
}
// Get caller's location reference
var callerSysId = g_form.getValue('caller_id');
if (callerSysId) {
// Get reference field value
var ga = new GlideAjax('LocationUtilsAjax');
ga.addParam('sysparm_name', 'getCallerLocation');
ga.addParam('sysparm_caller_id', callerSysId);
ga.getXMLAnswer(function(answer) {
if (answer) {
g_form.setValue('location', answer);
}
});
}
}
Alternative Direct Copy (if location is a direct field):
JavaScriptfunction onChange(control, oldValue, newValue, isLoading) {
if (isLoading || newValue == 'false') {
return;
}
var callerLocation = g_form.getReference('caller_id').location;
if (callerLocation) {
g_form.setValue('location', callerLocation);
}
}
Key Takeaways:
- Use GlideAjax for complex server-side data retrieval
- Use
getReference()for simple reference field access - Always check if source values exist before copying
Example 6: Real-Time Field Validation (onChange)
Use Case: Validate that an email address is properly formatted as the user types.
Type: onChange Client Script
Table: User [sys_user]
Field: Email
JavaScriptfunction onChange(control, oldValue, newValue, isLoading) {
if (isLoading || newValue == '') {
return;
}
// Email validation regex
var emailPattern = /^[a-zA-Z0-9._-]+@[a-zA-Z0-9.-]+\.[a-zA-Z]{2,6}$/;
if (!emailPattern.test(newValue)) {
g_form.showFieldMsg('email', 'Please enter a valid email address', 'error');
g_form.flash('email', '#FF0000', 0);
} else {
g_form.hideFieldMsg('email');
g_form.showFieldMsg('email', 'Email format is valid', 'success');
// Auto-hide success message after 3 seconds
setTimeout(function() {
g_form.hideFieldMsg('email');
}, 3000);
}
}
Key Takeaways:
- Use regular expressions for pattern validation
- Provide both error and success feedback
- Consider user experience with timed message removal
Example 7: Calculate and Display Total Cost (onChange)
Use Case: Automatically calculate total cost based on quantity and unit price in a Purchase Order.
Type: onChange Client Script
Table: Purchase Order Line [sc_req_item]
Field: Quantity (and Price – need two scripts)
JavaScript// Script 1: On Quantity Change
function onChange(control, oldValue, newValue, isLoading) {
if (isLoading) {
return;
}
calculateTotal();
}
function calculateTotal() {
var quantity = parseFloat(g_form.getValue('quantity')) || 0;
var unitPrice = parseFloat(g_form.getValue('price')) || 0;
var total = quantity * unitPrice;
// Set the total field
g_form.setValue('total_cost', total.toFixed(2));
// Show calculation to user
if (quantity > 0 && unitPrice > 0) {
g_form.showFieldMsg('total_cost',
quantity + ' × $' + unitPrice.toFixed(2) + ' = $' + total.toFixed(2),
'info');
}
}
// Create identical script for 'price' field with same code
Key Takeaways:
- Use
parseFloat()to handle numeric calculations - Provide default values with
|| 0to prevent NaN errors - Use
toFixed(2)for proper currency formatting - Create reusable functions for calculations used in multiple scripts
Example 8: Confirmation Dialog for Critical Actions (onSubmit)
Use Case: Display a confirmation dialog when closing a critical incident to ensure proper resolution.
Type: onSubmit Client Script
Table: Incident [incident]
JavaScriptfunction onSubmit() {
var state = g_form.getValue('state');
var priority = g_form.getValue('priority');
var resolution = g_form.getValue('close_notes');
// State 7 = Closed, Priority 1 = Critical
if (state == '7' && priority == '1') {
if (!resolution || resolution.length < 50) {
g_form.addErrorMessage('Critical incidents require detailed resolution notes (minimum 50 characters).');
return false;
}
var confirmMsg = 'You are closing a Critical incident. Please confirm:\n\n' +
'• Root cause has been identified\n' +
'• Proper resolution has been documented\n' +
'• User has confirmed resolution\n\n' +
'Proceed with closing this incident?';
var confirmed = confirm(confirmMsg);
if (!confirmed) {
return false; // Cancel submission
}
}
return true; // Allow submission
}
Key Takeaways:
- Use
confirm()for important user confirmations - Validate completeness of critical fields
- Provide clear checklist items in confirmation messages
- Remember that confirm() returns boolean
Example 9: Dynamic Field Options Based on Selection (onChange with GlideAjax)
Use Case: Filter available assignment groups based on the selected category.
Type: onChange Client Script
Table: Incident [incident]
Field: Category
JavaScriptfunction onChange(control, oldValue, newValue, isLoading, isTemplate) {
if (isLoading || newValue == '') {
return;
}
// Clear current assignment group
g_form.clearValue('assignment_group');
// Get filtered assignment groups based on category
var ga = new GlideAjax('IncidentUtils');
ga.addParam('sysparm_name', 'getAssignmentGroups');
ga.addParam('sysparm_category', newValue);
ga.getXMLAnswer(function(answer) {
if (answer) {
var groups = JSON.parse(answer);
if (groups.length == 1) {
// Auto-populate if only one group
g_form.setValue('assignment_group', groups[0].sys_id);
g_form.showFieldMsg('assignment_group',
'Auto-assigned to: ' + groups[0].name,
'info');
} else if (groups.length > 1) {
g_form.showFieldMsg('assignment_group',
groups.length + ' assignment groups available for this category',
'info');
} else {
g_form.showFieldMsg('assignment_group',
'No specific assignment group found for this category',
'warning');
}
}
});
}
Required Script Include (IncidentUtils):
JavaScriptvar IncidentUtils = Class.create();
IncidentUtils.prototype = Object.extendsObject(AbstractAjaxProcessor, {
getAssignmentGroups: function() {
var category = this.getParameter('sysparm_category');
var groups = [];
var gr = new GlideRecord('sys_user_group');
gr.addQuery('active', true);
gr.addQuery('u_supported_category', category);
gr.query();
while (gr.next()) {
groups.push({
sys_id: gr.getUniqueValue(),
name: gr.getValue('name')
});
}
return JSON.stringify(groups);
},
type: 'IncidentUtils'
});
Key Takeaways:
- GlideAjax enables server-side data retrieval
- Always parse JSON responses properly
- Clear dependent fields when parent changes
- Provide feedback about available options
Example 10: Set Read-Only Fields Based on User Role (onLoad)
Use Case: Make certain fields read-only for users who don’t have specific roles.
Type: onLoad Client Script
Table: Change Request [change_request]
JavaScriptfunction onLoad() {
// Check if user has change_manager role
var hasChangeManagerRole = g_user.hasRole('change_manager');
var hasAdminRole = g_user.hasRole('admin');
if (!hasChangeManagerRole && !hasAdminRole) {
// Make critical fields read-only for non-managers
g_form.setReadOnly('approval', true);
g_form.setReadOnly('risk', true);
g_form.setReadOnly('impact', true);
// Show info message
g_form.addInfoMessage('Risk and approval fields are managed by Change Managers only.');
// Hide sections that shouldn't be visible
g_form.setSectionDisplay('approval_section', false);
}
// Additional logic for submitted changes
var state = g_form.getValue('state');
if (state == 'implement' || state == 'closed') {
// Make most fields read-only once implementation starts
var fieldsToLock = ['short_description', 'description', 'start_date', 'end_date'];
fieldsToLock.forEach(function(field) {
g_form.setReadOnly(field, true);
});
g_form.addInfoMessage('This change is in implementation phase. Most fields are locked.');
}
}
Key Takeaways:
- Use
g_user.hasRole()for role-based logic - Combine multiple conditions for complex scenarios
- Inform users why fields are read-only
- Consider both role and record state
Best Practices for Writing ServiceNow Client Scripts
To create efficient, maintainable, and performant ServiceNow Client Scripts, follow these industry-proven best practices:
1. Always Check isLoading Parameter
JavaScriptfunction onChange(control, oldValue, newValue, isLoading) {
if (isLoading) {
return; // Prevents execution during form load
}
// Your code here
}
Why: Prevents unnecessary execution and potential infinite loops.
2. Minimize GlideAjax Calls
- Cache results when possible
- Combine multiple data requests into single calls
- Consider alternative approaches for simple data access
- Use asynchronous callbacks properly
Poor Practice:
JavaScript// Making multiple separate AJAX calls
var ga1 = new GlideAjax('Utils');
ga1.getXMLAnswer(callback1);
var ga2 = new GlideAjax('Utils');
ga2.getXMLAnswer(callback2);
Best Practice:
JavaScript// Single call retrieving multiple data points
var ga = new GlideAjax('Utils');
ga.addParam('sysparm_name', 'getMultipleValues');
ga.getXMLAnswer(function(answer) {
var data = JSON.parse(answer);
// Process all data at once
});
3. Use Descriptive Naming and Comments
JavaScriptfunction onChange(control, oldValue, newValue, isLoading) {
// Prevent execution during form load
if (isLoading) {
return;
}
// Retrieve current priority value
var priorityValue = g_form.getValue('priority');
// Priority 1 (Critical) requires immediate assignment
if (priorityValue == '1') {
enforceImmediateAssignment();
}
}
function enforceImmediateAssignment() {
g_form.setMandatory('assigned_to', true);
g_form.showFieldMsg('assigned_to',
'Critical priority requires immediate assignment',
'error');
}
4. Validate Input and Handle Edge Cases
JavaScriptfunction onChange(control, oldValue, newValue, isLoading) {
if (isLoading || newValue == '' || newValue == oldValue) {
return;
}
// Validate numeric input
var quantity = parseInt(newValue);
if (isNaN(quantity) || quantity < 0) {
g_form.showFieldMsg('quantity', 'Please enter a valid positive number', 'error');
g_form.setValue('quantity', oldValue); // Revert to previous value
return;
}
// Proceed with logic
}
5. Avoid Using g_scratchpad for Large Data
- Use g_scratchpad only for small, essential data
- Consider alternatives like GlideAjax for larger datasets
- Remember that g_scratchpad increases page size
6. Test with Different User Roles and Scenarios
- Test as different user types (end-users, admins, etc.)
- Test with various data combinations
- Test form load, field changes, and submissions
- Verify mobile and desktop experiences
7. Use UI Policies When Possible
Before writing a ServiceNow Client Script, consider if a UI Policy can achieve the same result:
Use UI Policy For:
- Simple show/hide logic
- Basic mandatory field rules
- Read-only field settings
- Simple field clearing
Use Client Scripts For:
- Complex calculations
- Multi-field validations
- AJAX calls
- Custom user messages
- Advanced conditional logic
8. Optimize Performance
JavaScript// Poor Performance: Multiple getValue calls
if (g_form.getValue('priority') == '1' &&
g_form.getValue('priority') == '2') {
// Logic
}
// Better Performance: Store in variable
var priority = g_form.getValue('priority');
if (priority == '1' || priority == '2') {
// Logic
}
9. Handle Errors Gracefully
JavaScriptfunction onChange(control, oldValue, newValue, isLoading) {
try {
if (isLoading) return;
// Your logic here
var result = performCalculation(newValue);
g_form.setValue('result', result);
} catch (error) {
g_form.addErrorMessage('An error occurred while processing your request. Please contact support.');
console.error('Client Script Error:', error);
}
}
10. Document Your Scripts
JavaScript/*
* Client Script: Auto-populate Assignment Group
* Type: onChange
* Table: Incident
* Field: Category
*
* Description: When category changes, automatically suggests appropriate
* assignment group based on category-to-group mapping table.
*
* Dependencies:
* - Script Include: IncidentUtils
* - Custom Table: u_category_group_mapping
*
* Author: Your Name
* Date: 2024-01-15
* Last Modified: 2024-01-15
*/
Common Troubleshooting Tips for ServiceNow Client Scripts
Even experienced ServiceNow developers encounter issues with ServiceNow Client Scripts. Here are common problems and their solutions:
Issue 1: Script Not Executing
Symptoms: Your Client Scripts doesn’t seem to run at all.
Possible Causes & Solutions:
- Inactive Script
- Check: Navigate to the Client Script record
- Solution: Ensure “Active” checkbox is selected
- Wrong Table
- Check: Verify the “Table” field matches your form
- Solution: Update to correct table
- Conditions Not Met
- Check: Review “Condition” field in script record
- Solution: Test without conditions first, then add back
- UI Policy Conflict
- Check: Look for UI Policies on the same field
- Solution: Adjust execution order or consolidate logic
Debugging Steps:
JavaScriptfunction onChange(control, oldValue, newValue, isLoading) {
console.log('Script executing'); // Check browser console
console.log('Old Value:', oldValue);
console.log('New Value:', newValue);
console.log('Is Loading:', isLoading);
// Your code here
}
Issue 2: Infinite Loop or Performance Problems
Symptoms: Browser freezes, script takes too long, or page becomes unresponsive.
Common Causes:
- Missing isLoading Check
JavaScript// BAD - Can cause loops
function onChange(control, oldValue, newValue, isLoading) {
g_form.setValue('field1', 'value'); // This triggers another onChange!
}
// GOOD
function onChange(control, oldValue, newValue, isLoading) {
if (isLoading) return;
if (oldValue == newValue) return; // Additional safety
g_form.setValue('field1', 'value');
}
- Circular onChange Scripts
- Problem: Field A onChange sets Field B, which triggers Field B onChange that sets Field A
- Solution: Add conditions to break the cycle
- Too Many GlideAjax Calls
- Problem: Making AJAX calls for every keystroke
- Solution: Implement debouncing or throttling
Issue 3: GlideAjax Not Working
Symptoms: AJAX call doesn’t return expected data or returns undefined.
Troubleshooting Checklist:
- Script Include Configuration
- ✓ “Client callable” checkbox is selected
- ✓ Script Include extends AbstractAjaxProcessor
- ✓ Function name matches sysparm_name parameter
- Parameter Passing
JavaScript// Correct parameter syntax
var ga = new GlideAjax('MyScriptInclude');
ga.addParam('sysparm_name', 'myFunction');
ga.addParam('sysparm_parameter1', 'value1');
ga.getXMLAnswer(callback);
- Callback Function
JavaScript// Ensure callback is defined properly
ga.getXMLAnswer(function(answer) {
if (answer) {
console.log('Response:', answer);
// Process answer
} else {
console.log('No response received');
}
});
- Check Browser Console
- Look for JavaScript errors
- Verify network tab shows XHR request completing
- Check response data format
Issue 4: Fields Not Updating as Expected
Symptoms: setValue() doesn’t seem to work or fields don’t reflect changes.
Solutions:
- Check Field Name
JavaScript// Verify field name is correct (use browser inspect)
g_form.setValue('caller_id', value); // Correct
g_form.setValue('caller', value); // Wrong - won't work
- Reference Fields Require Sys ID
JavaScript// For reference fields, use sys_id
g_form.setValue('caller_id', 'sys_id_value_here');
// Not the display value
g_form.setValue('caller_id', 'John Doe'); // Won't work
- Timing Issues
JavaScript// If setting multiple fields, sometimes you need delay
g_form.setValue('field1', 'value1');
setTimeout(function() {
g_form.setValue('field2', 'value2');
}, 100);
Issue 5: Script Works in Desktop but Not Mobile
Symptoms: Client Script functions correctly on desktop but fails on mobile devices.
Solutions:
- Use Mobile-Compatible Methods
- Avoid:
confirm(),alert(),prompt() - Use:
g_form.addInfoMessage(),g_form.showFieldMsg()
- Avoid:
- Test Mobile-Specific Behavior
JavaScript// Detect mobile platform
if (g_form.isMobile()) {
// Mobile-specific logic
g_form.addInfoMessage('Please complete all required fields');
} else {
// Desktop logic
alert('Please complete all required fields');
}
- Simplify Complex Scripts
- Mobile browsers have less processing power
- Reduce AJAX calls
- Minimize DOM manipulations
Issue 6: Mandatory Field Not Preventing Submission
Symptoms: onSubmit returns false but form still submits.
Solutions:
- Check Return Statement
JavaScript// WRONG - Missing return
function onSubmit() {
if (validateForm()) {
false; // This does nothing!
}
}
// CORRECT
function onSubmit() {
if (!validateForm()) {
return false; // Explicitly return
}
return true;
}
- Check for Multiple onSubmit Scripts
- Only one script needs to return false
- But if any returns true explicitly, it may override
- Verify Error Messages Display
JavaScriptfunction onSubmit() {
if (!isValid()) {
g_form.addErrorMessage('Please correct the errors before submitting');
return false;
}
return true;
}
Pro Tip: Enable Client Script Debugging
- Navigate to: System Properties > UI Properties
- Search for:
glide.ui.security.allow_client_script_debugging - Set to:
true - Add debug parameter to URL:
&sysparm_client_script_debug=true
This enables detailed logging of Client Scripts execution in browser console.
Conclusion
Mastering ServiceNow Client Scripts is essential for creating efficient, user-friendly ServiceNow applications. Throughout this comprehensive guide, we’ve explored:
✅ What ServiceNow Client Scripts are and their role in the platform
✅ Four types of Client Scripts and their specific execution contexts
✅ 10 real-world examples you can implement immediately
✅ Best practices for writing maintainable, performant code
✅ Troubleshooting tips for common issues in Client Scripts
Key Takeaways
- Choose the Right Type: Select onLoad, onChange, onSubmit, or onCellEdit based on your specific needs
- Always Validate: Check isLoading, validate inputs, and handle edge cases
- Optimize Performance: Minimize AJAX calls, cache values, and avoid unnecessary processing
- Provide User Feedback: Use informative messages and visual cues
- Test Thoroughly: Verify functionality across different roles, scenarios, and devices
Next Steps
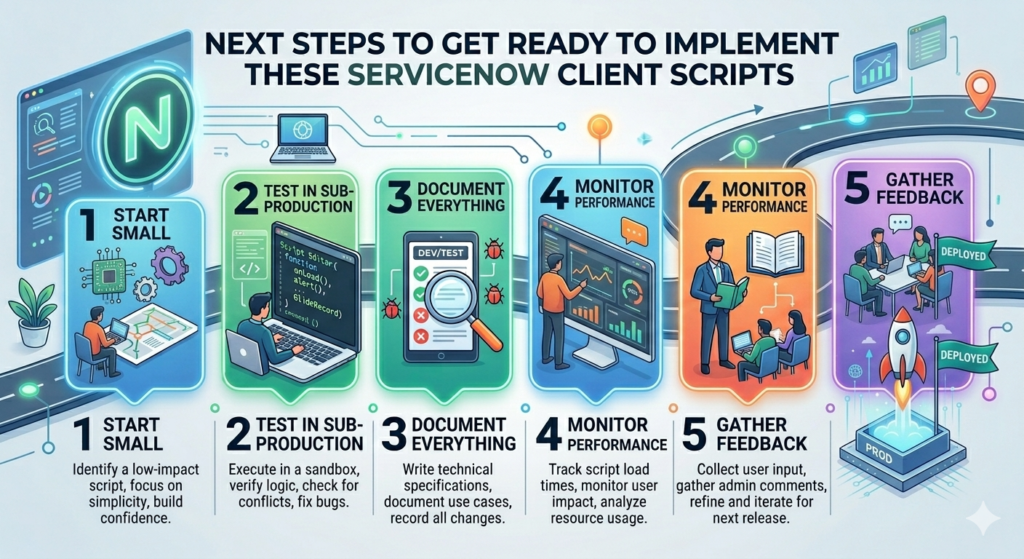
Ready to implement these ServiceNow Client Scripts in your instance? Here’s what to do:
- Start Small: Begin with simple onLoad or onChange Client scripts
- Test in Sub-Production: Always test in a development or test instance first
- Document Everything: Maintain clear documentation for future reference
- Monitor Performance: Watch for any impact on form load times
- Gather Feedback: Ask users about their experience with your implementations
Need Expert ServiceNow Development Support?
At RizeX Labs, we specialize in ServiceNow development, customization, and optimization. Our team of certified ServiceNow professionals can help you:
- 🚀 Implement complex Client Scripts and custom workflows
- ⚡ Optimize existing scripts for better performance
- 🔧 Troubleshoot and resolve ServiceNow issues
- 📚 Provide training for your development team
- 🎯 Design comprehensive ServiceNow solutions
Contact RizeX Labs Today to discuss your ServiceNow project needs!

Join the Conversation
What ServiceNow Client Scripts have you found most useful in your projects? Do you have additional examples or best practices to share?
Leave a comment below and let’s discuss! Your insights help the entire ServiceNow community grow stronger.
Don’t forget to:
- 📌 Bookmark this guide for future reference
- 🔗 Share this article with your ServiceNow colleagues
- ⭐ Follow RizeX Labs for more expert ServiceNow content
Related Resources
Continue expanding your ServiceNow knowledge with these related articles:
- ServiceNow Business Rules: Complete Guide
- GlideForm API Reference Guide
- ServiceNow Script Includes Best Practices
- ServiceNow Developer Documentation
- ServiceNow Community
Quick Summary
This comprehensive guide on ServiceNow Client Scripts provides both beginners and advanced users with practical knowledge to enhance ServiceNow form interactions. The article covers: Core Content: Definition and significance of Client Scripts in the ServiceNow platform Four types of Client Scripts (onLoad, onChange, onSubmit, onCellEdit) with detailed execution contexts 10 real-world, copy-paste ready examples including auto-population, validation, conditional logic, and dynamic calculations Best practices for writing efficient, maintainable scripts (checking isLoading, minimizing AJAX calls, proper error handling) Comprehensive troubleshooting guide for common issues like infinite loops, GlideAjax failures, and mobile compatibility Key Highlights: Each example includes complete working code with explanations Performance optimization techniques and anti-patterns to avoid Mobile vs. desktop considerations Role-based field control implementations Step-by-step debugging strategies
