
Introduction: Why Customer Portals Matter in 2026
The digital customer experience landscape has fundamentally shifted. Today’s customers expect instant access to their data, self-service capabilities, and seamless interactions across all touchpoints. When your support team receives the same questions repeatedly, when customers struggle to track their cases, or when partners lack visibility into deal registration—you have a portal problem.
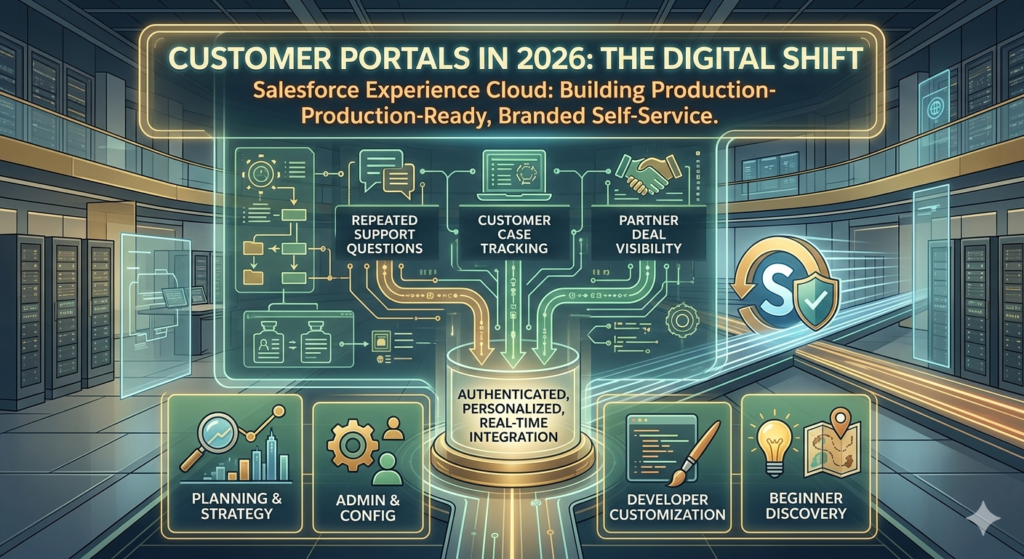
Salesforce Experience Cloud (formerly Community Cloud) addresses these challenges by creating branded, self-service digital experiences that connect customers, partners, and employees directly to your Salesforce data. Unlike basic web portals, Experience Cloud provides authenticated, personalized experiences with real-time Salesforce integration.
This salesforce experience cloud tutorial walks you through building a production-ready customer portal from initial planning through advanced optimization. Whether you’re a Salesforce admin tackling your first portal project, a developer implementing custom functionality, or a beginner exploring what’s possible, this guide provides the technical depth and practical insights you need.
Understanding Salesforce Experience Cloud
What Is Experience Cloud?
Salesforce Experience Cloud is a digital experience platform that enables organizations to build authenticated portals, websites, and mobile apps connected to Salesforce data. It allows external users (customers, partners, or suppliers) to interact with your Salesforce org through controlled, branded experiences.
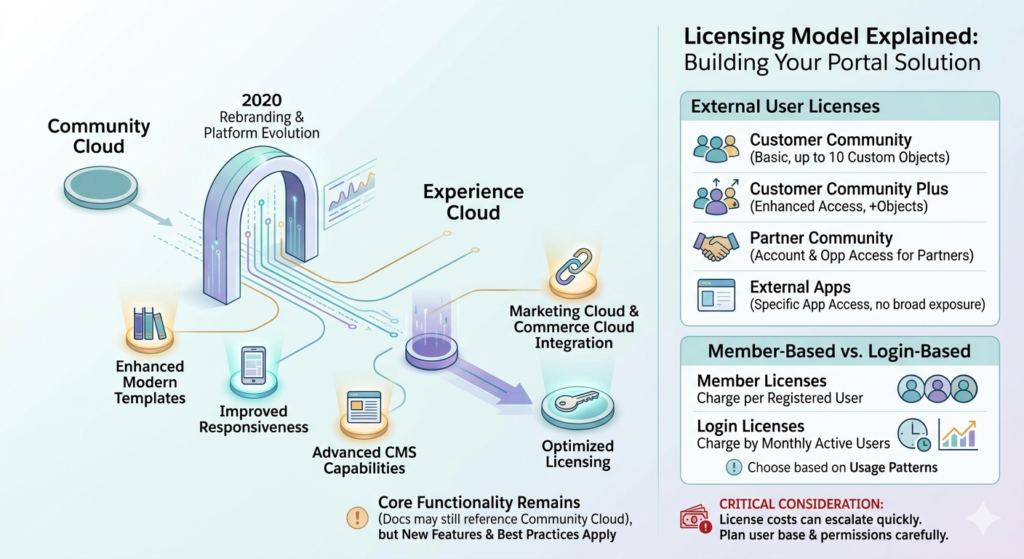
Key architectural components:
- Templates: Pre-built site structures optimized for specific use cases (Customer Service, Partner Central, Build Your Own)
- Experience Builder: Drag-and-drop visual editor for designing pages
- Community User Licensing: Specialized license types for external users
- Sharing Architecture: Object-level and record-level security controlling data visibility
- CMS: Content management system for publishing articles and resources
Experience Cloud vs. Community Cloud: What Changed?
In 2020, Salesforce rebranded Community Cloud to Experience Cloud. This wasn’t just cosmetic—the platform evolved significantly:
- Enhanced template library with modern designs
- Improved mobile responsiveness
- Advanced CMS capabilities
- Better integration with Marketing Cloud and Commerce Cloud
- Streamlined licensing options
If you’re working with documentation mentioning “Community Cloud,” understand that the core functionality remains the same, but newer features and best practices apply specifically to Experience Cloud.
Licensing Model Explained
Understanding licensing is critical before building your customer portal salesforce solution:
External User Licenses:
- Customer Community License: Basic access for customers (up to 10 custom objects)
- Customer Community Plus License: Enhanced access with additional objects and features
- Partner Community License: For partners needing account and opportunity access
- External Apps License: For specific application access without broader Salesforce exposure
Member-Based vs. Login-Based:
- Member licenses charge per registered user
- Login licenses charge based on monthly active users
- Choose based on expected usage patterns and user volume
Critical consideration: License costs can escalate quickly. Plan your user base and required permissions carefully before selecting license types.
Business Benefits of Customer Portals
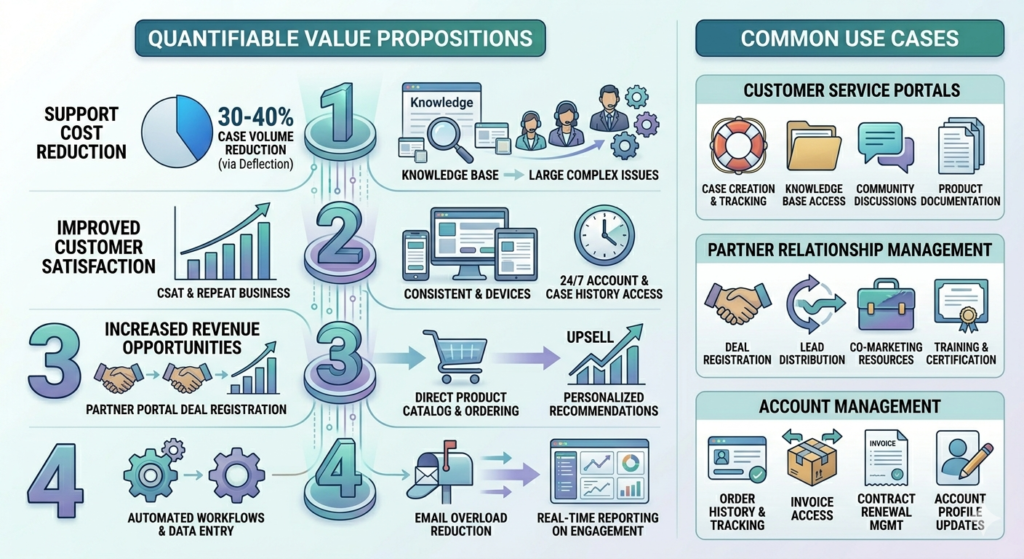
Quantifiable Value Propositions
Building a Salesforce Experience Cloud customer portal delivers measurable business outcomes:
1. Support Cost Reduction
- Self-service deflection reduces case volume by 30-40% on average
- Customers resolve simple issues through knowledge base searches
- Support staff focus on complex, high-value interactions
2. Improved Customer Satisfaction
- 24/7 access to account information, orders, and case history
- Faster resolution times through self-service
- Consistent experience across devices
3. Increased Revenue Opportunities
- Partner portals streamline deal registration and co-selling
- Customers access product catalogs and place orders directly
- Cross-sell and upsell through personalized recommendations
4. Operational Efficiency
- Automated workflows reduce manual data entry
- Centralized communication reduces email overload
- Real-time reporting on customer engagement and portal usage
Common Use Cases
Customer Service Portals:
- Case creation and tracking
- Knowledge base access
- Community discussions
- Product documentation
Partner Relationship Management:
- Deal registration
- Lead distribution
- Co-marketing resource libraries
- Training and certification tracking
Account Management:
- Order history and tracking
- Invoice access
- Contract renewal management
- Account profile updates
Prerequisites and Planning Phase
Technical Requirements
Before starting your salesforce experience cloud tutorial implementation, verify these requirements:
Salesforce Edition:
- Enterprise Edition or higher
- Experience Cloud licenses purchased and allocated
User Prerequisites:
- System Administrator profile or equivalent permissions
- Experience Cloud Admin permissions enabled
- Basic understanding of Salesforce security model
Infrastructure Considerations:
- Domain setup for custom URL (requires DNS access)
- SSL certificate for production deployment
- Integration endpoints configured if connecting external systems
Planning Your Portal Architecture
User Personas Definition:
Create detailed profiles for your portal users:
textExample Customer Persona:
- Role: IT Manager purchasing enterprise software
- Goals: Track support cases, access documentation, manage licenses
- Technical proficiency: Moderate
- Access needs: Cases, Accounts, Assets, Knowledge Articles
- Mobile usage: 40% of sessions
Document each persona’s required object access, features, and workflows.
Information Architecture:
Map your navigation structure before building:
textHomepage
├── My Dashboard
├── Support
│   ├── Create Case
│   ├── My Cases
│   └── Knowledge Base
├── My Account
│   ├── Profile
│   ├── Orders
│   └── Contracts
└── Resources
    ├── Documentation
    ├── Training
    └── Community Discussions
Data Access Requirements:
List every object external users need to access and define:
- Read, create, edit, or delete permissions
- Record-level access criteria
- Field-level visibility
- Related object dependencies
This foundation prevents costly rework later.
Step-by-Step Implementation Guide
Phase 1: Enable and Configure Experience Cloud
Step 1: Enable Experience Cloud
- Navigate to Setup > Feature Settings > Experience Management > Settings
- Click Enable Experience Cloud
- Confirm the enable dialog (this action cannot be reversed)
- Wait for provisioning to complete (typically 5-10 minutes)
Step 2: Create Your First Experience
- From Setup, go to Experience Management > All Sites
- Click New to launch the creation wizard
- Select your template:
- Customer Service: Optimized for support portals
- Partner Central: Designed for partner relationship management
- Build Your Own: Blank canvas for custom designs
Template Selection Guidance:
For a customer portal salesforce implementation, start with Customer Service template unless:
- You have specific design requirements (use Build Your Own)
- Your primary use case is partner management (use Partner Central)
Step 3: Configure Basic Settings
Enter these details:
- Name: Internal reference (e.g., “Customer Portal”)
- URL: Custom subdomain (e.g., “support.yourcompany.force.com”)
- Primary Language: Default language for content
- Optional: Additional languages for multilingual support
Click Create and wait for the site to provision.
Phase 2: Configure User Access and Permissions
Step 1: Create a Custom Profile
Never use standard profiles for portal users. Create custom profiles for granular control:
- Navigate to Setup > Users > Profiles
- Clone the appropriate base profile:
- For Customer Community License: Clone “Customer Community User”
- For Customer Community Plus: Clone “Customer Community Plus User”
- Name descriptively (e.g., “Customer Portal – Standard User”)
Step 2: Configure Object and Field Permissions
For each object customers access, configure permissions:
textExample for Case object:
- Read: ✓ Enabled
- Create: ✓ Enabled
- Edit: ✓ Enabled (own records only, enforced via sharing)
- Delete: ✗ Disabled

Visible Fields:
- Case Number: ✓
- Subject: ✓
- Description: ✓
- Status: ✓
- Priority: ✓
- Internal Comments: ✗ (sensitive field)
Critical: Enable “Read” on Account and Contact objects, even if you’re not displaying them directly. Portal users must access their Account and Contact records for proper functionality.
Step 3: Configure Sharing Settings
Portal sharing differs significantly from internal sharing:
- Go to Setup > Security > Sharing Settings
- Locate Experience Cloud Site Guest User Access section
- Configure organization-wide defaults for external users:
- Account: Private (controlled via account relationship)
- Case: Private (controlled via Account access)
- Knowledge: Public Read Only (if using Knowledge)
Step 4: Create Sharing Rules
Implement Account-based sharing to ensure customers only see their data:
- In Sharing Settings, scroll to Case Sharing Rules
- Click New (for Experience Cloud)
- Configure:
- Label: “Customer Portal Case Access”
- Owned by members of: [Customer Portal Profile]
- Share with: [Customer Portal Users]
- Access Level: Read/Write
- Based on criteria: ContactId != null
This rule ensures portal users access cases associated with their Contact record.
Step 5: Create Permission Sets (Optional)
For additional access beyond profile permissions:
- Navigate to Setup > Permission Sets
- Click New
- Add specific permissions (e.g., “Delete Cases” for premium customers)
- Assign to specific users as needed
Phase 3: Design Your Portal with Experience Builder
Step 1: Access Experience Builder
- From All Sites, click Builder next to your Experience
- Wait for Experience Builder to load
- Familiarize yourself with the interface:
- Left sidebar: Components
- Center: Canvas/preview
- Right sidebar: Properties
- Top toolbar: Pages, settings, publish
Step 2: Configure Theme and Branding
- Click Settings (gear icon) > Theme
- Configure brand colors:
- Primary Color: Main brand color
- Secondary Color: Accent color
- Text Color: Body text
- Link Color: Hyperlinks
- Upload your logo (recommended: 200x50px PNG with transparency)
- Set font families to match brand guidelines
Custom CSS (Advanced):
For precise control, add custom CSS:
CSS/* Example: Custom button styling */
.slds-button--brand {
    background-color: #0066CC;
    border-radius: 4px;
    font-weight: 600;
}

/* Adjust header spacing */
.forceCommunityHeader {
    padding: 20px 0;
    box-shadow: 0 2px 4px rgba(0,0,0,0.1);
}
Add in Settings > Advanced > Head Markup.
Step 3: Build Your Homepage
The homepage sets the tone for your entire customer portal salesforce experience.
Recommended Components:
- Hero Banner:
- Component: “Featured Topics” or custom HTML
- Use to welcome users and highlight key features
- Include search bar for quick access
- Quick Actions Tiles:
- Component: “Tile Menu”
- Configure tiles for common tasks:
- Create a Case
- Search Knowledge
- View My Cases
- Update Profile
- Featured Content:
- Component: “Featured Articles” or “Topics”
- Display helpful resources
- Update regularly to drive engagement
Implementation Example:
textHomepage Layout:
┌─────────────────────────────────┐
│      Header with Navigation      │
├─────────────────────────────────┤
│                                  │
│         Hero Banner              │
│    "Welcome to Support Portal"  │
│        [Search Bar]              │
│                                  │
├──────────┬──────────┬───────────┤
│  Create  │   My     │ Knowledge │
│   Case   │  Cases   │   Base    │
├──────────┴──────────┴───────────┤
│                                  │
│      Featured Articles           │
│                                  │
└─────────────────────────────────┘
Step 4: Build Case Management Pages
Create Case Page:
- Create new page: Pages > + New Page > Standard Page
- Select Record Page type and Case object
- Add components:
- Record Detail: Configure to show Case create form
- Rich Text: Add instructions for case creation
- Only show fields customers should populate
Field Configuration Example:
textVisible Fields:
- Subject (Required)
- Description (Required)
- Priority (Optional)
- Type (Optional)

Hidden Fields (auto-populated):
- AccountId (set via trigger or process)
- ContactId (set from current user)
- Origin (set to "Portal")
My Cases List Page:
- Create new page: + New Page > Standard Page
- Select Object Page type and Case object
- Configure List View component:
- List View: Create custom view “My Portal Cases”
- Filters: Status, Priority, Date filters
- Columns: Case Number, Subject, Status, Priority, Last Modified
Case Detail Page:
- Create Record Page for Case object
- Add components:
- Record Detail: Display case information
- Related List: Case Comments
- Chatter Feed: Enable customer-agent communication
- Related Articles: Suggest helpful knowledge articles
Enable Case Comments:
Configure Case Feed in Setup:
- Setup > Feature Settings > Service > Case Feed
- Enable Case Feed
- Add Feed publisher actions in page layout
- Test comment visibility in portal
Phase 4: Implement Knowledge Base
Step 1: Enable Lightning Knowledge
- Setup > Feature Settings > Service > Knowledge Setup
- Click Start to launch setup wizard
- Configure settings:
- Lightning Knowledge: Enable
- Articles per page: 20 (default is fine)
- Article versioning: Enable for content control
Step 2: Create Article Types
Define article structures for different content types:
- Setup > Knowledge > Article Management Settings
- Create article types:
- FAQ: Simple question/answer format
- How-To Guide: Step-by-step instructions
- Troubleshooting: Problem/solution format
Example Article Type Structure (FAQ):
textFields:
- Title (Text, 255 chars)
- Question (Long Text Area)
- Answer (Rich Text Area)
- Article Number (Auto-generated)
- Last Published Date (Date/Time)
- Categories (Data Categories for organization)
Step 3: Configure Data Categories
Organize articles with hierarchical categories:
- Setup > Data Category Setup
- Create category groups:
- Products: List your product lines
- Topics: Technical areas (Installation, Configuration, Troubleshooting)
- Customer Type: Segment by user level (Basic, Advanced, Enterprise)
Step 4: Create and Publish Articles
- Navigate to Knowledge tab in Salesforce
- Click New and select article type
- Complete article content
- Assign data categories
- Set publication status to Publish
- Define channel visibility (include your Experience)
Step 5: Add Knowledge to Portal
In Experience Builder:
- Navigate to Knowledge page or create new page
- Add Knowledge Component:
- Featured Articles: Highlight popular content
- Search Results: Display search-driven results
- Article View: Show full article content
Configure search settings:
- Settings > General > Guest User Profile
- Ensure Read access on Knowledge object
- Configure article types visible to portal users
Optimization Tip:
Implement article voting and feedback:
- Enable article feedback in Knowledge Setup
- Add Rating and Feedback components to article pages
- Monitor article effectiveness through reports
- Update or retire low-performing articles
Phase 5: Configure Navigation and User Experience
Step 1: Build Primary Navigation
- In Experience Builder, click Settings > Navigation
- Configure menu structure:
textRecommended Structure:
- Home
- Support
  - Create Case
  - My Cases
  - Knowledge Base
- My Account
  - Profile
  - Orders (if applicable)
- Resources
  - Documentation
  - Community
Step 2: Create Mega Menu (Advanced)
For complex portals with many options:
- Enable Navigation Menu component in header
- Configure NavigationMenuItems in Setup
- Create hierarchical menu structure with categories
- Style with custom CSS for better UX
Step 3: Implement Contextual Search
Configure the search bar for optimal results:
- Settings > Search
- Select searchable objects: Cases, Knowledge, Topics
- Configure result layout preferences
- Test search relevance and adjust ranking
Search Optimization:
textSearch Configuration:
- Knowledge Articles: Weight 1.0 (highest)
- Case: Weight 0.7
- Topics: Weight 0.5

Enable features:
- Autocomplete: ✓
- Spell correction: ✓
- Synonyms: Configure common terms
Phase 6: Configure Login and Authentication
Step 1: Set Up Self-Registration
Allow customers to create accounts without admin intervention:
- Experience Workspaces > Administration > Login & Registration
- Enable Allow Self-Registration
- Configure registration form fields
- Map form fields to Contact and User records
Critical Configuration:
textRequired Mappings:
- First Name → Contact.FirstName & User.FirstName
- Last Name → Contact.LastName & User.LastName
- Email → Contact.Email & User.Email
- Account → Contact.AccountId (requires custom logic)
Account Assignment Logic:
Create a Flow or Apex trigger to assign new registrants to appropriate Accounts:
apextrigger AssignAccountOnRegistration on User (before insert) {
    for(User u : Trigger.new) {
        if(u.ContactId != null) {
            Contact c = [SELECT Email FROM Contact WHERE Id = :u.ContactId];
            // Logic to find or create Account based on email domain
            String emailDomain = c.Email.split('@')[1];

            // Query for existing Account
            List<Account> existingAccounts = [
                SELECT Id FROM Account
                WHERE Website LIKE :('%' + emailDomain)
                LIMIT 1
            ];

            if(!existingAccounts.isEmpty()) {
                c.AccountId = existingAccounts[0].Id;
                update c;
            }
        }
    }
}
Step 2: Configure Single Sign-On (SSO)
For enterprise deployments, implement SSO:
- Setup > Identity > Single Sign-On Settings
- Enable SAML
- Configure Identity Provider details
- Test SSO flow thoroughly before production
Common SSO Providers:
- Okta
- Azure AD
- Google Workspace
- OneLogin
Step 3: Customize Login Page
Enhance brand consistency:
- In Experience Builder, navigate to Login Page
- Customize components:
- Add brand logo
- Customize welcome message
- Add helpful links (Forgot Password, Contact Support)
- Configure background image or color
Security Best Practices:
textLogin Security Settings:
- Password complexity: Require 8+ chars, mixed case, numbers
- Password expiration: 90 days for external users
- Session timeout: 2 hours for inactive sessions
- IP restrictions: Consider for partner portals
- Two-factor authentication: Require for sensitive data access
Phase 7: Testing and Quality Assurance
Step 1: Create Test Users
Never test with your admin account. Create realistic test users:
- Navigate to Setup > Users
- Create test Contacts associated with test Accounts
- Enable portal users for these Contacts
- Assign appropriate profiles and permission sets
Test User Matrix Example:
textTest User 1: Basic Customer
- Profile: Customer Portal - Standard User
- Account: Small business account
- Permissions: Create/view own cases, read knowledge

Test User 2: Premium Customer
- Profile: Customer Portal - Premium User
- Account: Enterprise account
- Permissions: Advanced case management, priority support

Test User 3: Guest User
- Profile: Guest User (unauthenticated)
- Access: Knowledge base only, no case creation
Step 2: Functional Testing Checklist
Test every workflow systematically:
Authentication & Access:
- Self-registration creates user correctly
- Login with valid credentials succeeds
- Login with invalid credentials fails appropriately
- Forgot password email sends and reset works
- SSO authentication (if configured)
- Session timeout enforces correctly
Data Security:
- Users only see their own Account data
- Users only see their own Cases
- Field-level security hides sensitive fields
- Record editing respects permissions
- Cross-Account data access prevented
Case Management:
- Create case form displays correctly
- Required fields enforce validation
- Case creation completes successfully
- Case appears in “My Cases” list
- Case detail page shows all information
- Comments post correctly
- Email notifications send (if configured)
- Case status updates reflect properly
Knowledge Base:
- Search returns relevant results
- Article categories filter correctly
- Article detail pages render properly
- Voting and feedback work (if enabled)
- Related articles display
- Unpublished articles don’t appear
Step 3: Performance Testing
Test portal performance under load:
Metrics to Monitor:
- Page load time (target: < 3 seconds)
- Search response time (target: < 1 second)
- Concurrent user capacity
- Mobile performance
Tools:
- Salesforce Lightning Performance Reports
- Browser DevTools Network tab
- Third-party monitoring (New Relic, AppDynamics)
Step 4: Mobile Testing
Test on actual devices, not just emulators:
- iOS (iPhone, iPad)
- Android (various screen sizes)
- Responsive breakpoints (tablet, phone)
- Touch interactions and gestures
- Mobile search functionality
Phase 8: Pre-Launch Configuration
Step 1: Configure Email Notifications
Set up automated communications:
- Experience Workspaces > Administration > Emails
- Configure email templates:
- Welcome email (new user registration)
- Password reset
- Case creation confirmation
- Case status updates
- Weekly digest of activity
Example Case Creation Email Template:
HTML<messaging:emailTemplate subject="Case {!Case.CaseNumber} Created"
                        recipientType="Contact">
    <messaging:htmlEmailBody>
        <html>
            <body>
                <h2>Thank you for contacting support</h2>
                <p>Hi {!Contact.FirstName},</p>
                <p>We've received your support request:</p>
                <ul>
                    <li><strong>Case Number:</strong> {!Case.CaseNumber}</li>
                    <li><strong>Subject:</strong> {!Case.Subject}</li>
                    <li><strong>Priority:</strong> {!Case.Priority}</li>
                </ul>
                <p>Expected response time: [X hours based on priority]</p>
                <p>
                    <a href="[Portal URL]/case/{!Case.Id}">
                        View your case
                    </a>
                </p>
            </body>
        </html>
    </messaging:htmlEmailBody>
</messaging:emailTemplate>
Step 2: Set Up SEO and Metadata
Optimize for search engines (if portal is public-facing):
- Settings > SEO
- Configure:
- Site Title: Appears in browser tabs
- Meta Description: Search engine description
- Meta Keywords: (minimal impact, but still worth adding)
- Robots.txt: Control search engine indexing
Step 3: Configure Analytics
Track portal usage and engagement:
Built-in Analytics:
- Experience Workspaces > Dashboards
- Enable Insights dashboards
- Monitor metrics:
- Active users
- Page views
- Search queries
- Login frequency
Google Analytics Integration:
- Create Google Analytics property
- Obtain tracking ID
- In Experience Builder: Settings > Advanced > Head Markup
- Add tracking code:
HTML<!-- Google Analytics -->
<script async src="https://www.googletagmanager.com/gtag/js?id=GA_TRACKING_ID"></script>
<script>
  window.dataLayer = window.dataLayer || [];
  function gtag(){dataLayer.push(arguments);}
  gtag('js', new Date());
  gtag('config', 'GA_TRACKING_ID');
</script>
Step 4: Create Help and Support Resources
Add contextual help within the portal:
- Create Help page with:
- Getting Started guide
- FAQ section
- Video tutorials
- Contact information for escalation
- Add help links in navigation
- Include tooltips on complex forms
Phase 9: Go Live and Activate
Step 1: Final Pre-Launch Checklist
Complete before making portal public:
- All test user scenarios pass
- Performance meets targets
- Mobile experience tested
- Security review complete
- Email notifications tested
- Backup and recovery plan documented
- Support team trained on portal workflows
- User documentation prepared
- Communication plan ready
- Monitoring dashboards configured
Step 2: Activate the Portal
- In Experience Builder, click Settings
- Navigate to Activation
- Review activation checklist
- Click Activate
- Confirm activation
Step 3: Configure Custom Domain (Production)
Replace force.com URL with branded domain:
- Experience Workspaces > Administration > Settings > Custom URLs
- Enter your domain (e.g., support.yourcompany.com)
- Configure DNS CNAME record:text
CNAME: support.yourcompany.com → [provided force.com URL] - Wait for DNS propagation (15 minutes to 48 hours)
- Verify SSL certificate is active
Step 4: Launch Communications
Notify users about the new portal:
Email Campaign:
- Subject: “Introducing Our New Customer Portal”
- Highlight key features and benefits
- Include login instructions
- Provide training resources
Phased Rollout Approach:
textWeek 1: Pilot group (10-20 users)
- Gather feedback
- Fix critical issues

Week 2: Expanded beta (100-200 users)
- Monitor performance
- Refine based on feedback

Week 3: Full launch
- All users invited
- Support team on high alert
Common Mistakes to Avoid
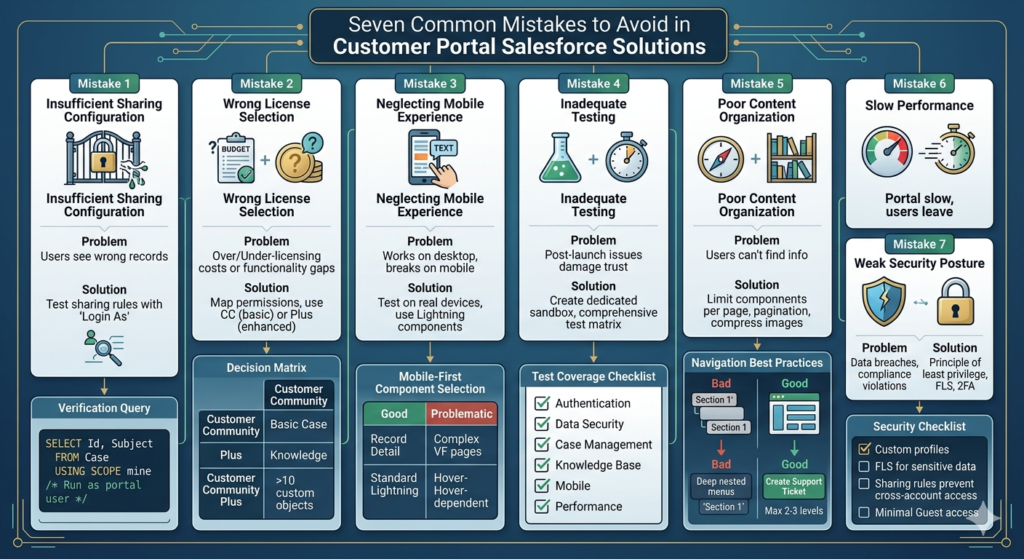
1. Insufficient Sharing Configuration
Problem: Users can’t see records they should access, or see records they shouldn’t.
Solution:
- Test sharing rules with actual user accounts, not admin accounts
- Use “Login As” feature to verify exact user perspective
- Document sharing architecture before building
- Implement Account-based sharing model for customer portals
Verification Query:
SQL-- Check what a specific user can access
SELECT Id, Subject, AccountId, ContactId
FROM Case
USING SCOPE mine
/* Run as portal user to see their view */
2. Over-Licensing or Under-Licensing
Problem: Purchasing wrong license types leads to cost overruns or functionality gaps.
Solution:
- Map required permissions to license capabilities
- Start with Customer Community licenses for basic portals
- Upgrade to Plus licenses only when you need:
- More than 10 custom objects
- Advanced workflows
- Report access
- Additional API access
Decision Matrix:
textUse Customer Community when:
- Basic case management
- Knowledge access
- Limited custom objects

Use Customer Community Plus when:
- Custom reporting needed
- More than 10 custom objects
- Complex workflow requirements
- Higher API volume
3. Neglecting Mobile Experience
Problem: Portal works on desktop but breaks on mobile devices.
Solution:
- Test on real devices throughout development
- Use Lightning components (automatically responsive)
- Avoid custom CSS that breaks responsive layouts
- Test touch interactions (buttons sized appropriately)
- Simplify forms for mobile users
Mobile-First Component Selection:
textGood for Mobile:
- Record Detail (auto-responsive)
- List View (scrollable)
- Standard Lightning components

Problematic for Mobile:
- Complex custom Visualforce pages
- Multi-column layouts without responsive CSS
- Hover-dependent interactions
4. Inadequate Testing
Problem: Issues discovered post-launch damage user trust and increase support costs.
Solution:
- Create dedicated test environment (sandbox)
- Build comprehensive test user matrix
- Test negative scenarios (invalid inputs, permission violations)
- Perform load testing before launch
- Have non-technical users test UX
Test Coverage Checklist:
textAuthentication: 10 scenarios
Data Security: 15 scenarios
Case Management: 20 scenarios
Knowledge Base: 10 scenarios
Profile Management: 8 scenarios
Mobile: All above scenarios
Performance: Load testing
5. Poor Content Organization
Problem: Users can’t find information, defeating self-service purpose.
Solution:
- Design information architecture before building
- Use clear, descriptive navigation labels
- Implement robust search with synonyms
- Create logical knowledge categories
- Highlight popular content on homepage
- Implement breadcrumbs for navigation
Navigation Best Practices:
textBad Navigation:
- "Section 1", "Section 2" (meaningless labels)
- Deeply nested menus (>3 levels)
- Inconsistent terminology

Good Navigation:
- "Create Support Ticket" (clear action)
- "My Account" (user-centric)
- Max 2-3 levels deep
- Consistent across portal
6. Ignoring Performance Optimization
Problem: Slow portal drives users away before they complete tasks.
Solution:
- Limit components per page (8-10 max)
- Optimize list views (only show necessary columns)
- Use pagination for large datasets
- Compress images before upload
- Minimize custom code execution
- Enable caching where appropriate
7. Weak Security Posture
Problem: Data breaches, unauthorized access, or compliance violations.
Solution:
- Implement principle of least privilege
- Use field-level security to hide sensitive data
- Require strong passwords and consider 2FA
- Set appropriate session timeouts
- Monitor login attempts and block suspicious activity
- Regular security audits
Security Checklist:
text- [ ] All profiles use custom (not standard) profiles
- [ ] Field-level security configured for sensitive data
- [ ] Sharing rules prevent cross-account access
- [ ] Guest user access minimal (if allowing unauthenticated)
- [ ] Login security policies enforced
- [ ] Regular permission audits scheduled
Advanced Optimization Tips
1. Implement Progressive Profiling
Collect user information over time rather than upfront:
Initial Registration:
textMinimal fields:
- First Name
- Last Name
- Email
- Company Name
Subsequent Visits:
Request additional information through:
- Profile completion prompts
- Conditional form fields based on activity
- Incentivized profile updates (access to premium content)
Implementation:
Create a Flow that calculates profile completeness and prompts users to fill gaps.
2. Create Personalized Experiences
Use Audience targeting to show relevant content:
- Settings > Audience
- Create audiences based on criteria:
- Account type (Small Business, Enterprise)
- Product owned
- Support tier (Basic, Premium)
- Geographic location
Example Use Case:
textAudience: Enterprise Customers
- Show premium support contact info
- Display advanced documentation
- Feature enterprise-specific case creation form
- Hide basic tier messaging
Apply audiences to components in Experience Builder to show/hide dynamically.
3. Optimize Search with Synonyms and Promoted Terms
Improve search accuracy:
- Setup > Feature Settings > Search > Synonyms
- Create synonym groups:
textGroup 1 - Login Issues:
- login, log in, sign in, sign-in, access

Group 2 - Password Problems:
- password, passcode, credentials, authentication

Group 3 - Billing:
- invoice, bill, payment, charge, receipt
Promoted Search Terms:
Manually boost specific content for high-value queries:
- Navigate to Promoted Search Terms in Setup
- For query “getting started”, promote:
- Quick Start Guide article
- Video tutorial
- Sample templates
4. Implement Chatbot Integration
Add AI-powered assistance:
Einstein Bots:
- Enable Einstein Bots in Setup
- Create bot in Einstein Bot Builder
- Design conversation flows:
- Greeting and intent capture
- FAQ responses
- Knowledge article suggestions
- Case creation if bot can’t resolve
- Deploy bot to portal
Bot Design Best Practices:
textGood Bot Flow:
1. Greet user
2. Ask about issue
3. Attempt knowledge-based resolution
4. Offer to create case if unresolved
5. Capture relevant details
6. Confirm case creation

Avoid:
- Overly complex conversation trees
- Dead-end responses without escalation path
- Requiring exact keyword matches
5. Create Automated Case Routing
Ensure cases reach the right team quickly:
Assignment Rules:
- Setup > Case Assignment Rules
- Create rule based on:
- Product category
- Case priority
- Customer tier
- Case type
Example Rule:
textRule: Enterprise Customer Critical Issue
Criteria:
- Account.Type = "Enterprise"
- Case.Priority = "Critical"
- Case.Type = "Technical"

Action:
- Assign to: Enterprise Support Queue
- Send email to: enterprise-support@company.com
- Escalate immediately
Auto-Response Rules:
Configure immediate acknowledgment:
- Setup > Auto-Response Rules
- Set response templates based on case attributes
- Include expected response time
- Link to knowledge articles
6. Build Custom Reports and Dashboards
Create portal-specific analytics:
Key Metrics to Track:
textUser Engagement:
- Daily/Monthly Active Users
- Average session duration
- Pages per session
- Return user rate

Self-Service Effectiveness:
- Knowledge article views
- Article deflection rate (views vs cases created)
- Search success rate
- Bot resolution rate

Case Metrics:
- Cases created via portal vs other channels
- Average time to first response
- Case resolution time
- Customer satisfaction scores
Dashboard Implementation:
- Create custom report type: “Cases with Portal Origin”
- Build reports for each metric
- Combine in dashboard
- Schedule email delivery to stakeholders
Advanced: Embed Dashboards in Portal
Show customers their own metrics:
- Create user-specific dashboard showing:
- Their case history
- Response times
- Product usage stats
- Embed using Dashboard component in Experience Builder
- Apply dynamic filters to show only their data
7. Implement Content Recommendations
Surface relevant content automatically:
Einstein Article Recommendations:
- Enable Einstein for Experience Cloud
- Configure recommendation engine
- Add Recommended Articles component to:
- Case detail pages
- Homepage
- Search results
Recommendations appear based on:
- Current page context
- User’s case history
- Search queries
- Popular articles
8. Create Multi-Language Support
Serve global customer base:
- Setup > Translation Workbench > Enable
- Add supported languages
- Translate:
- Standard field labels
- Custom field labels
- Custom labels
- Knowledge articles
- Email templates
User Language Selection:
- Auto-detect from browser settings
- Provide language switcher in navigation
- Store preference in user profile
Translation Best Practices:
text- Use Translation Workbench, not custom labels (for consistency)
- Translate all visible text (including alt tags, tooltips)
- Have native speakers review translations
- Test layout in all languages (some expand significantly)
- Consider right-to-left languages (Arabic, Hebrew)
9. Optimize Page Load Performance
Reduce load times for better experience:
Component Optimization:
textSlow Components:
- Large list views (>50 records)
- Multiple Chatter feeds
- Complex custom components
- Unoptimized images

Fast Components:
- Cached content
- Lazy-loaded lists
- Optimized Lightning components
- CDN-delivered static resources
Implementation:
- Audit current performance:
- Use Salesforce Lightning Performance tool
- Check Experience Cloud Performance Dashboard
- Optimization techniques:
- Reduce components per page
- Enable caching for static content
- Optimize SOQL queries in custom components
- Use pagination for large lists
- Compress images to WebP format
- Lazy load below-fold content
Target Metrics:
textPage Load Time:
- Homepage: < 2 seconds
- List pages: < 3 seconds
- Detail pages: < 2.5 seconds
- Search: < 1 second for results
10. Implement Advanced Analytics
Go beyond basic metrics:
User Journey Tracking:
Map common paths through portal:
textExample Journey:
1. Login
2. Search knowledge base
3. View article
4. Create case (if article didn't help)
5. Track case status
Track drop-off points and optimize.
Heatmapping and Session Recording:
Integrate tools like:
- Hotjar
- FullStory
- Lucky Orange
See exactly how users interact with portal.
A/B Testing:
Test variations of key pages:
- Create two versions of homepage
- Split traffic 50/50
- Measure conversion (e.g., self-service vs case creation)
- Implement winner
Implement via:
- Custom Lightning components with variant logic
- Third-party A/B testing tools
- Audience-based content variations
Measuring Success: KPIs and Metrics
Portal Adoption Metrics
User Registration and Growth:
- New registrations per week/month
- Activation rate (registered vs active)
- User growth rate
Engagement Metrics:
- Daily/Monthly Active Users (DAU/MAU)
- Average session duration
- Sessions per user
- Bounce rate
- Page views per session
Self-Service Effectiveness
Knowledge Base Performance:
- Article views
- Unique article viewers
- Articles with highest views (promote these)
- Articles with lowest views (improve or remove)
- Search queries not returning results (content gaps)
Deflection Rate:
textFormula: (Knowledge Views / (Knowledge Views + Cases Created)) × 100

Example:
- 1,000 knowledge article views
- 200 cases created
- Deflection rate: (1000 / 1200) × 100 = 83.3%

Target: 70%+ deflection rate
Case Management Metrics
Portal-Generated Cases:
- Cases created via portal vs other channels
- Average time to case creation (from login)
- Case abandonment rate (started but not submitted)
Resolution Metrics:
- First response time (portal cases)
- Average resolution time
- Customer satisfaction (post-resolution survey)
- Reopen rate
Business Impact Metrics
Cost Savings:
textCalculate support cost reduction:

Before Portal:
- 500 cases/month × $25 per case = $12,500/month

After Portal (with 70% deflection):
- 150 cases/month × $25 per case = $3,750/month
- Savings: $8,750/month ($105,000/year)
Customer Satisfaction:
- Net Promoter Score (NPS)
- Customer Satisfaction Score (CSAT)
- Customer Effort Score (CES)
Revenue Impact:
- Portal users vs non-portal users retention rate
- Upsell/cross-sell conversion via portal
- Time to value for new customers
Creating Executive Dashboards
Build a single dashboard for leadership:
Components:
textRow 1: High-Level Metrics
- Total Active Users
- Month-over-Month Growth
- Cases Deflected This Month
- Cost Savings (YTD)

Row 2: Engagement
- DAU/MAU ratio
- Average Session Duration
- Top Visited Pages

Row 3: Performance
- Average Page Load Time
- Portal Uptime %
- Customer Satisfaction Score

Row 4: Trends
- User Growth Trend (line chart)
- Case Volume Trend (line chart)
- Knowledge Article Usage (bar chart)
Schedule weekly delivery to stakeholders.
Maintenance and Continuous Improvement
Ongoing Administration Tasks
Daily:
- Monitor system health dashboard
- Review error logs
- Check case assignment queue
Weekly:
- Review analytics for anomalies
- Check failed login attempts
- Update featured content
- Review and respond to user feedback
Monthly:
- Publish new knowledge articles
- Review and update existing articles
- Analyze search queries (identify gaps)
- User permission audit
- Review top support issues (add to knowledge base)
Quarterly:
- Security audit
- License utilization review
- Performance benchmarking
- User satisfaction survey
- Feature usage analysis (remove unused features)
Annually:
- Complete portal redesign assessment
- Technology stack review
- Competitive analysis
- Strategic roadmap planning
Continuous Improvement Framework
1. Collect Feedback:
Implement multiple feedback mechanisms:
- Post-interaction surveys (after case resolution)
- In-portal feedback widget
- Quarterly user surveys
- User advisory board meetings
- Support team input
2. Analyze Data:
Identify improvement opportunities:
textData Sources:
- Portal analytics (usage patterns)
- Search analytics (failed searches = content gaps)
- Case data (common issues)
- User feedback (pain points)
- Support team observations
3. Prioritize Initiatives:
Use impact/effort matrix:
textHigh Impact, Low Effort (Do First):
- Add missing knowledge articles
- Fix broken links
- Update outdated content

High Impact, High Effort (Plan Carefully):
- New feature development
- Integration with third-party systems
- Major redesign

Low Impact, Low Effort (Quick Wins):
- UI polish
- Minor copy updates

Low Impact, High Effort (Avoid):
- Nice-to-have features few will use
4. Implement and Measure:
- Deploy changes to sandbox first
- Test thoroughly
- Release to production
- Monitor impact on KPIs
- Iterate based on results
Staying Current with Salesforce Releases
Salesforce releases updates three times per year:
Best Practices:
- Review Release Notes:
- Focus on Experience Cloud section
- Identify features relevant to your portal
- Note any breaking changes
- Test in Sandbox:
- Salesforce previews releases in sandboxes first
- Test your portal functionality
- Identify any issues before production release
- Plan Feature Adoption:
- Not every new feature needs immediate implementation
- Prioritize based on user value
- Update roadmap to incorporate relevant features
- Educate Team:
- Share relevant updates with admins and developers
- Update internal documentation
- Train support team on new capabilities
Resources:
- Salesforce Release Notes
- Trailhead modules on new features
- Salesforce community forums
- Dreamforce and Trailhead Live events
Conclusion: Building a Portal that Drives Business Value
Implementing a successful Salesforce Experience Cloud customer portal requires more than technical configuration—it demands strategic planning, user-centered design, and ongoing optimization. The difference between a portal that languishes with low adoption and one that transforms customer service lies in the details.
Key Takeaways:
- Start with clear objectives: Define specific business outcomes (reduced case volume, improved satisfaction, cost savings) before building.
- Invest in planning: The time spent mapping user personas, information architecture, and sharing models prevents costly rework.
- Prioritize security: External-facing portals require rigorous security configuration. Never shortcut sharing rules or permission testing.
- Focus on user experience: A beautiful portal that’s confusing to navigate fails. Prioritize clarity, accessibility, and mobile responsiveness.
- Launch is the beginning: The real work starts post-launch with continuous monitoring, user feedback incorporation, and iterative improvement.
- Measure what matters: Track metrics that tie to business value, not just vanity metrics like page views.
- Stay current: Leverage Salesforce’s continuous innovation through regular release review and feature adoption.
Your Next Steps:
- Today: Review your current customer service challenges. Identify which could be solved through self-service.
- This week: Create a project charter defining portal objectives, success metrics, and stakeholder alignment.
- This month: Begin the planning phase—map user personas, required objects, and information architecture.
- Next quarter: Build your MVP portal following this salesforce experience cloud tutorial, test thoroughly, and launch to a pilot group.
- Ongoing: Implement continuous improvement processes to evolve your portal based on real user behavior and feedback.
Building an effective customer portal salesforce solution transforms customer relationships from reactive support interactions to proactive, self-directed engagement. When customers can quickly find answers, track their cases, and manage their accounts on their own terms, everyone wins—customers get faster resolution, support teams focus on complex issues, and the business reduces costs while improving satisfaction.
The comprehensive salesforce community cloud capabilities, combined with thoughtful implementation and ongoing optimization, create digital experiences that don’t just meet customer expectations—they exceed them. Your portal becomes a competitive differentiator, a cost-saver, and a catalyst for deeper customer relationships.
Now it’s time to build yours.
About RizeX Labs
At RizeX Labs, we specialize in delivering cutting-edge Salesforce solutions, including Experience Cloud implementations for building scalable customer portals. Our expertise combines deep technical knowledge, industry best practices, and real-world implementation experience to help businesses enhance customer engagement and streamline digital experiences.
We empower organizations to transform their customer interaction approach—from disconnected systems to fully integrated, self-service portals that improve satisfaction, reduce support load, and drive business growth.
Internal Links:
- Salesforce Admin course page
Salesforce Flows vs Apex: When Should You Use Code vs No-Code Automation? - Salesforce Nonprofit Cloud: Features, Use Cases, and Career Opportunities (2026 Guide)
- Salesforce Net Zero Cloud: What It Is and Why It’s the Next Green Career Niche (2026 Guide)
- Salesforce Slack Integration: How It Works and What Developers Need to Know
- Salesforce Named Credentials: What They Are and How to Use Them Safely
- Salesforce Deployment Best Practices: Change Sets vs Salesforce CLI vs Gearset
External Links:
McKinsey Sales Growth Reports
Gartner Sales Automation Insights
