
Salesforce Process Builder 2026 is at a critical crossroads — and if you’ve been working in the Salesforce ecosystem for any length of time, Process Builder has probably been your go-to tool for automating repetitive tasks, streamlining business workflows, and eliminating manual data entry. From sending automated email alerts to updating records across multiple related objects, Salesforce Process Builder made point-and-click automation accessible to admins who didn’t want to write a single line of Apex code.
But here’s the reality check for 2026: Salesforce Process Builder is on its way out.
Salesforce officially announced the retirement of Process Builder (along with Workflow Rules) as part of its broader push toward a unified automation platform powered by Salesforce Flow. For many organizations still running active processes in their orgs, this isn’t just a technical housekeeping issue — it’s a business continuity concern that demands immediate attention.
Whether you’re still using Salesforce Process Builder in 2026 because it works for your current setup, you’ve inherited legacy processes from a previous admin, or you’re simply not sure where to start with migration, this guide covers everything you need to know — including how it still works, where it falls short, and how to begin transitioning to modern Salesforce automation tools before the retirement deadline hits.
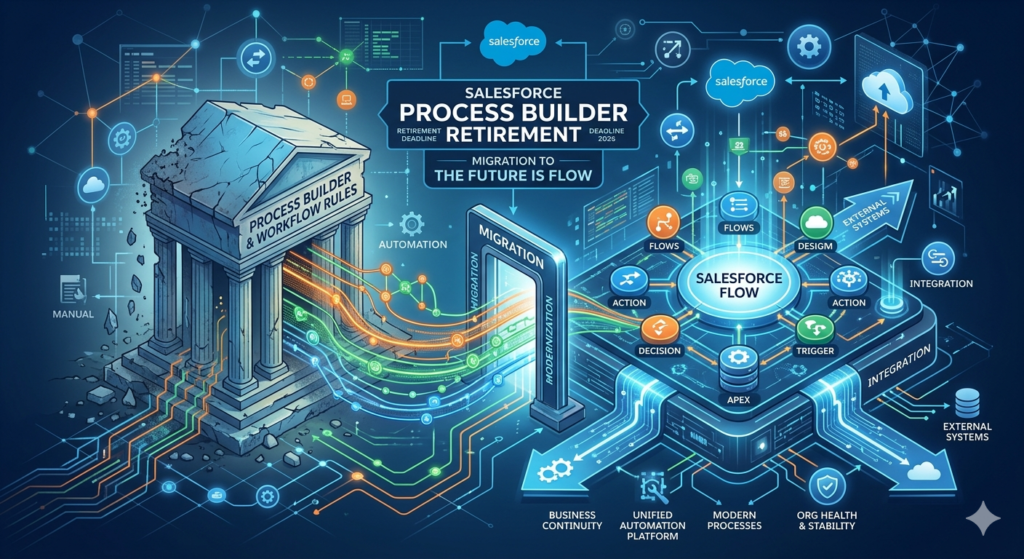
Quick Note: As of this writing, Salesforce has been progressively restricting new Process Builder creation and pushing hard on migration tooling. Always check the Salesforce Help documentation for the latest retirement timeline specific to your org edition.
Let’s dive in.
What Is Salesforce Process Builder?
Salesforce Process Builder is a declarative automation tool — meaning it lets you build automation through a visual, drag-and-drop interface without writing code. Introduced in 2015 as a successor to Workflow Rules, it was designed to give Salesforce admins more power and flexibility when building automated business logic.
At its core, Process Builder operates on a simple principle:
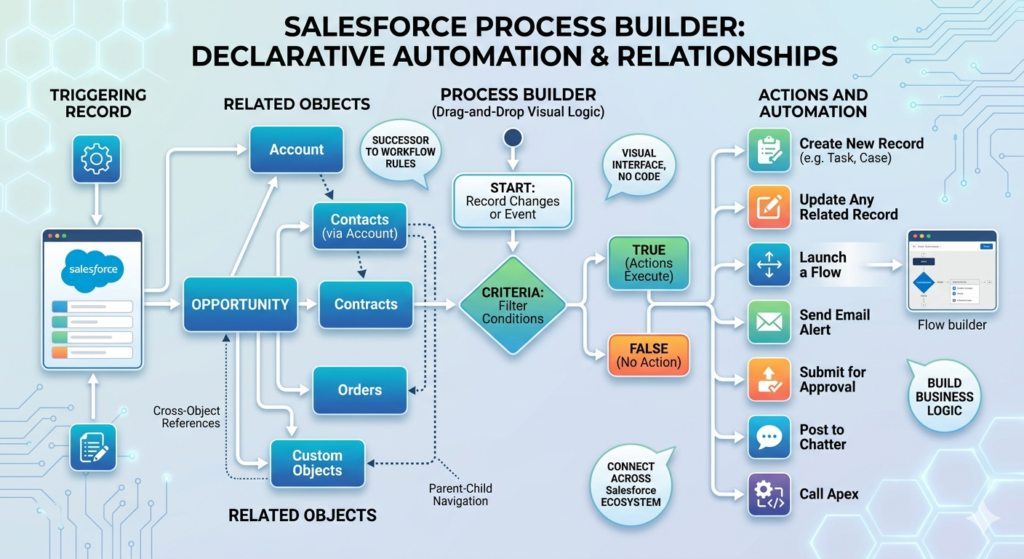
For example:
- When an Opportunity stage changes to “Closed Won” AND the deal value is over $50,000, then send an email alert to the VP of Sales and update the Account’s “VIP Customer” field to true.
That kind of logic, which might have taken a developer hours to code in Apex, could be built in Process Builder in under 15 minutes.
Key Features and Capabilities
Process Builder came equipped with a robust set of features that made it genuinely powerful for its time:
Trigger Types:
- Record changes – Triggers when a record is created or edited
- Platform events – Triggers when a platform event message is received
- Invocable – Triggers when called from another process or flow
Action Types Available:
- Create a new record
- Update a related record (including parent and child records)
- Send email alerts
- Post to Chatter
- Submit records for approval
- Call Apex classes (invocable methods)
- Launch a Flow
- Send custom notifications
- Call an outbound message
Additional Capabilities:
- Multiple criteria nodes – Unlike Workflow Rules, Process Builder could evaluate multiple sets of conditions in a single process
- Scheduled actions – Run actions immediately or at a specified time (e.g., 5 days after a record is created)
- Cross-object field updates – Update fields on related records (not just the triggering record)
- Logical branching – Use AND/OR logic and multiple criteria groups
Real-World Use Cases
Here are some scenarios where organizations commonly used Process Builder:
| Business Use Case | Trigger | Action |
|---|---|---|
| Lead follow-up automation | Lead created | Send email alert to owner |
| Opportunity stage update | Opportunity stage changed | Update related tasks and contact fields |
| Case escalation | Case open > 48 hours | Send alert to manager, update priority |
| New customer onboarding | Account type changed to “Customer” | Create onboarding tasks automatically |
| Contract renewal reminders | Contract end date approaching | Schedule email to account owner |
| Employee offboarding | Contact status set to “Inactive” | Update related records and post to Chatter |
These use cases explain why thousands of Salesforce orgs accumulated dozens — sometimes hundreds — of Process Builder automations over the years.
Why Is Process Builder Being Retired?
Salesforce’s Strategic Shift Toward Flow
The short answer: Salesforce Flow does everything Process Builder does, and a whole lot more.
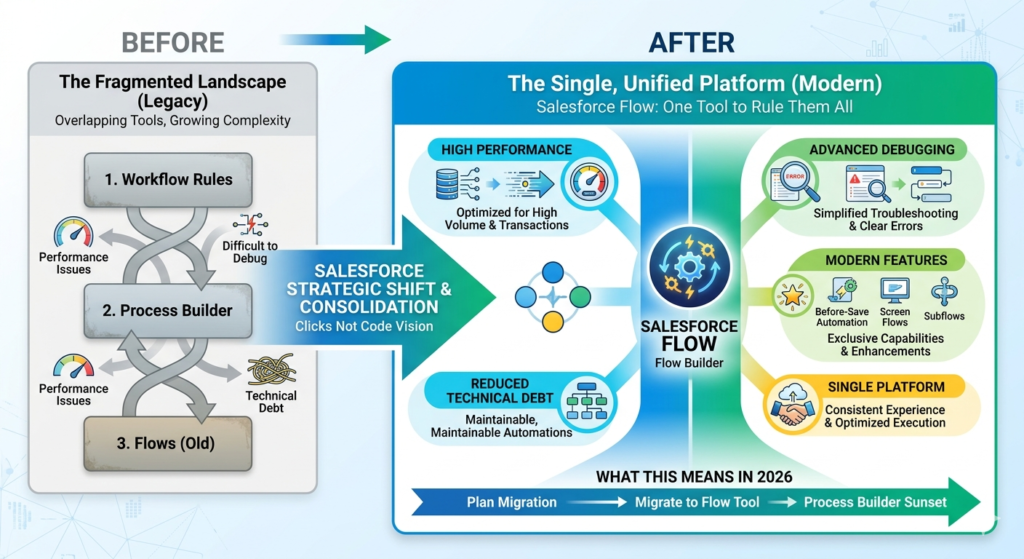
Salesforce made a deliberate decision to consolidate its automation tools under a single, more powerful platform called Salesforce Flow (often referred to as Flow Builder). Rather than maintaining three separate automation tools (Workflow Rules, Process Builder, and Flow) with overlapping capabilities, Salesforce is retiring the older tools and directing all automation investment into Flow.
This is part of Salesforce’s broader “clicks not code” vision — making enterprise-grade automation accessible to admins while reducing technical debt across the platform.
Specific Reasons for Process Builder’s Retirement
1. Performance Limitations
Process Builder was never optimized for high-volume transaction processing. In orgs with large data volumes or complex automation chains, Process Builder processes could trigger governor limit errors, create recursive loops, and slow down record save times significantly.
2. Difficult to Debug
When something breaks in Process Builder, finding the root cause is notoriously painful. Error messages are often cryptic, and tracing a failure across multiple chained processes requires significant manual investigation.
3. No Support for Modern Salesforce Features
As Salesforce has evolved, Process Builder hasn’t kept pace. Features like before-save automation, screen flows, subflows, and advanced error handling are all exclusive to Flow.
4. Technical Debt Accumulation
Over years of use, many organizations built layered, interdependent Process Builder automations that became nearly impossible to modify safely. This “automation spaghetti” created significant maintenance burdens.
5. Salesforce Automation Is Moving to a Single Platform
By consolidating everything in Flow, Salesforce can deliver a more consistent experience, better performance through better-optimized execution, and a clearer upgrade path for customers.
What This Means for You in 2026
If your org still has active Process Builder automations, here’s what you’re dealing with:
- You may not be able to create new processes in orgs on newer API versions or certain editions
- Existing processes continue to run (for now), but are not receiving feature updates
- Salesforce support for Process Builder issues is increasingly limited
- The “Migrate to Flow” tool is now your primary migration path
- The full retirement deadline will render existing processes inactive — at which point anything not migrated will simply stop working
The message is clear: modern Salesforce automation lives in Flow, and it’s time to plan your path there.
How to Use Process Builder in 2026 (Step-by-Step Guide)
Even though Process Builder is heading toward retirement, you may still need to understand and work with existing processes in your org. Here’s a complete walkthrough of how Process Builder works — useful both for managing legacy automation and for understanding what you’ll be replicating in Flow.
Step 1: Accessing Process Builder
- Navigate to Setup in your Salesforce org
- In the Quick Find search box, type “Process Builder”
- Click Process Builder under Process Automation
- You’ll see a list of all existing processes in your org
2026 Note: Depending on your org’s API version and Salesforce edition, you may see a warning banner indicating that Process Builder is deprecated and encouraging you to use Flow Builder instead.
Step 2: Creating a New Process
- Click the New button in the top-right corner
- In the dialog box that appears:
- Process Name: Give your process a clear, descriptive name (e.g., “Opportunity Closed Won — Notify Sales VP”)
- API Name: Auto-populated based on your Process Name
- Description: Add a meaningful description — this is critical for future maintenance and migration
- The process starts when: Choose from:
- A record changes
- It’s invoked by another process
- A platform event message is received
- Click Save
Step 3: Setting Your Object and Trigger
- Click Add Object in the canvas
- Select the Object your process will run on (e.g., Opportunity)
- Choose when to start the process:
- Only when a record is created — Fires on new records only
- When a record is created or edited — Fires on both new and existing records
- Click Save
Step 4: Defining Your Criteria
This is where you tell Process Builder when the automation should fire based on conditions.
- Click Add Criteria
- Name your criteria node (e.g., “Stage Is Closed Won”)
- Choose your criteria type:
- Criteria are met — Define specific field conditions
- Formula evaluates to true — Use a formula for more complex logic
- No criteria — always run actions — Fires every time the trigger occurs
- If using “Criteria are met,” set your conditions:
- Field: Select the field to evaluate (e.g., Opportunity > Stage)
- Operator: Choose Equals, Not Equals, Contains, Greater Than, etc.
- Type: Field, Global Constant, or String
- Value: Enter the comparison value (e.g., “Closed Won”)
- Set your Conditions: All conditions are met (AND) / Any condition is met (OR)
- Click Save
Pro Tip: Always check the “Do you want to execute the actions only when specified changes are made to the record?” option when applicable. This prevents infinite loops and unnecessary action triggers.
Step 5: Adding Immediate Actions
- Under your criteria node, click Add Action in the Immediate Actions section
- Select your action type. Common options include:
Email Alert:
- Action Type: Email Alert
- Description: Name this action
- Email Alert: Select a pre-configured email alert template
Field Update:
- Action Type: Update Records
- Description: Name this action
- Select the record to update (current record or related records)
- Set the field and new value
Create a Record:
- Action Type: Create a Record
- Select the object to create (e.g., Task, Case)
- Map field values from the triggering record to the new record
Post to Chatter:
- Action Type: Post to Chatter
- Choose where to post (User, Record, or Group)
- Write your message (can include merge fields)
Launch a Flow:
- Action Type: Flows
- Select an autolaunched Flow to invoke
Step 6: Adding Scheduled Actions (Optional)
Scheduled actions allow you to run automation at a specific time relative to the trigger.
- Click Add Scheduled Actions
- Set the time frame:
- Number: e.g., 3
- Time units: Hours, Days, or Months
- Before or After: e.g., After
- Date field: e.g., Opportunity Close Date
- Add actions to run at that scheduled time (same options as immediate actions)
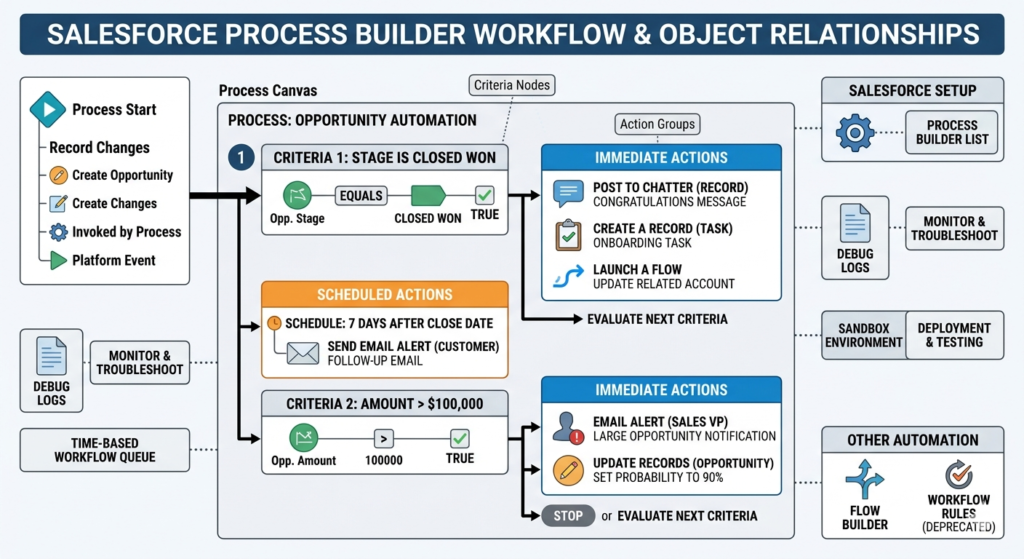
Example: Send a follow-up email 7 days after an Opportunity’s Close Date if it’s still in “Negotiation” stage.
Step 7: Handling Multiple Criteria Groups
One of Process Builder’s advantages over Workflow Rules was the ability to have multiple criteria nodes in a single process.
After your first criteria node and its actions, you can:
- Click Add Criteria again below the existing criteria/action group
- Define a different set of conditions
- Add different actions for this scenario
Example:
- Criteria 1: Stage = “Closed Won” → Send congratulations Chatter post, create onboarding task
- Criteria 2: Stage = “Closed Lost” → Send loss analysis survey email, update “Loss Reason” field
- Criteria 3: Amount > $100,000 → Notify VP Sales via email alert
The process evaluates each criteria node in order (top to bottom) and stops at the first match unless you explicitly set it to continue evaluating.
Step 8: Activating Your Process
- Click Activate in the top-right corner of the Process Builder canvas
- Confirm the activation in the dialog box
- Your process is now live and will fire whenever its trigger conditions are met
Important: Always test your process in a Sandbox environment before activating in production. Process Builder changes in production can be difficult to roll back quickly if something goes wrong.
Step 9: Monitoring and Troubleshooting
- Navigate to Setup → Process Builder to see the status of all processes (Active/Inactive)
- Check Setup → Debug Logs to trace process execution
- Review Email Logs for email action delivery confirmation
- Use Setup → Time-Based Workflow to view and manage scheduled actions queue
Limitations of Process Builder in 2026
Understanding where Process Builder falls short is essential — both for managing existing automation and for justifying the migration to Flow.
1. No Before-Save Execution
Process Builder runs after a record is saved to the database. This means every process consumes a DML (Data Manipulation Language) operation. Flow’s Record-Triggered automations can run before a record saves, which is more efficient and doesn’t consume additional DML operations.
Impact: In high-volume orgs, this difference can cause governor limit errors and degraded performance.
2. Governor Limit Vulnerabilities
Salesforce enforces strict governor limits on all automated operations. Process Builder is particularly susceptible to hitting these limits because:
- It runs after-save (consuming DML operations)
- Chained processes (Process A calls Process B calls Process C) compound limit consumption rapidly
- In bulk operations (data loads, integrations), multiple records trigger simultaneously, easily exhausting limits
3. No Screen or User Interaction Capabilities
Process Builder is purely a background automation tool. It cannot create guided user experiences, collect input through forms, or display information to users. Flow supports Screen Flows that can do all of this.
4. Limited Looping and Iteration
Processing collections of records (like all Contacts related to an Account) is extremely difficult in Process Builder and often requires complex workarounds or Apex code. Flow has native loop capabilities that make this straightforward.
5. Poor Error Handling
When a Process Builder action fails, the error handling options are minimal — usually, the entire transaction is rolled back and an error email is sent. Flow offers sophisticated fault path handling, allowing you to catch errors, log them, and continue execution gracefully.
6. Difficult to Version and Document
Process Builder has no native versioning system beyond creating a new version and activating it. There’s no built-in change log, diff tool, or documentation generator. Over time, this creates significant maintenance challenges.
7. No Support for Pause/Resume Logic
While Process Builder has scheduled actions, it doesn’t support pausing execution mid-process and waiting for an external event or user input before resuming. Flow supports this through Wait Elements and Screen Elements.
8. Increasingly Unsupported
With retirement approaching, Salesforce has stopped developing new features for Process Builder. Any new Salesforce capabilities (new objects, new field types, new automation patterns) will only be supported in Flow.
Process Builder vs. Flow: A Head-to-Head Comparison
Understanding the differences between Process Builder and Flow is critical for planning your process builder migration strategy and making informed decisions about your automation architecture.
Feature Comparison Table
| Feature | Process Builder | Salesforce Flow |
|---|---|---|
| Visual builder | ✅ Yes | ✅ Yes (more powerful) |
| Record-triggered automation | ✅ Yes (after-save only) | ✅ Yes (before-save AND after-save) |
| Schedule-triggered automation | ⚠️ Limited (relative to record date) | ✅ Full schedule-triggered flows |
| Platform event triggers | ✅ Yes | ✅ Yes |
| Screen/user interface | ❌ No | ✅ Yes (Screen Flows) |
| Loops and collections | ❌ Very limited | ✅ Full loop support |
| Error handling | ❌ Basic only | ✅ Fault paths, try/catch logic |
| Subflows | ❌ No | ✅ Yes |
| Before-save execution | ❌ No | ✅ Yes |
| Governor limit efficiency | ⚠️ Less efficient | ✅ More efficient |
| Debugging tools | ⚠️ Limited | ✅ Flow debugger built-in |
| Version control | ⚠️ Basic versioning | ✅ Better versioning |
| Active development | ❌ No (deprecated) | ✅ Actively developed |
| Long-term support | ❌ Retiring | ✅ Strategic platform |
| Complexity ceiling | Low-Medium | Very High |
| Learning curve | Low | Medium |
When to Still Use Process Builder (In 2026)
Honestly? You shouldn’t be building new automations in Process Builder in 2026. Even if your org technically still allows it, any new automation should be built in Flow.
However, there are a few scenarios where you might temporarily leave existing Process Builder automations running:
- Low-risk, stable automations that work correctly and have no immediate need for changes
- Automations you haven’t had time to migrate yet — running as-is while you work through your migration backlog
- Complex interdependent processes that require careful migration planning before being touched
Even in these cases, create a migration timeline. Don’t leave Process Builder automations indefinitely.
When to Switch to Flow
Switch to Flow for everything going forward, and prioritize migration for:
- Any automation that is currently broken or unreliable in Process Builder
- Automations with performance issues or governor limit errors
- Any process that needs new functionality only available in Flow
- High-volume record operations
- Anything that would benefit from before-save execution
- Complex logic requiring loops, decisions, or user interaction
Process Builder Migration Guide
This is the section you’ve been waiting for. Let’s walk through a practical, step-by-step process builder migration approach to help you move from Process Builder to Salesforce Flow safely and efficiently.
Phase 1: Audit Your Existing Processes
Before you migrate anything, you need to know exactly what you’re working with.
Step 1: Generate a Process Builder Inventory
- Go to Setup → Process Builder
- Export a list of all processes (Active, Inactive, and Draft)
- For each process, document:
- Process name and API name
- Object it runs on
- Trigger type (Create, Create/Edit, Invocable)
- Number of criteria nodes
- Types of actions used
- Whether it calls other processes or flows
- Last modified date
- Current status (Active/Inactive)
Step 2: Assess Complexity
Categorize each process:
| Category | Description | Priority |
|---|---|---|
| Simple | 1 criteria node, 1-2 actions, no chaining | Migrate first (easy wins) |
| Medium | 2-4 criteria nodes, multiple actions | Migrate second |
| Complex | Many criteria, chained processes, Apex calls | Migrate with careful planning |
| Critical | Business-critical processes, high transaction volume | Prioritize — test thoroughly |
Step 3: Identify Dependencies
Some processes call other processes or invoke Flows. Map these dependencies before migrating to avoid breaking chains.
Phase 2: Use the “Migrate to Flow” Tool
Salesforce provides a built-in migration tool designed specifically for this purpose.
How to Access It:
- Go to Setup → Process Builder
- Click on the name of the process you want to migrate
- Look for the “Migrate to Flow” button (available on inactive processes or with an option to deactivate first)
- Click it to launch the migration wizard
What the Tool Does:
- Analyzes your existing Process Builder process
- Generates an equivalent Record-Triggered Flow in Flow Builder
- Identifies any elements that cannot be automatically migrated (flags them for manual attention)
- Creates the flow in Draft/Inactive status so you can review before activating
Limitations of the Auto-Migration Tool:
- Not all Process Builder actions have a 1:1 equivalent in Flow
- Complex processes may be partially migrated with manual steps required
- Chained processes need to be migrated and reconnected manually
- Always review the generated Flow before activating
Recommended Workflow:
textDeactivate Process Builder Process
        ↓
Run "Migrate to Flow" Tool
        ↓
Review Generated Flow in Flow Builder
        ↓
Test in Sandbox
        ↓
Fix Any Flagged Issues Manually
        ↓
Test Again
        ↓
Activate Flow in Production
        ↓
Monitor for 2-4 Weeks
        ↓
Archive/Delete Original Process
Phase 3: Manual Migration (For Complex Processes)
For processes too complex for the automated tool, here’s how to approach manual migration.
Migrating a Record-Triggered Process to a Record-Triggered Flow:
- Open Flow Builder: Setup → Flows → New Flow → Record-Triggered Flow
- Configure the trigger:
- Select the same object as your Process Builder process
- Set trigger to “A record is created or updated” (or whichever matches)
- Choose “After the record is saved” (to match Process Builder’s after-save behavior) or “Before the record is saved” if appropriate
- Add a Decision element for each criteria node in your process
- Configure conditions matching your Process Builder criteria logic
- Add action elements for each action in your process:
- Update Records (replaces field updates)
- Send Email Alert (replaces email alert actions)
- Create Records (replaces create record actions)
- Post to Chatter (replaces Chatter post actions)
- Subflow (replaces “Launch a Flow” or chained processes)
- Add scheduled paths if your process had scheduled actions (use Scheduled Paths in Flow Builder)
- Add fault paths for error handling (a huge improvement over Process Builder)
Phase 4: Testing Your Migrated Flows
Never skip this phase. Automation errors can corrupt data at scale.
Testing Checklist:
- Test in a full sandbox with representative data
- Test trigger conditions — confirm the flow fires when expected and NOT when it shouldn’t
- Test each criteria branch individually
- Test bulk operations (import 200+ records and verify no governor limit errors)
- Test edge cases (null values, extreme field values, missing related records)
- Test scheduled path timing
- Compare results between old Process Builder output and new Flow output
- Have business users validate that outcomes match expectations
- Check debug logs for any warnings or errors
Phase 5: Cutover and Monitoring
- Deactivate the Process Builder process in production
- Activate the equivalent Flow in production
- Monitor closely for the first 48-72 hours:
- Watch for error emails
- Check debug logs
- Ask business users to report any unexpected behavior
- Set up Flow Error Notifications to alert you if the Flow encounters an unhandled fault
Migration Best Practices
Do:
- ✅ Migrate in small batches — don’t try to do everything at once
- ✅ Start with simple, low-risk processes to build confidence
- ✅ Document every migration decision and deviation from original logic
- ✅ Test bulk data scenarios before going live
- ✅ Use meaningful names and descriptions for all Flow elements
- ✅ Add comments/annotations inside your Flows explaining complex logic
- ✅ Consolidate related processes into a single well-structured Flow where possible
Don’t:
- ❌ Build 1:1 replicas of bad Process Builder design — use migration as an opportunity to improve
- ❌ Activate a migrated Flow without deactivating the Process Builder process first (double execution!)
- ❌ Rush migration without proper testing
- ❌ Leave both the Process Builder process AND the Flow active simultaneously
- ❌ Ignore the “cannot be automatically migrated” warnings from the migration tool
Best Practices for Managing Process Builder Before Full Retirement
Even while you’re migrating, there are important best practices to follow for managing your existing Process Builder automations.
1. Conduct a Comprehensive Automation Audit
If you haven’t already, run a full audit of your org’s automation landscape:
- Process Builder processes — How many? How complex? Status?
- Workflow Rules — Also being retired; needs migration
- Apex Triggers — May interact with Process Builder; document interactions
- Flows already in production — What’s already been migrated?
Free Tool: Salesforce’s Optimizer tool (Setup → Optimizer) can help identify automation complexity and provide recommendations.
2. Stop Creating New Process Builder Processes
This one is non-negotiable. Do not build new automation in Process Builder in 2026. Every new automation you build in Process Builder is technical debt you’ll have to migrate later. Build everything new in Flow — even if you’re less familiar with it. The learning investment pays off immediately.
3. Freeze Inactive Processes
Identify all inactive Process Builder processes in your org. These should be either:
- Migrated and archived (if they were once useful and might be needed again)
- Deleted (if they’re truly obsolete)
Inactive processes won’t cause immediate harm, but they clutter your org, confuse future admins, and create migration scope uncertainty.
4. Document Everything Before You Touch It
Before migrating any process, create thorough documentation:
- What does this process do in business terms?
- Why does it exist? What problem does it solve?
- Who depends on it? Which teams? Which users?
- What would break if it stopped working?
- Are there any known issues or quirks?
This documentation will be invaluable during migration and for whoever maintains the org after you.
5. Prioritize High-Risk Processes
Focus your migration energy on processes that:
- Run on high-volume objects (Leads, Opportunities, Cases)
- Are in the critical path of important business workflows
- Have known performance issues
- Involve financial calculations or data you can’t afford to lose
6. Get Stakeholder Buy-In
Migration isn’t just a technical project — it affects business users who rely on existing automation. Communicate your migration plan to:
- Business process owners who depend on specific automations
- Sales, Service, and Marketing team leads
- IT leadership and project sponsors
Set realistic timelines and get sign-off on testing plans. The last thing you want is to migrate a critical process and discover a week later that it’s been silently failing.
7. Build Your Flow Skills Now
The best preparation for Process Builder retirement is getting comfortable with Flow Builder. Resources to accelerate your learning:
- Trailhead: “Flow Builder” trail and “Automate Your Business Processes” module
- Salesforce Automation Champion community
- Salesforce Admin YouTube channel — regular Flow tutorials
- Salesforce Well-Architected guidance on automation patterns
- Process Builder to Flow Comparison Salesforce Help article
Conclusion: The Future of Salesforce Automation Is Flow
Process Builder had a remarkable run. For nearly a decade, it empowered Salesforce admins to build powerful, code-free automation that transformed how organizations managed their CRM workflows. If you’ve built your Salesforce expertise on a foundation of Process Builder, you’ve done valuable work — and that experience translates well to Flow.
But Salesforce Process Builder in 2026 is clearly in its final chapter. The retirement isn’t a punishment — it’s an upgrade path. Salesforce Flow is objectively more powerful, more efficient, more maintainable, and more aligned with where the platform is headed. The before-save execution, native error handling, screen flow capabilities, and active Salesforce investment all make Flow a dramatically better tool for building modern Salesforce automation.
About RizeX Labs
We’re Pune’s leading IT training institute specializing in emerging technologies like Salesforce and automation architecture. At RizeX Labs, we help professionals bridge the gap between legacy tools and modern solutions like Salesforce Flow. Through hands-on training and expert mentorship, we transform learners into architects capable of managing complex migrations and building future-proof automation strategies.
Internal Links:
- Mastering Salesforce Flow: The Ultimate Migration Guide
- Salesforce Order of Execution: Why Flow Trumps Process Builder
- Apex vs. Flow: When to Code and When to Click in 2026
