Introduction
In today’s hyperconnected enterprise landscape, no software platform operates in isolation. Businesses rely on dozens — sometimes hundreds — of SaaS tools working in concert: CRMs, ERPs, marketing automation platforms, customer support systems, and custom-built applications. At the center of this ecosystem for millions of companies sits Salesforce, and the question every integration architect eventually faces is: how do you connect external systems to Salesforce securely, reliably, and at scale?
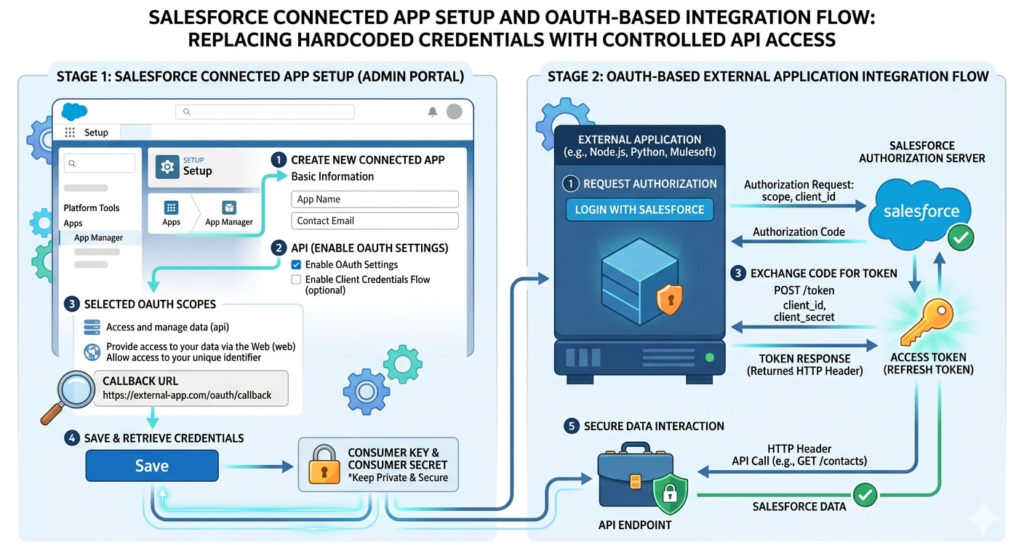
The answer lies in Salesforce Connected App setup and OAuth-based integration — a combination that gives organizations enterprise-grade security without sacrificing developer agility.
Poorly secured integrations are among the most common attack vectors in enterprise environments. Hardcoded credentials, unencrypted tokens, overprivileged API access — these are vulnerabilities that make security teams lose sleep. Salesforce addresses these risks through Connected Apps, which act as controlled gateways enabling external applications to authenticate and interact with Salesforce data using industry-standard protocols like OAuth 2.0.
In this comprehensive guide, RizeX Labs walks you through everything you need to know about connected app Salesforce configuration, OAuth flow selection, practical integration examples, troubleshooting, and security best practices — whether you’re a Salesforce administrator building your first integration or an architect designing a multi-system enterprise platform.
What Is a Salesforce Connected App?
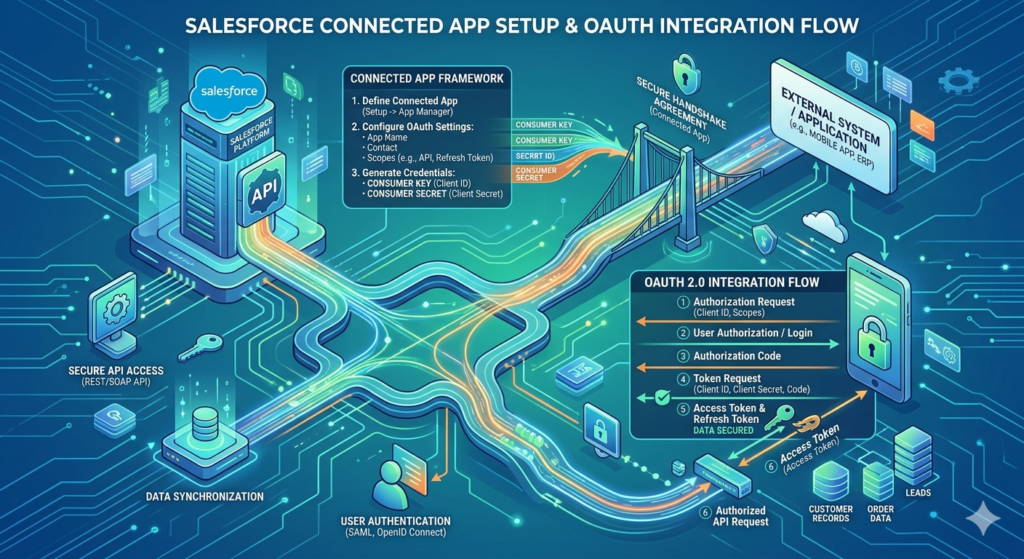
A Salesforce Connected App is a framework that allows an external application to integrate with Salesforce using APIs, OAuth 2.0 protocols, and SAML-based authentication. Think of it as a registered identity for your external application within the Salesforce ecosystem.
When you create a Connected App, you’re essentially telling Salesforce:
“This external application has permission to communicate with our org. Here are the specific access levels it should have, and here’s how it should prove its identity.”
Key Capabilities of a Connected App
- OAuth 2.0 Authentication: Enables secure, token-based access without sharing usernames and passwords
- API Access Control: Restricts what data and operations the external app can perform
- Single Sign-On (SSO): Supports SAML 2.0 for identity federation
- Mobile Application Integration: Powers Salesforce-connected mobile apps
- Scope Management: Granular control over which Salesforce features the app can access
- IP Restrictions and Session Policies: Adds an additional layer of security
Connected Apps are the foundational building block for virtually every modern Salesforce OAuth integration — from simple data sync tools to complex, event-driven enterprise architectures.
Step-by-Step Guide to Salesforce Connected App Setup
Let’s get hands-on. Here’s exactly how to create and configure a Connected App in Salesforce.
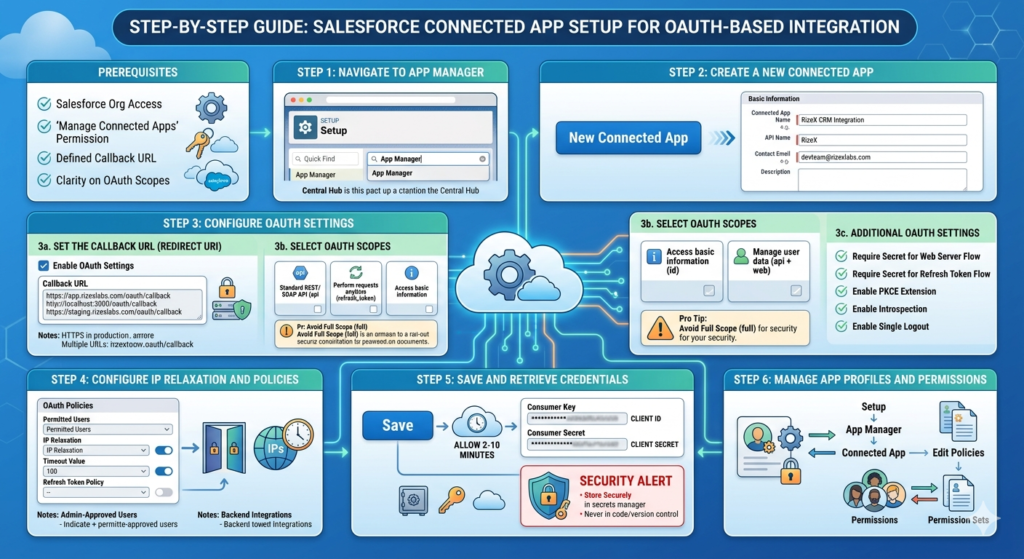
Prerequisites
Before you begin, ensure you have:
- Salesforce org access (Developer, Sandbox, or Production)
- System Administrator profile or a profile with “Manage Connected Apps” permission
- A defined callback URL for your external application
- Clarity on which OAuth scopes your integration requires
Step 1: Navigate to App Manager
- Log in to your Salesforce org
- Click the gear icon (⚙️) in the top-right corner
- Select Setup
- In the Quick Find search box, type App Manager
- Click App Manager under the Apps section
The App Manager is the central hub for all Lightning apps, Classic apps, and Connected Apps in your Salesforce org.
Step 2: Create a New Connected App
- In the App Manager, click New Connected App in the top-right corner
- You’ll be redirected to the Connected App creation form
Fill in the Basic Information section:
| Field | Description | Example |
|---|---|---|
| Connected App Name | Human-readable name for the app | RizeX CRM Integration |
| API Name | Auto-populated, used in code | RizeX_CRM_Integration |
| Contact Email | Admin email for notifications | devteam@rizexlabs.com |
| Description | Purpose of the Connected App | Integrates RizeX platform with Salesforce |
Step 3: Configure OAuth Settings
This is the most critical part of the Salesforce Connected App setup. Check the box labeled Enable OAuth Settings to expand the configuration panel.
3a. Set the Callback URL (Redirect URI)
The Callback URL (also called a Redirect URI) is where Salesforce sends the authorization code after a user successfully authenticates. This is a mandatory field for Authorization Code flows.
texthttps://app.rizexlabs.com/oauth/callback
Important notes:
- Use HTTPS in production environments (HTTP is only acceptable for localhost during development)
- You can specify multiple callback URLs by separating them with line breaks
- The URL must exactly match what your application sends in the OAuth request
For local development, you might use:
texthttp://localhost:3000/oauth/callback
https://app.rizexlabs.com/oauth/callback
https://staging.rizexlabs.com/oauth/callback
3b. Select OAuth Scopes
OAuth scopes define what your Connected App is permitted to do. Salesforce follows the principle of least privilege — you should only request scopes your application genuinely needs.
Here are the most commonly used scopes:
| Scope | API Name | Use Case |
|---|---|---|
| Access and manage your data | api | Standard REST/SOAP API access |
| Perform requests at any time | refresh_token | Obtain refresh tokens for long-lived sessions |
| Access your basic information | id | Retrieve user identity information |
| Full access | full | All permissions (use sparingly!) |
| Access custom permissions | custom_permissions | Read user’s custom permissions |
| Access Salesforce APIs without a user | sfap_api | Headless/backend integrations |
| Manage user data via APIs | api + web | Combined web and API access |
| Perform ANYTIME requests | offline_access | Offline token refresh capability |
Pro Tip: Avoid selecting full scope unless absolutely necessary. Overprivileged scopes are a significant security risk and violate compliance requirements in regulated industries.
3c. Additional OAuth Settings
- Require Secret for Web Server Flow: Enable this to require the client secret for added security
- Require Secret for Refresh Token Flow: Recommended for server-side applications
- Enable PKCE Extension: Highly recommended for public clients (mobile/SPA apps)
- Enable Introspection of Tokens: Allows token validation without a full API call
- Enable Single Logout: Terminates sessions across all connected systems simultaneously
Step 4: Configure IP Relaxation and Policies
Scroll down to the OAuth Policies section:
- Permitted Users: Choose between “All users may self-authorize” or “Admin-approved users are pre-authorized”
- IP Relaxation: Control whether users need to be within trusted IP ranges
- Timeout Value: Set session duration (default is 2 hours)
- Refresh Token Policy: Define when refresh tokens expire
For backend integrations, select “Admin approved users are pre-authorized” and manage access through profiles and permission sets.
Step 5: Save and Retrieve Credentials
- Click Save
- Salesforce will display a message: “Your changes are being saved. Allow 2-10 minutes for your changes to take effect on the server.”
- After saving, click Continue
- You’ll now see the Consumer Key (Client ID) and Consumer Secret (Client Secret)
⚠️ Security Alert: Treat the Consumer Secret like a password. Never commit it to version control, expose it in client-side code, or share it in plaintext communications. Store it in a secrets manager (AWS Secrets Manager, HashiCorp Vault, Azure Key Vault, etc.)
Step 6: Manage App Profiles and Permissions
To control which Salesforce users can use this Connected App:
- Go to Setup > App Manager
- Find your Connected App and click Manage from the dropdown
- Click Edit Policies to configure access
- Under Profiles or Permission Sets, click Manage Profiles or Manage Permission Sets
- Add the appropriate profiles or permission sets
Salesforce OAuth Integration: Understanding OAuth 2.0
Now that your Connected App is configured, let’s dive deep into Salesforce OAuth integration and understand how the authentication flows work.
What Is OAuth 2.0?
OAuth 2.0 is an industry-standard authorization framework that enables third-party applications to obtain limited access to a service on behalf of a resource owner (user), without exposing credentials. Instead of passwords, OAuth uses access tokens — time-limited, scoped credentials that represent authorized access.
In Salesforce’s implementation, OAuth 2.0 involves four key parties:
- Resource Owner: The Salesforce user
- Client: Your external application
- Authorization Server: Salesforce’s identity platform (login.salesforce.com)
- Resource Server: Salesforce APIs (your org’s instance)

OAuth 2.0 Flows Supported by Salesforce
Salesforce supports multiple OAuth flows, each designed for different use cases. Choosing the right flow is critical for both security and functionality.
1. Authorization Code Flow (Web Server Flow)
Best for: Web applications with a backend server, where a user needs to authorize access
How it works:
- User clicks “Connect to Salesforce” in your application
- Application redirects user to Salesforce login
- User authenticates and grants permission
- Salesforce redirects back to your callback URL with an authorization code
- Your backend exchanges the code for an access token and refresh token
textStep 1: Authorization Request
GET https://login.salesforce.com/services/oauth2/authorize
  ?response_type=code
  &client_id=YOUR_CONSUMER_KEY
  &redirect_uri=https://app.rizexlabs.com/oauth/callback
  &scope=api%20refresh_token
  &state=random_state_string
textStep 2: Token Exchange (Server-to-Server)
POST https://login.salesforce.com/services/oauth2/token
Content-Type: application/x-www-form-urlencoded

grant_type=authorization_code
&code=AUTHORIZATION_CODE_FROM_SALESFORCE
&client_id=YOUR_CONSUMER_KEY
&client_secret=YOUR_CONSUMER_SECRET
&redirect_uri=https://app.rizexlabs.com/oauth/callback
Sample Response:
JSON{
  "access_token": "00D5g000004xQfs!AQcAQH...",
  "refresh_token": "5Aep861TSESvWeug_xvFHRBTiCj...",
  "instance_url": "https://yourorg.salesforce.com",
  "id": "https://login.salesforce.com/id/00D.../005...",
  "token_type": "Bearer",
  "scope": "api refresh_token",
  "issued_at": "1698765432000",
  "signature": "..."
}
2. Authorization Code with PKCE Flow
Best for: Single-page applications (SPAs), mobile applications, or any public client that cannot securely store a client secret
PKCE (Proof Key for Code Exchange) adds a security layer by generating a code verifier and code challenge pair, eliminating the need for a client secret.
JavaScript// Generate Code Verifier and Challenge (Node.js example)
const crypto = require('crypto');

function generateCodeVerifier() {
  return crypto.randomBytes(32).toString('base64url');
}

function generateCodeChallenge(verifier) {
  return crypto
    .createHash('sha256')
    .update(verifier)
    .digest('base64url');
}

const codeVerifier = generateCodeVerifier();
const codeChallenge = generateCodeChallenge(codeVerifier);

// Authorization Request with PKCE
const authUrl = `https://login.salesforce.com/services/oauth2/authorize
  ?response_type=code
  &client_id=${process.env.SF_CLIENT_ID}
  &redirect_uri=${encodeURIComponent(process.env.SF_CALLBACK_URL)}
  &code_challenge=${codeChallenge}
  &code_challenge_method=S256
  &scope=api%20refresh_token`;
3. Client Credentials Flow
Best for: Server-to-server integrations without user context; daemon processes; backend services
This flow doesn’t involve a user at all — it’s purely machine-to-machine authentication. Your application authenticates using only its credentials.
textPOST https://login.salesforce.com/services/oauth2/token
Content-Type: application/x-www-form-urlencoded

grant_type=client_credentials
&client_id=YOUR_CONSUMER_KEY
&client_secret=YOUR_CONSUMER_SECRET
Note: Client Credentials Flow requires Salesforce to associate a specific user with the Connected App through the “Run As” configuration in OAuth policies. The access token carries the permissions of that designated user.
4. JWT Bearer Token Flow
Best for: Headless integrations, CI/CD pipelines, automated processes where no user interaction is possible and high security is required
JWT (JSON Web Token) flow allows your application to authenticate using a digital certificate without any user interaction or client secret exposure.
Setup Requirements:
- Generate a self-signed certificate or use a CA-issued certificate
- Upload the certificate’s public key to the Connected App
- Store the private key securely on your server
Python# Python example for JWT Bearer Token Flow
import jwt
import time
import requests
from cryptography.hazmat.primitives import serialization

def get_salesforce_token_jwt(
    client_id: str,
    username: str,
    private_key_path: str,
    sandbox: bool = False
):
    # Load private key
    with open(private_key_path, 'rb') as key_file:
        private_key = serialization.load_pem_private_key(
            key_file.read(),
            password=None
        )

    # Build JWT payload
    audience = 'https://test.salesforce.com' if sandbox else 'https://login.salesforce.com'

    payload = {
        'iss': client_id,         # Consumer Key
        'sub': username,          # Salesforce username
        'aud': audience,
        'exp': int(time.time()) + 300  # 5-minute expiry
    }

    # Sign the JWT
    signed_jwt = jwt.encode(
        payload,
        private_key,
        algorithm='RS256'
    )

    # Request access token
    response = requests.post(
        f'{audience}/services/oauth2/token',
        data={
            'grant_type': 'urn:ietf:params:oauth:grant-type:jwt-bearer',
            'assertion': signed_jwt
        }
    )

    return response.json()

# Usage
token_data = get_salesforce_token_jwt(
    client_id='YOUR_CONSUMER_KEY',
    username='integration_user@yourorg.com',
    private_key_path='./private_key.pem',
    sandbox=True
)

access_token = token_data['access_token']
instance_url = token_data['instance_url']
5. Device Flow
Best for: IoT devices, CLI tools, or any application running on devices with limited input capabilities
The device requests a user code, displays it to the user who completes authentication on a separate device (phone, computer), and the device polls for token issuance.
OAuth Flow Selection Guide
| Scenario | Recommended Flow |
|---|---|
| Web app with user login | Authorization Code |
| Mobile/SPA app | Authorization Code + PKCE |
| Backend service, no user context | Client Credentials |
| Automated CI/CD, high security | JWT Bearer |
| IoT / CLI tools | Device Flow |
Practical Example: Integrating a Node.js Application with Salesforce
Here’s a complete, real-world example of integrating a Node.js Express application with Salesforce using the Authorization Code flow.
Application Setup
JavaScript// package.json dependencies
// npm install express axios dotenv querystring

const express = require('express');
const axios = require('axios');
const querystring = require('querystring');
require('dotenv').config();

const app = express();

const SF_CONFIG = {
  clientId: process.env.SF_CLIENT_ID,
  clientSecret: process.env.SF_CLIENT_SECRET,
  callbackUrl: process.env.SF_CALLBACK_URL,
  loginUrl: process.env.SF_LOGIN_URL || 'https://login.salesforce.com'
};

// Step 1: Redirect user to Salesforce login
app.get('/auth/salesforce', (req, res) => {
  const params = querystring.stringify({
    response_type: 'code',
    client_id: SF_CONFIG.clientId,
    redirect_uri: SF_CONFIG.callbackUrl,
    scope: 'api refresh_token id',
    state: generateRandomState() // Store this in session for CSRF protection
  });

  res.redirect(`${SF_CONFIG.loginUrl}/services/oauth2/authorize?${params}`);
});

// Step 2: Handle callback and exchange code for tokens
app.get('/oauth/callback', async (req, res) => {
  const { code, state, error } = req.query;

  if (error) {
    return res.status(400).json({
      error: 'OAuth Error',
      description: req.query.error_description
    });
  }

  // Validate state parameter (CSRF protection)
  if (!validateState(state)) {
    return res.status(403).json({ error: 'Invalid state parameter' });
  }

  try {
    // Exchange authorization code for tokens
    const tokenResponse = await axios.post(
      `${SF_CONFIG.loginUrl}/services/oauth2/token`,
      querystring.stringify({
        grant_type: 'authorization_code',
        code: code,
        client_id: SF_CONFIG.clientId,
        client_secret: SF_CONFIG.clientSecret,
        redirect_uri: SF_CONFIG.callbackUrl
      }),
      {
        headers: { 'Content-Type': 'application/x-www-form-urlencoded' }
      }
    );

    const { access_token, refresh_token, instance_url } = tokenResponse.data;

    // Store tokens securely (encrypted in database, not in plain session)
    await storeTokensSecurely(access_token, refresh_token, instance_url);

    res.json({ message: 'Authentication successful', instance_url });

  } catch (err) {
    console.error('Token exchange error:', err.response?.data);
    res.status(500).json({ error: 'Token exchange failed' });
  }
});

// Step 3: Make authenticated API calls to Salesforce
app.get('/api/accounts', async (req, res) => {
  try {
    const { accessToken, instanceUrl } = await getStoredTokens();

    const response = await axios.get(
      `${instanceUrl}/services/data/v58.0/query`,
      {
        params: {
          q: "SELECT Id, Name, Industry, AnnualRevenue FROM Account LIMIT 10"
        },
        headers: {
          'Authorization': `Bearer ${accessToken}`,
          'Content-Type': 'application/json'
        }
      }
    );

    res.json(response.data.records);

  } catch (err) {
    if (err.response?.status === 401) {
      // Token expired — refresh it
      await refreshAccessToken();
      // Retry the request...
    }
    res.status(500).json({ error: 'API call failed' });
  }
});

// Refresh token implementation
async function refreshAccessToken() {
  const { refreshToken } = await getStoredTokens();

  const response = await axios.post(
    `${SF_CONFIG.loginUrl}/services/oauth2/token`,
    querystring.stringify({
      grant_type: 'refresh_token',
      client_id: SF_CONFIG.clientId,
      client_secret: SF_CONFIG.clientSecret,
      refresh_token: refreshToken
    }),
    {
      headers: { 'Content-Type': 'application/x-www-form-urlencoded' }
    }
  );

  // Update stored access token
  await updateAccessToken(response.data.access_token);
  return response.data.access_token;
}

app.listen(3000, () => console.log('Integration server running on port 3000'));
Common Errors and Troubleshooting
Even with a perfect setup, OAuth integrations can fail in non-obvious ways. Here’s a troubleshooting guide for the most common issues.
Error 1: invalid_client_id
Cause: The Consumer Key doesn’t match or the Connected App hasn’t propagated yet
Solution:
- Double-check the Consumer Key (no extra spaces or characters)
- Wait 2-10 minutes after creating the Connected App before testing
- Verify you’re using the correct login URL (sandbox vs production)
Error 2: redirect_uri_mismatch
Cause: The callback URL in your request doesn’t exactly match what’s configured in the Connected App
Solution:
- Ensure trailing slashes match exactly (e.g.,
/callbackvs/callback/) - URL-encode the redirect_uri parameter correctly
- Verify the protocol (HTTP vs HTTPS)
- Check for environment mismatches (sandbox URL used in production request)
Error 3: invalid_grant
Cause: Multiple possible causes — expired authorization code, revoked refresh token, or user locked out
Solutions:
- Authorization codes expire within minutes — ensure your token exchange happens immediately
- If a refresh token is invalid, the user must re-authenticate
- Check if the user’s session policy has been changed or the IP restriction has been triggered
Error 4: insufficient_scope
Cause: The access token doesn’t have the scope required for the API operation
Solution:
- Edit the Connected App and add the required scope
- Re-authenticate to obtain a new token with the updated scopes
- Review the API documentation to confirm which scope is required
Error 5: INVALID_SESSION_ID (API Response)
Cause: Access token has expired
Solution:
- Implement automatic token refresh using the refresh token
- Ensure your refresh token hasn’t expired or been revoked
- Add token expiry tracking (
issued_at+ token validity window)
Error 6: JWT invalid_app or invalid_grant
Cause: Certificate mismatch, clock skew, or user not pre-authorized
Solutions:
- Ensure the public certificate uploaded matches the private key used to sign the JWT
- Sync server time (NTP) — JWT validation is time-sensitive (±5 minutes)
- Verify the
sub(username) is pre-authorized for the Connected App - Confirm the audience (
aud) matches the login URL
Security Best Practices for Salesforce OAuth Integration
Security isn’t an afterthought — it’s foundational. Here are non-negotiable best practices for production Connected App deployments.
Token Handling
- Never store access tokens in browser localStorage — use httpOnly, secure cookies or server-side sessions
- Encrypt refresh tokens at rest using AES-256 or equivalent
- Rotate refresh tokens when they’re used (enable “Rotate Refresh Token” in session settings)
- Implement token expiry tracking and proactively refresh before expiration (not after)
- Revoke tokens when users disconnect the integration or log out
Scope Management
- Apply the principle of least privilege — request only the scopes your integration actually uses
- Audit scopes regularly as integration requirements evolve
- Document scope justifications for security and compliance reviews
- Prefer
apioverfull— the latter grants unnecessary permissions
Connected App Configuration
- Enable PKCE for all public clients (mobile apps, SPAs)
- Restrict permitted users to admin-approved profiles/permission sets in production
- Configure IP restrictions where your integration servers have static IPs
- Use a dedicated integration user with a minimal permission profile
- Disable unused OAuth flows to reduce attack surface
- Monitor Connected App usage through Salesforce Event Monitoring
Secrets Management
Bash# Never do this:
SF_CLIENT_SECRET=abc123xyz  # ← Never hardcode in code or .env committed to git

# Do this instead — use environment-specific secrets managers:
# AWS: aws secretsmanager get-secret-value --secret-id sf/client-secret
# GCP: gcloud secrets versions access latest --secret="sf-client-secret"
# Azure: az keyvault secret show --vault-name YourVault --name sf-client-secret
Testing and Validating Your Salesforce Integration
Using Salesforce’s OAuth Debugger
Salesforce provides a built-in OAuth Token Debugger and Token Inspector:
- Navigate to Setup > Security > OAuth and OpenID Connect Settings
- Enable the token inspector
- Visit:
https://yourorg.salesforce.com/.well-known/openid-configurationfor OIDC metadata
Using Postman for Manual Testing
- Create a new request in Postman
- Go to Authorization tab
- Select OAuth 2.0
- Fill in:
- Auth URL:
https://login.salesforce.com/services/oauth2/authorize - Token URL:
https://login.salesforce.com/services/oauth2/token - Client ID: Your Consumer Key
- Client Secret: Your Consumer Secret
- Scope:
api refresh_token
- Auth URL:
- Click Get New Access Token and complete the authorization flow
- Use the received token in subsequent API requests
Validating API Access
Bash# Test your access token with a simple SOQL query
curl -X GET \
  "https://yourorg.salesforce.com/services/data/v58.0/query?q=SELECT+Id,Name+FROM+Account+LIMIT+1" \
  -H "Authorization: Bearer YOUR_ACCESS_TOKEN" \
  -H "Content-Type: application/json"
Expected successful response:
JSON{
  "totalSize": 1,
  "done": true,
  "records": [
    {
      "attributes": {
        "type": "Account",
        "url": "/services/data/v58.0/sobjects/Account/001..."
      },
      "Id": "001...",
      "Name": "Sample Account"
    }
  ]
}
Automated Integration Testing
JavaScript// Jest test example for token validation
describe('Salesforce OAuth Integration', () => {

  it('should obtain a valid access token', async () => {
    const tokenData = await getClientCredentialsToken();

    expect(tokenData).toHaveProperty('access_token');
    expect(tokenData).toHaveProperty('instance_url');
    expect(tokenData.token_type).toBe('Bearer');
  });

  it('should successfully query Salesforce API', async () => {
    const { accessToken, instanceUrl } = await getStoredTokens();

    const response = await axios.get(
      `${instanceUrl}/services/data/v58.0/limits`,
      { headers: { 'Authorization': `Bearer ${accessToken}` } }
    );

    expect(response.status).toBe(200);
    expect(response.data).toHaveProperty('DailyApiRequests');
  });

  it('should refresh expired tokens automatically', async () => {
    const newToken = await refreshAccessToken();
    expect(newToken).toBeTruthy();
    expect(typeof newToken).toBe('string');
  });
});
Key Takeaways and Business Impact
For Developers
- The Authorization Code + PKCE flow is your go-to for user-facing integrations; JWT Bearer is the gold standard for automated backend processes
- Always implement automatic token refresh — access tokens expire, and your integration must handle this gracefully
- Use dedicated integration users with minimal permissions rather than admin credentials
For Salesforce Administrators
- Connected App policies are your primary lever for controlling third-party access — use them
- Audit your Connected Apps regularly through Setup → Connected Apps OAuth Usage
- Leverage Event Monitoring to detect anomalous usage patterns
- Revoke Connected App access immediately when integrations are decommissioned
For Integration Architects
- Treat Connected Apps as first-class security boundaries, not just plumbing
- Design for token lifecycle management from day one — storage, rotation, revocation
- Use sandbox orgs to test OAuth flows before promoting to production
- Consider Salesforce’s Named Credentials feature as an alternative for Platform-native integrations
Business Value
When implemented correctly, Salesforce Connected App integrations deliver:
- Centralized access control — one place to manage all third-party integrations
- Audit trail compliance — every API call is traceable to a specific Connected App
- Scalability — OAuth tokens support millions of concurrent integrations without performance degradation
- Risk reduction — compromised tokens can be revoked without changing passwords or disrupting other systems
Conclusion
Setting up a Salesforce Connected App and implementing OAuth integration might seem complex at first glance, but with the right understanding of the components involved — app configuration, OAuth flow selection, token lifecycle management, and security hardening — it becomes a reliable, repeatable process that scales with your business.
The combination of Salesforce Connected App setup and robust Salesforce OAuth integration is what separates fragile, credential-based integrations from enterprise-grade, secure API ecosystems. Whether you’re syncing customer data between platforms, building a custom analytics pipeline, or enabling a mobile field service app, the Connected App framework gives you the control and security foundation to do it right.
At RizeX Labs, we specialize in architecting and implementing enterprise Salesforce integrations that are secure, scalable, and maintainable. If you’re starting a new integration project or need to modernize an existing one, reach out to our team — we’re ready to help you build it right from day one
About RizeX Labs
We are Pune’s leading IT training institute specializing in emerging technologies like Salesforce and data analytics. At RizeX Labs, we help professionals master tools like Salesforce Tableau CRM through hands-on training, real-world projects, and expert mentorship. Our programs are designed to transform learners into job-ready Salesforce professionals with strong analytical and reporting skills.
Internal Links
- Salesforce Admin & Development Training:
- Salesforce Apex Triggers: Beginner’s Guide with Real-Time Examples
- Salesforce Lightning Web Components (LWC) vs Aura: Which Should You Learn First?
External Links
- Salesforce official website
- Tableau CRM overview
- Trailhead learning platform
- Salesforce Help Docs (Reports)
Quick Summary
Connecting external tools to Salesforce requires a balance of agility and security. By mastering the Connected App framework and selecting the appropriate OAuth flow, you can build integrations that are both powerful and resilient against modern security threats.

