Introduction: The Mobile CRM Imperative
Your sales team closes deals in conference rooms, on client sites, and during travel. Your service agents respond to critical issues from the field. Yet many organizations still treat mobile CRM as an afterthought—a simplified version of the “real” desktop experience.

This approach leaves revenue on the table.
When executed properly, salesforce mobile app setup transforms how your teams work. Field reps update opportunities in real-time, managers approve requests instantly, and service technicians access knowledge articles at the point of service. The result? Faster decision cycles, improved data accuracy, and measurable productivity gains.
But here’s the challenge: Salesforce’s mobile platform offers tremendous flexibility, which means admins face dozens of configuration decisions. Get these wrong, and you’ll frustrate users with cluttered interfaces and missing functionality. Get them right, and you’ll deliver a mobile experience that drives adoption and business outcomes.
This guide provides technical depth on salesforce mobile configuration for administrators who need to deploy production-ready mobile solutions. We’ll cover architecture decisions, step-by-step setup procedures, and field-tested best practices that separate functional deployments from exceptional ones.
What is Salesforce Mobile App: Understanding the Platform Evolution

The Salesforce1 Legacy and Modern Mobile App
The Salesforce1 mobile platform launched in 2013 as Salesforce’s first unified mobile application. While Salesforce has since rebranded the consumer-facing app simply as “Salesforce Mobile App,” the underlying platform architecture—and many configuration interfaces—still reference the Salesforce1 framework.
Understanding this distinction matters for admins:
- Salesforce Mobile App (iOS/Android): The current downloadable application available in app stores
- Salesforce1 Platform: The underlying technology framework powering mobile customizations
- Mobile Browser Experience: The responsive web interface accessed via mobile browsers
All three leverage the same configuration settings you’ll establish as an admin, ensuring consistency across mobile access points.
Technical Architecture Overview
The Salesforce mobile platform operates on a metadata-driven architecture:
- Lightning components and Visualforce pages render within the mobile container
- Compact layouts control how record data displays in list views and highlights panels
- Quick actions expose functionality through optimized mobile UI patterns
- Mobile navigation menu provides the primary access structure
This architecture means your salesforce mobile app setup involves configuring metadata that shapes user experience across devices—not building separate mobile applications.
Supported Platforms and Requirements
Current support matrix:
- iOS 15.0 and later
- Android 8.0 and later
- Mobile browser access on Safari, Chrome, and Edge
Technical prerequisites:
- Salesforce Enterprise Edition or higher (Professional Edition with limitations)
- Proper user licenses and profiles
- Network connectivity (offline capabilities available with configuration)
Key Features of Salesforce Mobile Experience
Before diving into configuration, understanding platform capabilities helps you make informed architecture decisions.
Core Functionality
Real-time data access: The mobile app provides full CRUD operations on Salesforce objects, with data synchronization occurring in real-time when connected. Changes made mobile-side immediately reflect in the database.
Offline capabilities: With proper configuration, users can access cached records, make updates, and create new records while offline. The platform queues changes and synchronizes when connectivity returns.
Voice and productivity tools: Native integrations include:
- Click-to-call functionality
- Email composition with templates
- Calendar integration
- File attachment and viewing
- Barcode scanning
Mobile-Specific UI Patterns
Compact Layouts: These specialized page layouts control the limited screen real estate in mobile contexts, displaying the most critical 5-10 fields per object.
Quick Actions: Mobile-optimized actions appear as prominent buttons, streamlining common tasks like “Log a Call” or “Create Contact.”
Feed-first interface: The mobile app emphasizes Chatter feeds and activity timelines, recognizing that mobile users prioritize recent activity over comprehensive record details.
Advanced Capabilities
Lightning Mobile Actions: Custom Lightning components built specifically for mobile contexts, enabling complex workflows within native mobile UI.
Mobile Dashboards: Responsive dashboard rendering with touch-optimized filtering and drill-down capabilities.
Mobile Security: PIN protection, biometric authentication, and mobile-specific session timeout controls.
Enhanced Mobile Publisher: Streamlined action creation interface optimized for mobile consumption patterns.
Step-by-Step Salesforce Mobile App Setup for Admins
This section provides production-ready configuration procedures. Each step includes the technical rationale admins need to make appropriate decisions for their organization.
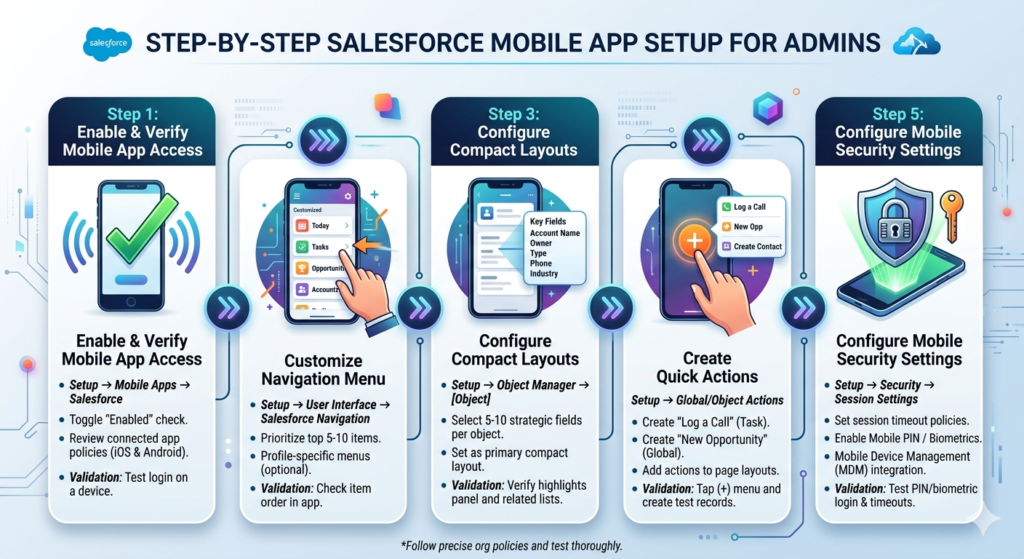
Step 1: Enable and Verify Mobile App Access
Navigate to: Setup → Mobile Apps → Salesforce → Salesforce Mobile App
Configuration tasks:
- Verify mobile app enablement (enabled by default in most orgs)
- Salesforce Mobile App toggle should show “Enabled”
- If disabled, enable and save
- Review connected app policies
- Navigate to Setup → Apps → Connected Apps → Salesforce for iOS and Android
- Verify “Permitted Users” setting aligns with organizational access policies
- Set IP relaxation and timeout policies appropriate for mobile use cases
- Configure mobile-only mode (optional)
- For field-only user populations, consider restricting desktop access
- Navigate to user profiles → Administrative Permissions
- Deselect “Enable Desktop Access” where appropriate
Technical consideration: Some organizations maintain separate profiles for mobile-only users. This approach simplifies license management but increases administrative overhead. Evaluate based on your user segmentation strategy.
Validation procedure:
- Create a test user with appropriate profile
- Download Salesforce Mobile App on test device
- Authenticate and verify successful login
- Confirm expected objects appear in navigation
Step 2: Customize the Mobile Navigation Menu
The navigation menu serves as the primary access point for mobile users. Unlike desktop navigation, mobile menus must balance comprehensiveness with usability constraints.
Navigate to: Setup → User Interface → Salesforce Navigation
Configuration procedure:
- Access navigation customization
- Click “Salesforce Navigation” in Setup
- The Navigation Menu editor displays available and selected items
- Add navigation items strategically
- Drag objects, Lightning pages, and Visualforce pages from Available Items
- Prioritize high-frequency access items (typically: Today, Tasks, Opportunities, Accounts, Contacts)
- Limit selected items to 15-20 maximum for usability
- Order items by user workflow
- Position most-accessed items at the top
- Group related objects together
- Consider user journey patterns (e.g., Leads → Opportunities → Accounts)
- Configure per-profile navigation (if needed)
- Create profile-specific navigation menus for differentiated user groups
- Navigate to individual profile settings
- Assign custom navigation menu under “Desktop and Mobile Settings”
Best practice navigation structure for sales users:
text1. Today (home page)
2. Tasks
3. Events
4. Opportunities
5. Accounts
6. Contacts
7. Leads
8. Dashboards
9. Reports
10. Chatter
11. Content
12. [Custom objects as needed]
Technical note: Navigation items appear in the “hamburger” menu on mobile. Users can access up to 50 items, but usability research indicates diminishing returns beyond 20 items. Prioritize ruthlessly.
Validation:
- Log into mobile app with test user
- Verify navigation menu shows only configured items
- Confirm item order matches configuration
- Test that all items navigate to expected destinations
Step 3: Configure Compact Layouts
Compact layouts determine which fields display in mobile card views, related lists, and the record highlights panel. This configuration directly impacts how quickly users can assess record information.
Navigate to: Setup → Object Manager → [Select Object] → Compact Layouts
Configuration for each major object:
- Create new compact layout
- Click “New” in Compact Layouts section
- Name descriptively (e.g., “Mobile_Account_View”)
- Select fields for display (5-10 field maximum)
- Select fields strategically
For Accounts:
- Account Name (always required)
- Account Owner
- Type
- Annual Revenue
- Industry
- Phone
For Contacts:
- Full Name (required)
- Account Name
- Title
- Phone
- Owner
For Opportunities:
- Opportunity Name (required)
- Account Name
- Stage
- Amount
- Close Date
- Owner
- Set as primary compact layout
- Return to Compact Layouts list page
- Click “Compact Layout Assignment”
- Assign your new compact layout as the Primary Compact Layout
- Save
- Create profile-specific assignments (optional)
- Use the Compact Layout Assignment button
- Assign different compact layouts to different profiles
- Example: Sales managers see forecast category; reps see next step
Technical considerations:
- Compact layouts support only certain field types (text, picklist, date, reference fields work well; long text areas and rich text don’t)
- Field-level security applies—fields hidden from users won’t display even if included
- The first field is always the object’s name field and cannot be changed
Advanced configuration: System Admin fields
Some admins include “Last Modified Date” or “Created Date” in compact layouts for audit purposes. Evaluate whether your mobile users need this metadata versus more business-relevant fields.
Validation:
- Open any record of the configured object in mobile app
- Verify the highlights panel shows your selected fields
- Check related list cards display compact layout fields
- Confirm field-level security works as expected
Step 4: Create Quick Actions for Common Tasks
Quick actions provide one-tap access to frequent operations. Properly configured actions dramatically reduce the steps required for mobile task completion.
Navigate to: Setup → User Interface → Global Actions (for global actions) or Object Manager → [Object] → Buttons, Links, and Actions (for object-specific actions)
Create a “Log a Call” action (object-specific):
- Navigate to Task object actions
- Object Manager → Task → Buttons, Links, and Actions
- Click “New Action”
- Configure action parameters
- Action Type: Create a Record
- Target Object: Task
- Label: “Log a Call”
- Name: Log_a_Call
- Design action layout
- Select fields to include in the action form
- Recommended fields: Subject, Related To, Name (Contact), Comments, Status
- Arrange fields in logical order
- Set predefined field values: Type = “Call”, Status = “Completed”
- Add action to page layouts
- Navigate to Object Manager → [Parent Object] → Page Layouts
- Edit relevant page layouts (Opportunity, Account, Contact)
- In the Salesforce Mobile and Lightning Experience Actions section, add your “Log a Call” action
- Save
Create a “New Opportunity” action (global):
- Create global action
- Setup → Global Actions → New Action
- Action Type: Create a Record
- Target Object: Opportunity
- Label: “New Opportunity”
- Configure action layout
- Essential fields: Opportunity Name, Account Name, Amount, Close Date, Stage
- Set predefined values: Stage = “Prospecting”
- Consider making Account Name a required field to enforce data quality
- Add to global publisher layout
- Setup → User Interface → Global Actions → Publisher Layouts
- Edit Global Layout
- Add “New Opportunity” action
- Position prominently in the action list
High-value quick actions for mobile:
- Log a Call (Task creation with predefined type)
- Send Email (Email action with templates)
- Create Contact (From Account context)
- Update Opportunity Stage (Update action with stage field only)
- Check In (Custom action logging location and timestamp)
- Submit for Approval (Submit for approval action)
Action layout optimization principles:
- Include 5-8 fields maximum
- Set intelligent predefined values to reduce data entry
- Use dependent picklists sparingly (they complicate mobile interaction)
- Make the most critical field appear first
- Consider making non-obvious required fields optional to reduce friction
Technical note on action types:
- Create actions: Generate new records (Tasks, Events, Contacts, etc.)
- Update actions: Modify existing records with focused field sets
- Log a Call actions: Specialized Task creation optimized for call logging
- Custom Visualforce/Lightning actions: Complex workflows requiring custom code
- Send Email actions: Email composition with template support
Validation:
- Open appropriate record in mobile app
- Tap the actions menu (+ button)
- Verify your action appears
- Create a test record through the action
- Confirm predefined values populate correctly
- Verify the created record contains expected data
Step 5: Configure Mobile Security Settings
Mobile security requires balancing accessibility with organizational security requirements. These configurations protect organizational data while maintaining user productivity.
Navigate to: Setup → Security → Session Settings
Configure mobile session timeout:
- Set timeout policy
- Timeout value: Consider 2-4 hours for mobile contexts
- Rationale: Mobile users frequently switch apps; overly aggressive timeouts create friction
- “Disable session timeout warning popup” consideration: Enable for mobile-primary users
- Enable “Lock sessions to the IP address from which they originated”
- Evaluate based on mobile workforce patterns
- Field teams with dynamic IPs may require this setting disabled
- Static office-based mobile users can enable for additional security
Configure mobile PIN protection:
Navigate to: Setup → Security → Session Settings → Advanced Settings (Require a minimum 1-minute session timeout for mobile apps)
- Enable PIN requirement
- Check “Require a minimum 1-minute session timeout for mobile apps”
- This forces users to create a PIN for mobile app access
- Configure PIN complexity (via Mobile Publisher settings)
- Navigate to Setup → Mobile Apps → Mobile Publisher
- Set minimum PIN length (recommendation: 4-6 digits)
- Configure failed attempt lockout threshold
Enable biometric authentication:
Navigate to: Setup → Identity → Authentication Configurations
- Create or edit authentication configuration
- Click “New Configuration” or edit existing
- Enable “Let users use biometric authentication”
- Apply to profiles
- In Authentication Configuration settings
- Select profiles that should use biometric authentication
- Save configuration
Configure mobile device management integration (if using MDM):
Navigate to: Setup → Security → Mobile Device Management
- Connect MDM provider
- Follow provider-specific integration instructions
- Common providers: Microsoft Intune, VMware Workspace ONE, MobileIron
- Set data protection policies
- Configure offline data caching limits
- Set data loss prevention rules
- Enable remote wipe capabilities
Mobile-specific connected app policies:
Navigate to: Setup → Apps → Connected Apps → Salesforce for iOS and Android → Manage
- Set session policies
- Session timeout: Configure based on organizational risk tolerance
- Refresh token policy: Set expiration for long-term access tokens
- Configure IP relaxation
- Enforce IP restrictions: Best for high-security environments
- Relax IP restrictions: Better for mobile workforces
- Middle ground: Restrict by geographic regions
- Set up mobile app activation
- Require user approval before mobile app access
- Useful for organizations needing to track device inventory
Data protection configurations:
Navigate to: Setup → Security → Platform Encryption (if using Shield)
- Enable encryption for fields containing sensitive data
- Note: Encrypted fields have limited mobile search capabilities
- Balance security requirements against mobile usability
Validation:
- Install Salesforce Mobile App on test device
- Verify PIN requirement triggers on first login
- Confirm biometric authentication works after PIN setup
- Test session timeout by leaving app idle
- Verify offline access restrictions work as configured
- Attempt login from unauthorized IP (if IP restrictions enabled)
Best Practices for Salesforce Mobile Configuration
Performance Optimization
Minimize layout complexity:
- Limit related lists on mobile page layouts to 3-5 most relevant
- Remove dashboard components and complex Visualforce from mobile layouts
- Use Lightning components specifically optimized for mobile rendering
Optimize ListView configuration:
- Create mobile-specific list views with fewer columns (3-5 maximum)
- Apply filters to reduce record sets returned to mobile devices
- Name mobile list views clearly (e.g., “My Opportunities – Mobile”)
Manage offline caching:
- Configure Offline Briefcase (Setup → Mobile Apps → Salesforce → Offline) for users who need offline access
- Limit cached record count to 2,000-5,000 based on device capabilities
- Select specific objects and recent records rather than full datasets
User Experience Design
Follow mobile-first design principles:
- Progressive disclosure: Show essential information first, detailed data on demand
- Thumb-friendly targets: Ensure buttons and actions are easily tappable
- Minimize text input: Use picklists, toggles, and quick actions instead of free text where possible
- Context awareness: Leverage location, time, and user context to pre-populate fields
Create mobile-specific page layouts:
Rather than using the same page layout for desktop and mobile:
- Navigate to Object Manager → [Object] → Page Layouts
- Clone existing layouts and append “_Mobile”
- Remove unnecessary sections and fields
- Assign mobile layouts specifically to mobile-active user profiles
Implement action categorization:
For objects with many quick actions:
- Group actions logically (Create, Update, Communicate)
- Position most-used actions first
- Remove desktop-specific actions from mobile layouts
Data Quality and Governance
Enforce data quality through mobile constraints:
- Make critical fields required in quick action layouts
- Use validation rules that provide clear, mobile-friendly error messages
- Implement dependent picklists to guide proper data entry
- Consider default values that represent the most common use cases
Create mobile-appropriate validation rules:
Poor mobile validation:
textError: "The Opportunity Stage must be set to 'Qualification' if the Probability is less than 20% and the Close Date is more than 60 days in the future, unless the Opportunity Amount exceeds $100,000 and the Type is 'New Customer'."
Good mobile validation:
textError: "Stage and Close Date don't match. Update one or contact your manager."
Profile and Permission Strategy
Segment mobile users strategically:
Create profiles or permission sets for:
- Field-only mobile users: Limited desktop access, full mobile functionality
- Mobile-heavy hybrid users: Full access with mobile-optimized defaults
- Manager mobile users: Approval-focused actions and dashboard access
- Part-time mobile users: Minimal mobile customization, desktop-primary configuration
Assign permissions granularly:
Use permission sets for mobile-specific capabilities:
- Offline access enablement
- Advanced mobile features (Einstein features, mobile scanning)
- Custom object mobile access
- Mobile-specific custom applications
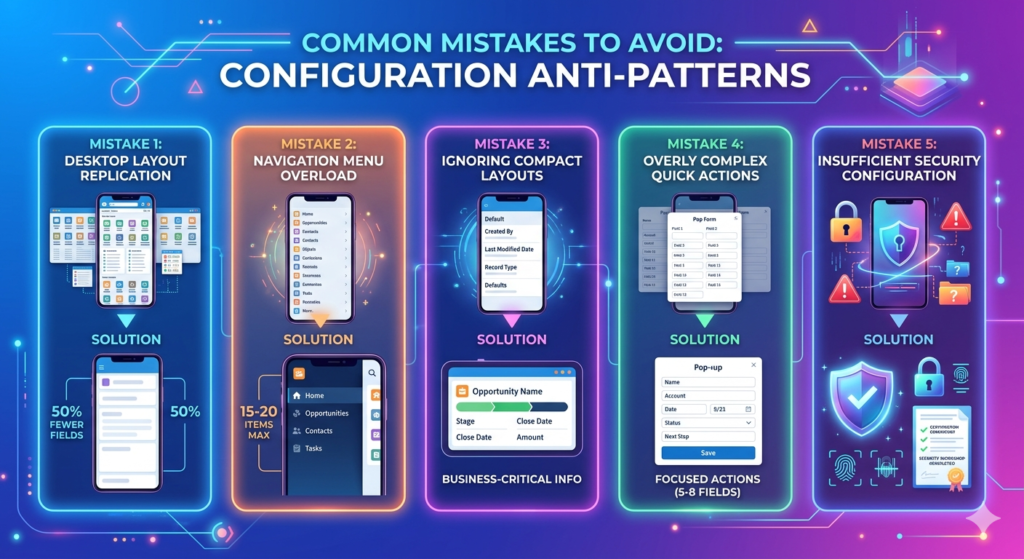
Common Mistakes to Avoid
Configuration Anti-Patterns
Mistake 1: Desktop layout replication
Many admins apply desktop page layouts directly to mobile contexts. This creates cluttered, difficult-to-navigate mobile experiences.
Solution: Create dedicated mobile page layouts with 50% fewer fields and sections. Focus on information density appropriate for 5-7 inch screens.
Mistake 2: Navigation menu overload
Including every available object in the mobile navigation menu creates cognitive overload and makes critical items difficult to find.
Solution: Limit navigation to 15-20 items maximum. Use the search function for infrequently accessed objects. Consider profile-specific navigation menus for distinct user groups.
Mistake 3: Ignoring compact layouts
Some admins never configure compact layouts, leaving Salesforce to display default field sets that often include low-value metadata instead of business-critical information.
Solution: Configure compact layouts for every standard and custom object accessible via mobile. Review and update quarterly based on user feedback.
Mistake 4: Overly complex quick actions
Creating quick actions with 15+ fields defeats the purpose of “quick” access and replicates the full record creation experience.
Solution: Limit quick actions to 5-8 fields. Use predefined values wherever possible. Create multiple focused actions rather than one comprehensive action.
Mistake 5: Insufficient security configuration
Leaving default mobile security settings often fails to meet organizational security requirements, creating compliance risks.
Solution: Conduct a mobile security requirements workshop with InfoSec stakeholders. Document required configurations and implement comprehensively before mobile rollout.
Organizational Anti-Patterns
Mistake 6: No mobile testing protocol
Deploying mobile configurations without testing on actual devices leads to broken layouts, missing actions, and frustrated users.
Solution: Establish a mobile testing protocol using:
- iOS and Android test devices representing your user base
- Multiple screen sizes (phone and tablet)
- Various OS versions
- Different network conditions (LTE, WiFi, offline)
Mistake 7: Missing user training
Assuming users will naturally discover mobile capabilities results in low adoption and underutilization of configured features.
Solution: Create mobile-specific training materials including:
- Video walkthroughs of common mobile workflows
- Quick reference cards for quick actions and shortcuts
- Profile-specific use case documentation
- Regular “mobile tips” communications
Mistake 8: Set-and-forget configuration
Mobile configuration requires ongoing refinement based on usage patterns, user feedback, and evolving business processes.
Solution: Implement quarterly mobile configuration reviews:
- Analyze mobile usage analytics (Setup → Mobile Apps → Salesforce → Adoption)
- Solicit user feedback through surveys or focus groups
- Review and update compact layouts, actions, and navigation
- Test new mobile features from Salesforce releases
Real-World Use Cases and Scenarios
Scenario 1: Field Sales Team Optimization
Organization: Mid-market B2B software company with 50 field sales representatives
Challenge: Sales reps spent 45+ minutes daily on administrative tasks—logging calls, updating opportunities, and creating follow-up tasks. This non-selling time represented $2.3M in lost productivity annually.
Mobile configuration solution:
- Navigation menu customization:
- Limited to: Today, Tasks, Events, Opportunities, Accounts, Contacts, Dashboards
- Removed: Leads, Campaigns, Forecasts (access via search when needed)
- Quick actions implemented:
- “Log Sales Call” (Task with predefined Type=Call, Subject template)
- “Update Stage” (Opportunity update with Stage, Next Step, Close Date)
- “Schedule Follow-up” (Event creation with 30-minute default duration)
- “Add Contact” (Contact creation from Account context with required fields only)
- Compact layout optimization:
- Opportunities: Name, Account, Stage, Amount, Close Date, Next Step
- Accounts: Name, Owner, Annual Revenue, Industry, Last Activity
- Contacts: Name, Title, Phone, Email, Last Touch
- Custom mobile dashboard:
- My Pipeline (current quarter opportunities)
- At Risk Deals (close date within 7 days, probability <50%)
- No Activity (accounts with no activity >30 days)
Results:
- Administrative time reduced to 15 minutes daily (66% reduction)
- Mobile adoption: 94% of sales team using app daily within 90 days
- Data quality improved: Opportunity stage updates occurred 3x more frequently
- Customer meeting productivity increased: Reps accessed customer history during meetings
Key configuration insight: The “Update Stage” quick action with only three fields (Stage, Next Step, Close Date) drove the highest usage. Simplicity proved more important than comprehensiveness.
Scenario 2: Service Technician Field Support
Organization: Enterprise HVAC equipment manufacturer with 200 field service technicians
Challenge: Technicians needed access to equipment history, service documentation, and knowledge articles while on-site. Previously, they carried printed documentation and called dispatch for information, creating service delays and customer satisfaction issues.
Mobile configuration solution:
- Custom object configuration:
- Equipment object with compact layout showing: Serial Number, Installation Date, Model, Warranty Status
- Service History object with compact layout showing: Date, Type, Technician, Summary
- Mobile-optimized page layouts:
- Work Orders: Reduced from 45 fields to 12 mobile-visible fields
- Knowledge Articles: Removed related lists, emphasized article content and attachments
- Quick actions for field service:
- “Check In” (custom action capturing GPS coordinates and timestamp)
- “Log Time” (time card creation with service categories)
- “Order Part” (parts request with photo attachment capability)
- “Complete Service” (Work Order update with completion fields and customer signature)
- Offline configuration:
- Enabled offline access for Work Orders, Equipment, and Knowledge
- Configured 30-day record caching for assigned work orders
- Pre-synced knowledge articles for common service issues
- Security configuration:
- Enabled biometric authentication for quick access
- 8-hour session timeout appropriate for field schedules
- Device-level encryption required via MDM integration
Results:
- First-time fix rate improved from 72% to 89%
- Average service call duration reduced by 18 minutes
- Customer satisfaction scores increased 23 points
- Dispatch calls reduced by 76%
Key configuration insight: Offline capability proved critical. Even with good cellular coverage, building equipment rooms often had poor signal. The 30-day caching window ensured technicians had access to complete service history.
Scenario 3: Executive Mobile Dashboards
Organization: Financial services firm with C-suite executives needing mobile access to business metrics
Challenge: Executives needed quick access to key performance indicators without navigating complex desktop dashboards. Previous mobile experience showed desktop dashboards that were unreadable on mobile devices.
Mobile configuration solution:
- Mobile-first dashboard design:
- Created separate mobile dashboards with maximum 4 components per dashboard
- Used large, single-metric components rather than multi-row tables
- Implemented drill-down pattern: summary dashboard → detail dashboard → record list
- Navigation customization:
- Executive profile navigation: Dashboards, Reports, Opportunities, Accounts
- Positioned dashboards first in navigation for immediate access
- Quick action focus:
- “Approve Opportunity” (approval action with comments)
- “Request Analysis” (Chatter post to analysts with tags)
- Minimal creation actions (executives consume more than create on mobile)
- Security hardening:
- 30-minute session timeout for executive profiles
- IP restriction to corporate and home networks
- Biometric authentication required
- Remote wipe enabled via MDM
- Compact layouts for executive context:
- Opportunities: Name, Owner, Amount, Stage, Probability, Risk Assessment
- Accounts: Name, Owner, Annual Revenue, Executive Sponsor, Health Score
Results:
- Executive mobile adoption: 100% within 30 days
- Average daily mobile sessions: 4.2 per executive
- Approval cycle time reduced from 36 hours to 4 hours average
- Executive team satisfaction with mobile CRM: 9.2/10
Key configuration insight: Executives needed information density, not simplification. Compact layouts with business-critical metrics outperformed simplified versions. The key was eliminating low-value metadata, not reducing information overall.
Scenario 4: Event-Based Mobile Deployment
Organization: Pharmaceutical company deploying field medical teams to industry conferences
Challenge: During conferences, medical liaisons needed to log physician interactions, schedule follow-ups, and access clinical documentation—all while moving between sessions and exhibitor halls.
Mobile configuration solution:
- Event-specific navigation:
- Created temporary profile with navigation focused on: Today, Physician Interactions (custom object), Calendar, Content
- Removed standard sales objects not relevant to medical liaisons
- Quick actions for event context:
- “Log Physician Interaction” (custom object record with predefined Event Name)
- “Schedule Meeting” (Event with physician contact and default location = conference venue)
- “Share Clinical Study” (Content distribution with tracking)
- Offline-first configuration:
- Pre-synced all physician contact records for expected attendees
- Cached clinical documentation in Content for offline access
- Configured queue-based sync for logged interactions
- Compact layout for event scanning:
- Physician custom object: Name, Institution, Specialty, Last Interaction Date, Interaction Count
- Simplified view enabled quick reference during conversations
- Location-based features:
- Enabled location services for “Check In” actions
- Used location data to analyze booth traffic patterns post-event
Results:
- Physician interaction logging increased 340% versus previous events
- Post-event follow-up completion rate: 87% (previous: 34%)
- Clinical content distribution tracked for compliance
- Event ROI analysis improved with granular interaction data
Key configuration insight: Temporary, event-specific configuration profiles proved more effective than trying to fit event workflows into standard sales profiles. Post-event, liaisons returned to standard profiles, but event data remained accessible.
Conclusion: Executing Your Salesforce Mobile App Setup
Effective salesforce mobile configuration transforms mobile CRM from a desktop afterthought into a productivity multiplier. The configurations detailed in this guide—navigation optimization, compact layouts, quick actions, and security hardening—create mobile experiences that users actually want to use.
Immediate action steps for admins:
- Audit current state (Week 1):
- Document existing mobile configuration
- Survey mobile users about pain points and missing functionality
- Review mobile usage analytics to identify adoption gaps
- Prioritize quick wins (Week 2):
- Configure compact layouts for your top 5 most-accessed objects
- Create 3-5 quick actions for highest-frequency tasks
- Optimize navigation menu by removing low-usage items
- Implement comprehensive configuration (Weeks 3-6):
- Roll out mobile-specific page layouts
- Configure security settings appropriate for your risk profile
- Set up offline access for field users
- Create mobile dashboards for key user personas
- Test rigorously (Week 7):
- Execute test protocols on iOS and Android devices
- Validate all quick actions create accurate records
- Confirm compact layouts display correctly across objects
- Test offline scenarios and data synchronization
- Train and deploy (Week 8):
- Create user documentation with screenshots and videos
- Conduct profile-specific training sessions
- Establish support channels for mobile-specific questions
- Communicate mobile capabilities and expectations
- Iterate and optimize (Ongoing):
- Monitor adoption metrics monthly
- Collect user feedback quarterly
- Update configurations based on usage patterns
- Evaluate new mobile features in Salesforce releases
Common implementation pitfall to avoid: Don’t try to achieve perfect configuration before launch. Deploy a solid foundation based on the configurations in this guide, then iterate based on actual usage. Real user behavior often differs from predicted behavior—your analytics will reveal optimization opportunities that planning alone cannot.
Measuring success:
Track these metrics to quantify your salesforce mobile app setup impact:
- Daily active mobile users (target: >80% for field-facing roles)
- Mobile records created/updated as % of total (increasing trend = success)
- Average session duration (2-5 minutes = users finding what they need efficiently)
- Quick action usage rates (>50 actions per user per week = good adoption)
- Time-to-complete common tasks (measure before/after mobile optimization)
The Salesforce mobile platform offers sophisticated capabilities that, when configured thoughtfully, deliver measurable business results. Use this guide as your technical foundation, adapt configurations to your specific organizational context, and commit to ongoing optimization based on user needs.
Your mobile CRM deployment isn’t complete when users can log in—it’s complete when mobile becomes the preferred interface for field-based workflows. Execute the configurations detailed here, and you’ll build that preference through superior user experience.
About RizeX Labs
At RizeX Labs, we specialize in delivering advanced Salesforce solutions with a strong focus on mobile-first enterprise experiences. Our expertise in Salesforce Mobile App setup enables organizations to extend CRM capabilities beyond desktops—empowering teams to work efficiently from anywhere.
We combine deep platform knowledge, real-world implementation experience, and best practices to configure secure, scalable, and high-performing mobile environments tailored to business needs.
Our goal is simple: transform Salesforce into a fully optimized mobile productivity engine that drives faster decision-making, improved user adoption, and real-time business visibility.
Internal Links:
- Salesforce Admin course page
- Salesforce Flows vs Apex: When Should You Use Code vs No-Code Automation?
- Salesforce Page Layouts vs Lightning App Builder
- Salesforce Custom Objects: Complete Build Guide for Beginners
- Salesforce Headless 360: The Complete Guide to Building the Agentic Enterprise
- Salesforce Email Templates: Complete Guide (Classic vs Lightning)
- Salesforce Queues: Setup and Use Cases Explained
External Links:
McKinsey Sales Growth Reports
Quick Summary
The Salesforce Mobile App transforms field productivity when configured strategically by administrators who understand mobile-specific requirements. Successful salesforce mobile app setup requires five critical configurations: customizing the navigation menu to 15-20 high-priority items, creating compact layouts with 5-10 business-critical fields per object, building quick actions limited to 5-8 fields with intelligent defaults, implementing appropriate security measures including PIN/biometric authentication and session timeouts, and designing mobile-specific page layouts that prioritize information density over comprehensiveness. Avoid common mistakes like replicating desktop layouts for mobile, overloading navigation menus, ignoring compact layouts, and deploying without device testing. Real-world implementations show that focused mobile configuration reduces administrative time by 60-70%, increases data quality through simplified data entry, and achieves 80%+ adoption rates when combined with user training. Success requires initial setup following these technical specifications, rigorous testing on actual iOS and Android devices, profile-specific training, and quarterly optimization based on usage analytics—not one-time configuration but ongoing refinement that makes mobile the preferred interface for field-based workflows.

