Introduction: Why Custom Objects Matter in Your Salesforce Journey
If you’ve been working with Salesforce, you’ve probably noticed that standard objects like Accounts, Contacts, and Opportunities don’t always capture everything your business needs. What happens when you need to track customer complaints, product warranties, event registrations, or project milestones? This is where custom objects become your secret weapon.

Custom objects allow you to extend Salesforce beyond its out-of-the-box capabilities, transforming it into a platform that perfectly mirrors your unique business processes. Think of them as building blocks that let you create a tailored CRM experience without writing a single line of code. Whether you’re tracking real estate properties, managing educational courses, or monitoring equipment maintenance schedules, custom objects give you the flexibility to capture, organize, and report on any type of data your business requires.
In this Salesforce custom objects guide, we’ll walk you through everything you need to know—from basic concepts to hands-on creation steps, relationships, and best practices that will set you up for success.
What Are Salesforce Custom Objects?
Before diving into the technical details, let’s clarify what custom objects actually are.
A custom object is essentially a database table that you create in Salesforce to store information specific to your organization. Just like standard objects (Account, Contact, Opportunity), custom objects have:
- Records (rows of data)
- Fields (columns that define what information you capture)
- Relationships (connections to other objects)
- Page layouts (how users view and interact with the data)
- Security settings (who can see and edit the data)
The key difference? You control exactly what data these objects store and how they behave.
Real-World Example
Imagine you run a property management company. Salesforce’s standard objects help you track clients (Contacts) and business accounts (Accounts), but you also need to manage:
- Individual properties with addresses, square footage, and rental rates
- Maintenance requests linked to specific properties
- Lease agreements with start dates, end dates, and terms
Each of these would be a separate custom object in your Salesforce data model, designed to capture the exact information you need.
Step-by-Step Guide: How to Create Custom Object Salesforce
Let’s walk through the actual process of building your first custom object. We’ll create a “Property” object for our property management example.
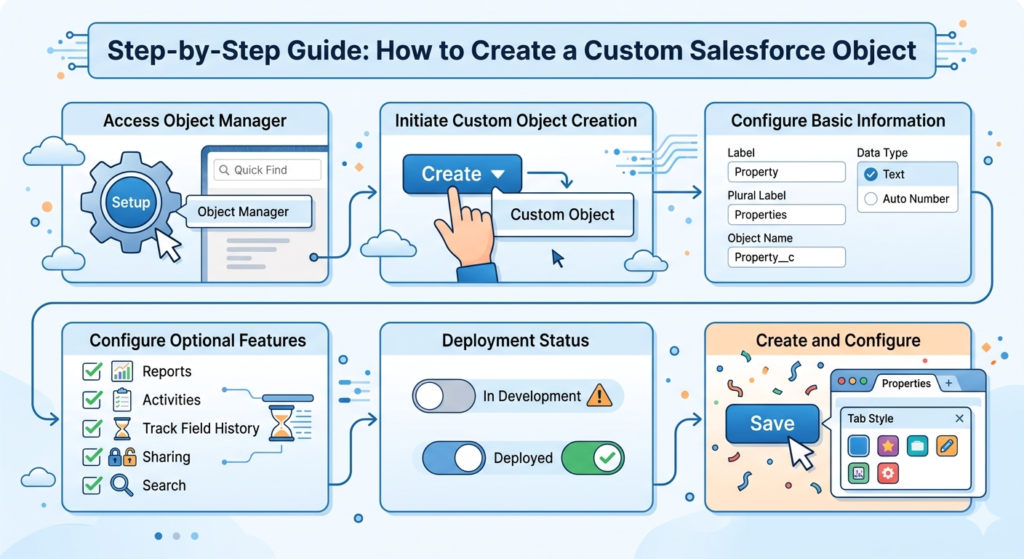
Step 1: Access Object Manager
- Log into your Salesforce org
- Click the gear icon in the upper right corner
- Select Setup
- In the Quick Find box (left sidebar), type “Object Manager”
- Click Object Manager
You’ll see a list of all standard and custom objects in your org.
Step 2: Initiate Custom Object Creation
- In Object Manager, click the Create dropdown in the upper right
- Select Custom Object
This opens the custom object creation wizard.
Step 3: Configure Basic Information
Fill in these essential fields:
Label: Property
- This is what users see in the interface
Plural Label: Properties
- How the object appears in tabs and reports
Object Name: Property
- The API name (automatically generated, can be modified)
- Note: Custom object API names end with “__c”
Record Name: Property Name
- What you call individual records
- Choose “Text” as the data type
Data Type: Text or Auto Number
- Text: You manually enter names
- Auto Number: Salesforce generates sequential numbers (like “PROP-0001”)
Step 4: Configure Optional Features
Salesforce presents several checkboxes for additional features:
✓ Allow Reports: Enable this to include your object in reports and dashboards
✓ Allow Activities: Check this if you want to log tasks and events related to records
✓ Track Field History: Useful for compliance—tracks who changed what and when
✓ Allow Sharing: Enables you to control record-level access
✓ Allow Bulk API Access: Important for data imports and integrations
✓ Allow Search: Makes records searchable in global search
✓ Launch New Custom Tab Wizard: Creates a tab for easy navigation
Step 5: Deployment Status
Choose your deployment status:
- In Development: Object is only visible to admins
- Deployed: Object is available to all users (based on permissions)
For new objects, start with “In Development” to test thoroughly before rolling out.
Step 6: Create and Configure
- Click Save
- If you selected the tab wizard, choose a tab style and visibility settings
- Click Save again
Congratulations! You’ve just created your first custom object.
Understanding Custom Fields and Field Types
Creating the object is just the beginning. Now you need to add custom fields to capture specific information.
Common Field Types Explained
When you click New in the Fields & Relationships section of your custom object, you’ll see numerous field types. Here are the most commonly used:
Text (up to 255 characters)
- Best for: Names, short descriptions, codes
- Example: Property Address, Unit Number
Text Area (Long)
- Best for: Detailed descriptions, notes
- Example: Property Description, Special Features
Number
- Best for: Quantities, counts, measurements
- Example: Square Footage, Number of Bedrooms
Currency
- Best for: Money values
- Example: Monthly Rent, Deposit Amount
Date and Date/Time
- Best for: Tracking when events occur
- Example: Lease Start Date, Last Inspection Date
Picklist
- Best for: Dropdown selections with predefined values
- Example: Property Type (Single Family, Condo, Townhouse)
Checkbox
- Best for: Yes/No, True/False situations
- Example: Pet Friendly, Parking Available
Email and Phone
- Best for: Contact information with built-in validation
- Example: Property Manager Email, Emergency Contact
Formula
- Best for: Calculated values based on other fields
- Example: Total Annual Rent (Monthly Rent × 12)
Lookup Relationship and Master-Detail Relationship
- Best for: Connecting objects together
- We’ll cover this in detail in the next section
Adding a Field: Quick Example
To add a “Monthly Rent” field:
- Go to your Property object in Object Manager
- Click Fields & Relationships in the left sidebar
- Click New
- Select Currency as the field type
- Click Next
- Enter Field Label: “Monthly Rent”
- Enter Length: 16 (default for currency)
- Decimal Places: 2
- Click Next
- Set field-level security (who can see/edit this field)
- Click Next
- Select page layouts where this field should appear
- Click Save
Understanding Relationships: Lookup vs Master-Detail
Relationships are what make your Salesforce data model powerful. They connect objects together, mirroring real-world business relationships.
Lookup Relationship
A lookup relationship creates a loose connection between two objects.
Characteristics:
- Creates a link between objects without ownership implications
- Child records can exist independently of parent records
- If you delete the parent, child records remain
- Doesn’t affect security or sharing settings
- You can have up to 40 lookup relationships per object
Real-World Example:
Create a lookup relationship from Property to Contact for “Property Manager”:
- A property can have a property manager (Contact)
- If the property manager leaves and you delete their contact, the property record remains
- The property manager field simply becomes empty
- Different properties can have different managers
When to Use Lookup:
- The relationship is optional or flexible
- Records should remain independent
- You need many-to-many relationships (using junction objects)
Master-Detail Relationship
A master-detail relationship creates a tight parent-child bond.
Characteristics:
- Child records cannot exist without a parent
- If you delete the parent, all child records are automatically deleted
- Security and sharing settings cascade from parent to child
- Parent field is required on child records
- Enables roll-up summary fields on the parent
- You can have up to 2 master-detail relationships per object
Real-World Example:
Create a master-detail relationship from Maintenance Request to Property:
- Every maintenance request must belong to a specific property
- If you delete the property, all its maintenance requests are deleted
- Users who can view the property can view its maintenance requests
- You can create a roll-up summary on Property showing “Total Maintenance Requests”
When to Use Master-Detail:
- There’s a clear parent-child ownership relationship
- Children should never exist without a parent
- You need to calculate totals on the parent (roll-up summaries)
- Security should flow from parent to child
Creating a Relationship: Step-by-Step
Let’s create a lookup relationship from Property to Contact:
- Go to your Property object in Object Manager
- Click Fields & Relationships
- Click New
- Select Lookup Relationship
- Click Next
- Choose “Contact” as the related object
- Click Next
- Enter Field Label: “Property Manager”
- Click Next
- Set field-level security
- Click Next
- Add to page layouts
- Optionally, add a related list to Contact page layouts (to show all properties managed by that contact)
- Click Save
How Custom Objects Fit Into the Salesforce Data Model
Understanding where custom objects fit in Salesforce’s architecture helps you design better solutions.
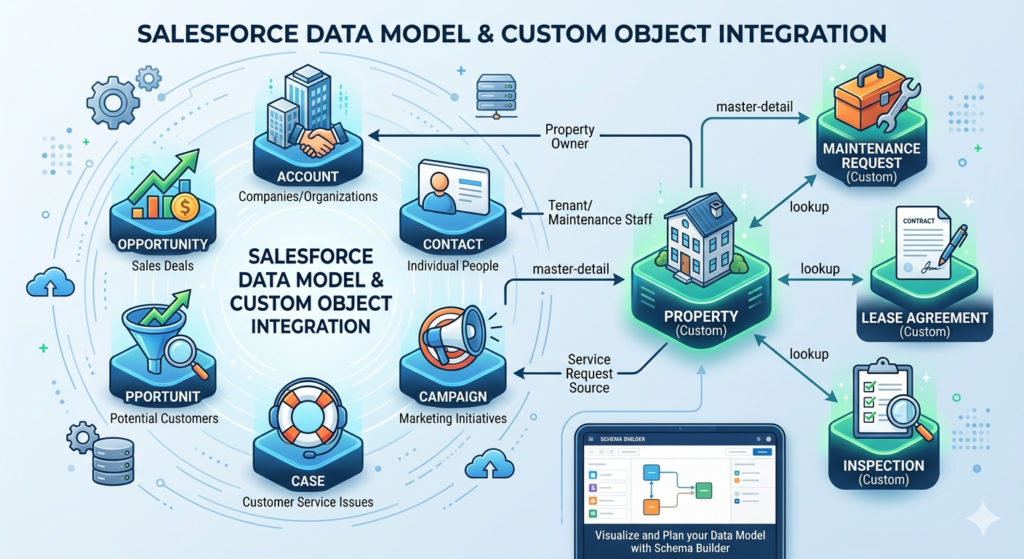
The Standard Object Foundation
Salesforce provides standard objects that form the core of the CRM:
- Account: Companies or organizations
- Contact: Individual people
- Opportunity: Sales deals
- Lead: Potential customers
- Case: Customer service issues
- Campaign: Marketing initiatives
Extending with Custom Objects
Custom objects extend this foundation by adding business-specific entities. They integrate seamlessly:
Relating to Standard Objects:
Your Property object might connect to:
- Account (property owner or management company)
- Contact (property manager, tenants, maintenance staff)
- Case (service requests or complaints)
Creating Complete Business Processes:
Example property management data model:
- Property (custom) → linked to Account (owner)
- Maintenance Request (custom) → master-detail to Property
- Lease Agreement (custom) → linked to Property and Contact (tenant)
- Inspection (custom) → linked to Property
This interconnected model gives you complete visibility into your business operations, with data flowing naturally between objects.
Schema Builder: Visualizing Your Data Model
Salesforce includes a visual tool to see your entire data model:
- Go to Setup
- Type “Schema Builder” in Quick Find
- Click Schema Builder
- Select objects to display
- Drag to arrange and visualize relationships
This tool is invaluable for planning and documenting your Salesforce data model.
Best Practices for Custom Objects
Following these best practices ensures your custom objects are maintainable, scalable, and professional.
Naming Conventions
Be Descriptive and Consistent:
❌ Bad: “Prop”, “Thing”, “Data”
✓ Good: “Property”, “Maintenance_Request”, “Lease_Agreement”
Use Underscores for Multi-Word Names:
❌ Bad: “maintenancerequest”
✓ Good: “Maintenance_Request”
Avoid Redundant Suffixes:
❌ Bad: “Property_Object”, “Property_Custom”
✓ Good: “Property”
Document Abbreviations:
If you use abbreviations (like “SLA” for Service Level Agreement), maintain a data dictionary explaining what they mean.
Security and Permissions
Start Restrictive:
Begin with limited access and expand as needed. It’s easier to grant permissions than to revoke them.
Use Permission Sets:
Instead of modifying profiles, create permission sets for custom object access. This gives you more flexibility.
Field-Level Security:
Some fields (like “Cost Basis” or “Commission Rate”) might need restriction even when users can see the object.
Sharing Settings:
Configure your object’s sharing settings appropriately:
- Private: Only owner can view
- Public Read Only: Everyone can view, only owner can edit
- Public Read/Write: Everyone can view and edit
Access this via Setup → Sharing Settings.
Scalability Considerations
Avoid Over-Customization:
Just because you can create unlimited custom objects doesn’t mean you should. Each object adds complexity.
Plan for Data Volume:
Custom objects can hold millions of records, but:
- Complex objects slow down performance
- Too many relationships create query complexity
- Consider archiving strategies for old data
Think About Reporting:
Design objects with reporting in mind. Will users need to count, sum, or group data? Structure your fields and relationships accordingly.
Governor Limits:
Salesforce imposes limits (like 100 SOQL queries per transaction). Complex data models can hit these limits, especially in automation.
Documentation
Create a Data Dictionary:
Document every custom object and field:
- Purpose and business use case
- Relationships to other objects
- Validation rules or automation
- Who requested it and when
Field Help Text:
Use the “Help Text” option when creating fields to guide users on what to enter.
Common Mistakes Beginners Make (and How to Avoid Them)
Learning from others’ mistakes saves time and headaches. Here are the most common pitfalls:
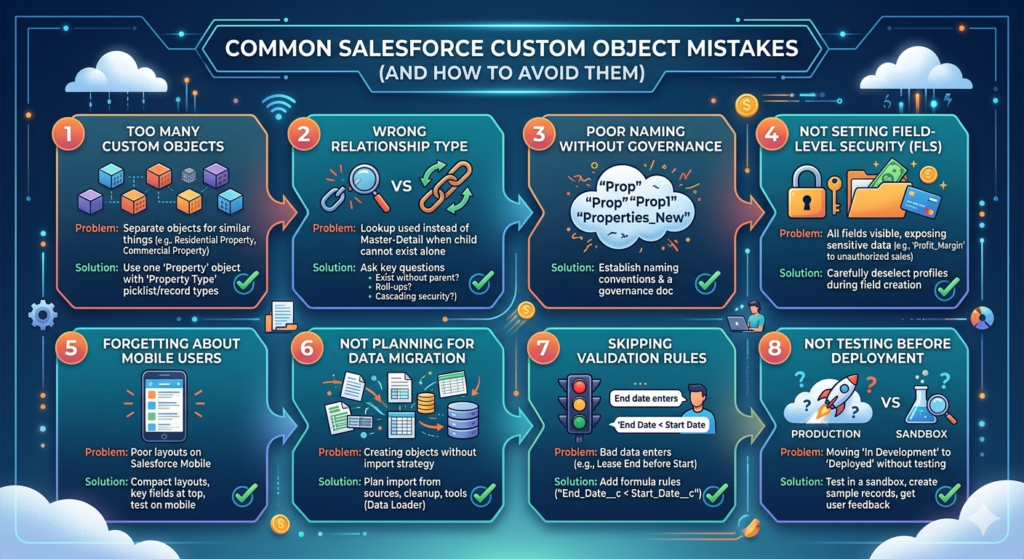
Mistake #1: Creating Too Many Custom Objects
The Problem:
Beginners sometimes create separate objects for things that could be a single object with a picklist or different record types.
Example:
Creating separate objects for “Residential_Property”, “Commercial_Property”, and “Industrial_Property” instead of one “Property” object with a “Property Type” picklist.
Solution:
Ask yourself: “Do these things have fundamentally different fields and processes?” If not, use one object with record types or classification fields.
Mistake #2: Choosing the Wrong Relationship Type
The Problem:
Using lookup when you need master-detail (or vice versa) causes issues later.
Example:
Creating a lookup from “Invoice Line Item” to “Invoice” means:
- Line items can exist without invoices (doesn’t make sense)
- You can’t create roll-up summaries for “Total Invoice Amount”
Solution:
Ask these questions:
- Can the child exist without the parent? → If no, use master-detail
- Do you need roll-up summaries? → If yes, use master-detail
- Should security cascade? → If yes, use master-detail
Mistake #3: Poor Naming Without Governance
The Problem:
Inconsistent naming creates confusion: “Prop”, “Property1”, “Properties_New”.
Solution:
Establish naming conventions before building, and document them. Create a simple governance document that all admins follow.
Mistake #4: Not Setting Field-Level Security
The Problem:
Making all fields visible to all users exposes sensitive data.
Example:
Creating “Purchase_Price” and “Profit_Margin” fields visible to sales reps who shouldn’t see financial details.
Solution:
When creating fields, carefully review the field-level security step and deselect profiles that shouldn’t have access.
Mistake #5: Forgetting About Mobile Users
The Problem:
Creating custom objects without considering how they’ll appear on Salesforce Mobile.
Solution:
- Keep page layouts compact
- Put the most important fields at the top
- Test on the Salesforce mobile app
- Use compact layouts to control which fields appear in highlights
Mistake #6: Not Planning for Data Migration
The Problem:
Creating an object without thinking about how to populate it with existing data.
Solution:
Before building, ask:
- Where is the data now? (Spreadsheets, legacy systems, etc.)
- How will we import it? (Data Loader, external tools)
- What data cleanup is needed first?
Mistake #7: Skipping Validation Rules
The Problem:
Not adding validation rules allows bad data to enter the system.
Example:
Allowing a “Lease End Date” that’s before the “Lease Start Date”.
Solution:
Add validation rules when creating objects:
- Go to your object in Object Manager
- Click Validation Rules
- Click New
- Create a formula:
End_Date__c < Start_Date__c - Set error message: “End date cannot be before start date”
Mistake #8: Not Testing Before Deployment
The Problem:
Moving objects from “In Development” to “Deployed” without thorough testing.
Solution:
- Test in a sandbox first (if available)
- Create sample records
- Test all relationships and page layouts
- Have end users provide feedback
- Gradually roll out to user groups
Real-World Implementation Example
Let’s put everything together with a complete example: Building a Customer Support Ticket System.
Business Requirement
A software company needs to track:
- Support tickets from customers
- Knowledge articles that help solve issues
- Resolutions and time spent
Custom Objects to Create
1. Support Ticket (custom object)
Fields:
- Ticket Number (auto-number)
- Subject (text)
- Description (long text area)
- Priority (picklist: Low, Medium, High, Critical)
- Status (picklist: New, In Progress, Waiting on Customer, Resolved)
- Account (lookup to Account)
- Contact (lookup to Contact)
- Assigned To (lookup to User)
- Date Opened (date/time)
- Date Closed (date/time)
2. Ticket Resolution (custom object)
Fields:
- Resolution Number (auto-number)
- Support Ticket (master-detail to Support Ticket)
- Resolution Notes (long text area)
- Hours Spent (number)
- Knowledge Article Used (lookup to Knowledge Article)
- Resolved By (lookup to User)
- Resolution Date (date/time)
Relationships
- Support Ticket → Account (lookup): Multiple tickets per account
- Support Ticket → Contact (lookup): Track who reported the issue
- Ticket Resolution → Support Ticket (master-detail): Resolutions can’t exist without tickets
- Roll-up summary on Support Ticket: “Total Hours Spent” (sum of hours from all resolutions)
Automation to Consider
- Validation Rule: Ticket can’t be marked “Resolved” without a Ticket Resolution record
- Workflow/Process Builder: Auto-assign tickets based on priority
- Auto-response: Email confirmation when ticket is created
This complete implementation shows how to create custom object Salesforce solutions that mirror real business processes.
Conclusion
Building custom objects in Salesforce is a transformative skill that empowers you to mold the platform around your organization’s unique needs rather than forcing your business processes into a rigid framework. Throughout this comprehensive Salesforce custom objects guide, we’ve journeyed from understanding the fundamental concept of custom objects to actually creating them step-by-step, configuring fields, establishing relationships, and implementing best practices that ensure long-term success.
The true power of custom objects lies not just in their ability to store data, but in how they connect to form a cohesive Salesforce data model that reflects the real-world relationships within your business. Whether you’re managing properties, tracking support tickets, monitoring inventory, or handling any specialized business function, the principles remain the same: plan thoughtfully, name consistently, secure appropriately, and always keep the end-user experience in mind.
Remember that learning to create custom object Salesforce solutions is an iterative process. Your first custom object might not be perfect, and that’s completely okay. Start with simple use cases, test thoroughly in a sandbox environment when possible, gather feedback from actual users, and refine your approach based on what you learn. The mistakes we’ve covered in this guide are stepping stones that every Salesforce administrator has encountered—by being aware of them upfront, you’re already ahead of the curve.
As you continue your Salesforce journey, custom objects will become one of your most valuable tools. They’re the building blocks that transform Salesforce from a powerful CRM into a comprehensive platform that handles every aspect of your business operations. Take the time to understand relationships deeply, invest in proper documentation, establish governance early, and always design with scalability in mind.
The skills you’ve gained from this guide form a solid foundation, but the real mastery comes from hands-on practice. Don’t be afraid to experiment in a developer org or sandbox, build out complete use cases, and challenge yourself to solve increasingly complex business requirements. Every custom object you create, every relationship you establish, and every field you configure adds to your expertise and makes you more valuable to your organization.
Salesforce’s declarative platform—the ability to build without code—puts incredible power in your hands. Custom objects are the cornerstone of that power. Use them wisely, follow best practices, and you’ll create solutions that not only meet today’s needs but adapt gracefully as your business evolves. Your journey to becoming a proficient Salesforce administrator starts here, one custom object at a time.
About RizeX Labs
At RizeX Labs, we specialize in delivering cutting-edge Salesforce solutions, including custom data modeling and scalable application development using Salesforce Custom Objects.
Our expertise combines deep technical knowledge, industry best practices, and real-world implementation experience to help businesses design flexible data models, streamline operations, and improve data visibility.
We empower organizations to move from rigid, standard-only setups to fully customized Salesforce environments that align perfectly with business needs and workflows.
Internal Links:
- Salesforce Admin course page
- Salesforce Flows vs Apex: When Should You Use Code vs No-Code Automation?
- Salesforce Data Cloud Explained — What It Is and Why It Matters
- AI Tools for Salesforce Development in 2026 — Cursor AI, Copilot and More
- Why Your Company Should Invest in Salesforce Developer Training in 2026
- Salesforce Named Credentials: What They Are and How to Use Them Safely
- Prompt Engineering for Salesforce Agentforce — Beginner’s Guide
External Links:
McKinsey Sales Growth Reports
Quick Summary
Custom objects are the foundation of tailoring Salesforce to your unique business needs. By understanding what custom objects are, following the step-by-step creation process, choosing the right field types and relationships, and adhering to best practices, you can build a robust Salesforce data model that scales with your organization. Remember to start simple, document thoroughly, and always consider the user experience—both desktop and mobile. Whether you're tracking properties, managing support tickets, or monitoring equipment, custom objects transform Salesforce from a one-size-fits-all CRM into a powerful platform perfectly aligned with how your business actually works. The key to success is thoughtful planning, consistent naming conventions, appropriate security settings, and learning from common mistakes before they impact your implementation.

