Introduction to Lightning Web Components
Welcome to the comprehensive Salesforce LWC tutorial that will transform you from a beginner to a confident Lightning Web Components developer in just 30 minutes. Whether you’re transitioning from Aura components or starting fresh with Salesforce development, this guide provides everything you need to create your first production-ready component.
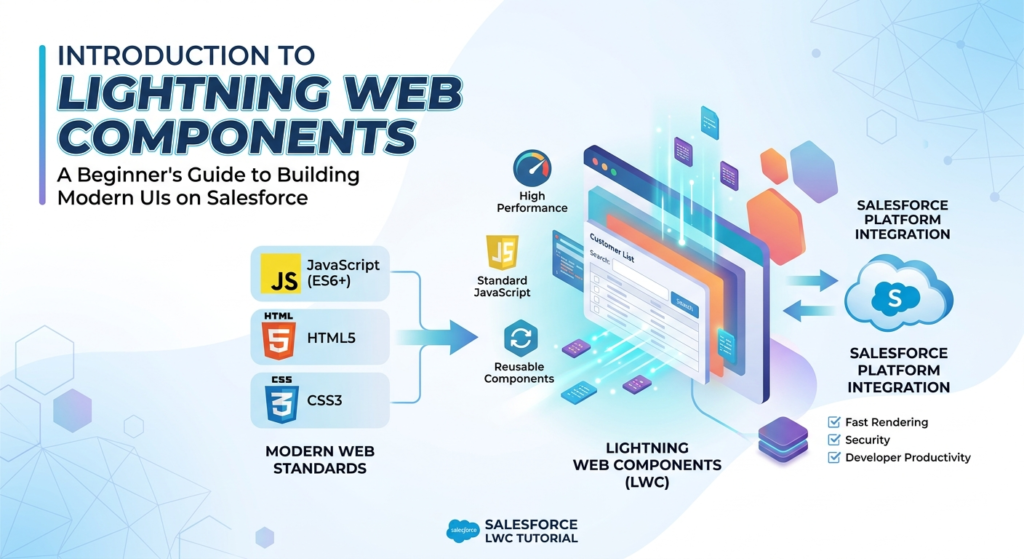
Lightning Web Components (LWC) represents Salesforce’s modern approach to building user interfaces, leveraging standard web technologies and modern JavaScript frameworks. Unlike its predecessor Aura, LWC offers superior performance, smaller bundle sizes, and a development experience that aligns perfectly with industry-standard web development practices.
In this lightning web components beginner guide, we’ll walk through the entire process of building a functional component from scratch, explaining every concept along the way. By the end of this tutorial, you’ll have created a working component and understood the fundamental architecture that powers Salesforce’s modern UI framework.
Why Choose Lightning Web Components Over Aura?
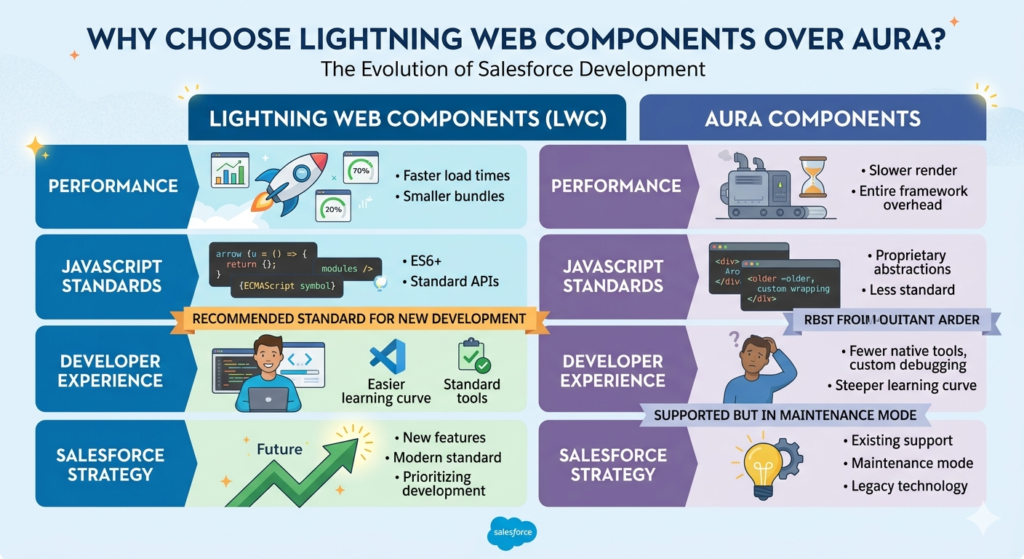
Before diving into code, let’s address the lwc vs aura debate that every Salesforce developer encounters. Understanding these differences will help you appreciate why LWC has become the recommended standard for new development.
Performance Advantages
Lightning Web Components deliver significantly faster load times and improved runtime performance. While Aura components require the entire framework to load before rendering, LWC components leverage native browser capabilities, resulting in:
- 50-70% smaller JavaScript bundles compared to equivalent Aura components
- Faster initial rendering due to native DOM manipulation
- Reduced memory footprint through efficient component lifecycle management
- Better mobile performance on resource-constrained devices
Modern JavaScript Standards
LWC embraces ECMAScript standards rather than creating proprietary abstractions. This means:
- Using native JavaScript modules instead of custom wrapping
- Leveraging ES6+ features like arrow functions, destructuring, and promises
- Working with standard DOM APIs familiar to any web developer
- Easier debugging with standard browser developer tools
Developer Experience
The lightning web components beginner journey is significantly smoother than learning Aura because:
- Smaller learning curve for developers familiar with HTML, CSS, and JavaScript
- Better IDE support with Visual Studio Code extensions providing autocomplete and error detection
- Clearer component structure with explicit imports and exports
- Standard testing frameworks like Jest for unit testing
Salesforce’s Strategic Direction
Salesforce has made it clear that LWC represents the future:
- All new features are built with LWC first
- Performance optimizations focus on LWC
- Documentation and resources prioritize LWC examples
- Aura remains supported but is in maintenance mode
Prerequisites and Environment Setup
Before building your first component, ensure your development environment is properly configured. This salesforce lwc tutorial assumes basic familiarity with JavaScript and HTML.
Required Tools
Salesforce CLI (Command Line Interface)
The Salesforce CLI is your primary tool for creating, deploying, and managing LWC components. Download it from the official Salesforce website and verify installation:
Bashsfdx --version
Visual Studio Code
Microsoft’s VS Code is the recommended editor, offering excellent Salesforce integration. Install the “Salesforce Extension Pack” which includes:
- Salesforce CLI Integration
- Lightning Web Components syntax highlighting
- Code snippets and autocomplete
- Built-in debugging capabilities
Node.js and npm
LWC development requires Node.js (version 14 or higher) for running local development servers and testing frameworks:
Bashnode --version
npm --version
Salesforce Org Access
You’ll need access to a Salesforce org for deployment. Developer Edition orgs are free and perfect for learning. Create one at developer.salesforce.com if you don’t already have access.
Authorize Your Org
Connect your development environment to your Salesforce org:
Bashsfdx auth:web:login -a MyDevOrg
This opens a browser window for authentication and creates a connection alias “MyDevOrg” for easy reference.
Project Initialization
Create your first Salesforce DX project:
Bashsfdx force:project:create -n lwcTutorialProject
cd lwcTutorialProject
This generates a project structure with the necessary configuration files and folder hierarchy.
Understanding LWC Architecture
Before writing code, understanding LWC’s architecture ensures you build components that follow best practices and integrate seamlessly with Salesforce.
Component Structure
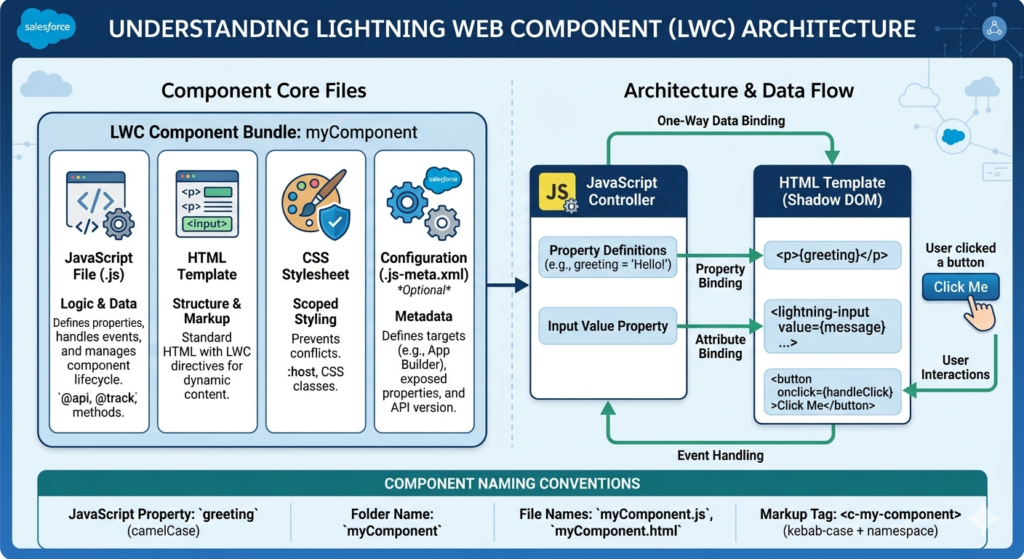
Every Lightning Web Component consists of three core files, all sharing the same base name:
JavaScript File (.js)
Contains the component’s logic, data handling, and lifecycle methods. This is where you define properties, handle events, and implement business logic.
HTML Template (.html)
Defines the component’s structure and markup. Unlike Aura’s tag-based approach, LWC templates use standard HTML with special directives for dynamic content.
CSS Stylesheet (.css)
Provides component-specific styling with automatic scoping to prevent style conflicts across components.
Optional Configuration File (.js-meta.xml)
Defines metadata about where and how the component can be used within Salesforce, including:
- Supported targets (Lightning App Builder, Experience Builder, etc.)
- Exposed properties for configuration
- API version
Component Naming Conventions
Lightning Web Components follow strict naming conventions:
- Component names use camelCase (myFirstComponent)
- Folder names match the component name exactly
- File names use the component name as prefix (myFirstComponent.js)
- Element names in markup use kebab-case with namespace (c-my-first-component)
Data Binding Fundamentals
LWC uses one-way data binding by default, meaning data flows from JavaScript to template. This explicit approach prevents unexpected side effects and makes components easier to debug.
Property Binding
Reference JavaScript properties in templates using curly braces:
HTML<p>{propertyName}</p>
Attribute Binding
Set HTML attributes dynamically:
HTML<input value={inputValue} />
Event Handling
Respond to user interactions with event handlers:
HTML<button onclick={handleClick}>Click Me</button>
Building Your First Component: Task Manager
Let’s build a practical component that demonstrates core LWC concepts. Our task manager will allow users to add, display, and remove tasks—showcasing data binding, event handling, and conditional rendering.
Step 1: Create the Component
Navigate to your project’s force-app/main/default/lwc directory and create the component:
Bashsfdx force:lightning:component:create -n taskManager -d force-app/main/default/lwc
This generates the three core files in a new taskManager folder.
Step 2: Build the HTML Template
Open taskManager.html and create the component structure:
HTML<template>
    <lightning-card title="My Task Manager" icon-name="standard:task">
        <div class="slds-m-around_medium">
            <!-- Input Section -->
            <div class="slds-grid slds-gutters slds-m-bottom_small">
                <div class="slds-col slds-size_10-of-12">
                    <lightning-input
                        type="text"
                        label="New Task"
                        placeholder="Enter task description"
                        value={newTaskName}
                        onchange={handleTaskNameChange}>
                    </lightning-input>
                </div>
                <div class="slds-col slds-size_2-of-12 slds-align-bottom">
                    <lightning-button
                        variant="brand"
                        label="Add Task"
                        onclick={addTask}
                        disabled={isAddDisabled}>
                    </lightning-button>
                </div>
            </div>

            <!-- Task List Section -->
            <template if:true={hasTasks}>
                <div class="task-list">
                    <template for:each={tasks} for:item="task">
                        <div key={task.id} class="slds-box slds-m-bottom_x-small task-item">
                            <div class="slds-grid slds-grid_align-spread">
                                <div class="slds-col">
                                    <p class="slds-text-heading_small">{task.name}</p>
                                    <p class="slds-text-color_weak slds-text-body_small">
                                        Created: {task.createdDate}
                                    </p>
                                </div>
                                <div class="slds-col slds-no-flex">
                                    <lightning-button-icon
                                        icon-name="utility:delete"
                                        alternative-text="Delete"
                                        variant="bare"
                                        onclick={deleteTask}
                                        data-id={task.id}>
                                    </lightning-button-icon>
                                </div>
                            </div>
                        </div>
                    </template>
                </div>
            </template>

            <!-- Empty State -->
            <template if:false={hasTasks}>
                <div class="slds-text-align_center slds-m-vertical_large">
                    <p class="slds-text-color_weak">No tasks yet. Add your first task above!</p>
                </div>
            </template>

            <!-- Task Counter -->
            <div class="slds-m-top_medium slds-text-align_center">
                <p class="slds-text-body_regular">
                    Total Tasks: <strong>{taskCount}</strong>
                </p>
            </div>
        </div>
    </lightning-card>
</template>
Template Analysis:
The template demonstrates several key lwc examples concepts:
Lightning Design System Components: We use lightning-card, lightning-input, lightning-button, and lightning-button-icon—pre-built components that provide consistent Salesforce styling.
Conditional Rendering: The if:true and if:false directives control what displays based on whether tasks exist, showing either the task list or an empty state message.
List Rendering: The for:each directive iterates over the tasks array, requiring a unique key attribute for performance optimization.
Data Binding: Curly braces {propertyName} bind JavaScript properties to the template, automatically updating the display when data changes.
Step 3: Implement JavaScript Logic
Open taskManager.js and add the component logic:
JavaScriptimport { LightningElement, track } from 'lwc';

export default class TaskManager extends LightningElement {
    // Reactive property for the new task input
    newTaskName = '';

    // Tracked array to store tasks
    @track tasks = [];

    // Counter for generating unique task IDs
    taskIdCounter = 0;

    // Computed property to check if tasks exist
    get hasTasks() {
        return this.tasks.length > 0;
    }

    // Computed property for task count
    get taskCount() {
        return this.tasks.length;
    }

    // Computed property to disable Add button when input is empty
    get isAddDisabled() {
        return !this.newTaskName || this.newTaskName.trim() === '';
    }

    // Handle input field changes
    handleTaskNameChange(event) {
        this.newTaskName = event.target.value;
    }

    // Add new task to the list
    addTask() {
        if (this.newTaskName.trim()) {
            // Create new task object
            const newTask = {
                id: this.generateTaskId(),
                name: this.newTaskName.trim(),
                createdDate: this.formatDate(new Date())
            };

            // Add to tasks array
            this.tasks = [...this.tasks, newTask];

            // Clear input field
            this.newTaskName = '';
        }
    }

    // Delete task from the list
    deleteTask(event) {
        const taskId = event.currentTarget.dataset.id;
        this.tasks = this.tasks.filter(task => task.id !== taskId);
    }

    // Generate unique task ID
    generateTaskId() {
        return `task-${++this.taskIdCounter}-${Date.now()}`;
    }

    // Format date to readable string
    formatDate(date) {
        const options = {
            year: 'numeric',
            month: 'short',
            day: 'numeric',
            hour: '2-digit',
            minute: '2-digit'
        };
        return date.toLocaleDateString('en-US', options);
    }
}
JavaScript Deep Dive:
Import Statement: We import LightningElement as the base class and track for reactive arrays. All LWC components extend LightningElement.
Reactive Properties: Properties defined in the class automatically trigger template updates when their values change. No special decorator needed for primitives.
@track Decorator: Used for arrays and objects to ensure the template re-renders when their contents change (in older LWC versions; newer versions track by default).
Getter Methods: Computed properties that recalculate whenever their dependencies change. Perfect for derived values like hasTasks and isAddDisabled.
Event Handlers: Methods that respond to user interactions. The naming convention handle[Action] improves code readability.
Immutability Pattern: this.tasks = [...this.tasks, newTask] creates a new array rather than mutating the existing one, ensuring reactivity works correctly.
Step 4: Add Styling
Open taskManager.css and enhance the component’s appearance:
CSS.task-list {
    max-height: 400px;
    overflow-y: auto;
    padding: 0.5rem 0;
}

.task-item {
    background-color: var(--lwc-colorBackground);
    border-left: 3px solid var(--lwc-brandAccessible);
    transition: all 0.2s ease;
}

.task-item:hover {
    box-shadow: 0 2px 8px rgba(0, 0, 0, 0.1);
    transform: translateY(-2px);
}

.slds-align-bottom {
    display: flex;
    align-items: flex-end;
}

.task-list::-webkit-scrollbar {
    width: 8px;
}

.task-list::-webkit-scrollbar-track {
    background: var(--lwc-colorBackgroundAlt);
    border-radius: 4px;
}

.task-list::-webkit-scrollbar-thumb {
    background: var(--lwc-colorBorder);
    border-radius: 4px;
}

.task-list::-webkit-scrollbar-thumb:hover {
    background: var(--lwc-colorBorderDark);
}
CSS Best Practices:
CSS Variables: Using var(--lwc-colorBackground) and other CSS custom properties ensures components adapt to different Salesforce themes.
Scoped Styles: LWC automatically scopes CSS to prevent conflicts with other components on the page.
Responsive Design: The grid system adapts to different screen sizes, maintaining usability across devices.
Accessibility: Proper hover states and focus indicators improve user experience for keyboard navigation.
Step 5: Configure Component Metadata
Open taskManager.js-meta.xml and define where the component can be used:
XML<?xml version="1.0" encoding="UTF-8"?>
<LightningComponentBundle xmlns="http://soap.sforce.com/2006/04/metadata">
    <apiVersion>58.0</apiVersion>
    <isExposed>true</isExposed>
    <targets>
        <target>lightning__AppPage</target>
        <target>lightning__RecordPage</target>
        <target>lightning__HomePage</target>
        <target>lightningCommunity__Page</target>
    </targets>
    <masterLabel>Task Manager</masterLabel>
    <description>A simple task management component for learning LWC basics</description>
</LightningComponentBundle>
Metadata Configuration:
isExposed: Must be true for the component to appear in Lightning App Builder.
targets: Defines where the component can be added (app pages, record pages, home pages, Experience Cloud sites).
masterLabel: The display name shown in Lightning App Builder.
apiVersion: Specifies which Salesforce API version the component uses.
Step 6: Deploy to Salesforce
Deploy your component to your Salesforce org:
Bashsfdx force:source:deploy -p force-app/main/default/lwc/taskManager -u MyDevOrg
Verify successful deployment by checking the output message. If errors occur, review the error messages carefully—they typically indicate syntax errors or missing dependencies.
Step 7: Add to a Lightning Page
Navigate to Setup → Lightning App Builder and create a new Lightning page or edit an existing one. Find your “Task Manager” component in the component list and drag it onto the page canvas. Save and activate the page to see your component in action.
Advanced LWC Concepts for Real-World Applications
Now that you’ve built a functional component, let’s explore advanced concepts that separate lightning web components beginner developers from professionals.
Component Communication
Real applications require components to communicate with each other. LWC provides several patterns:
Parent to Child Communication
Pass data down through public properties decorated with @api:
JavaScript// Child Component
import { LightningElement, api } from 'lwc';

export default class ChildComponent extends LightningElement {
    @api messageFromParent;
}
HTML<!-- Parent Template -->
<template>
    <c-child-component message-from-parent={parentData}></c-child-component>
</template>
Child to Parent Communication
Dispatch custom events that parent components can listen for:
JavaScript// Child Component
fireEventToParent() {
    const event = new CustomEvent('childaction', {
        detail: { data: 'Information from child' }
    });
    this.dispatchEvent(event);
}
HTML<!-- Parent Template -->
<template>
    <c-child-component onchildaction={handleChildEvent}></c-child-component>
</template>
Sibling Communication
Use Lightning Message Service for components that don’t have a direct parent-child relationship:
JavaScriptimport { LightningElement, wire } from 'lwc';
import { publish, MessageContext } from 'lightning/messageService';
import SAMPLE_CHANNEL from '@salesforce/messageChannel/SampleChannel__c';

export default class PublisherComponent extends LightningElement {
    @wire(MessageContext)
    messageContext;

    publishMessage() {
        const payload = { recordId: this.recordId };
        publish(this.messageContext, SAMPLE_CHANNEL, payload);
    }
}
Working with Salesforce Data
Most components need to interact with Salesforce data. LWC provides multiple approaches:
Lightning Data Service (LDS)
The recommended approach for standard CRUD operations, automatically handling caching and synchronization:
JavaScriptimport { LightningElement, wire, api } from 'lwc';
import { getRecord, getFieldValue } from 'lightning/uiRecordApi';
import NAME_FIELD from '@salesforce/schema/Account.Name';
import INDUSTRY_FIELD from '@salesforce/schema/Account.Industry';

export default class RecordViewer extends LightningElement {
    @api recordId;

    @wire(getRecord, { recordId: '$recordId', fields: [NAME_FIELD, INDUSTRY_FIELD] })
    account;

    get accountName() {
        return getFieldValue(this.account.data, NAME_FIELD);
    }
}
Apex Imperative Calls
For complex queries or business logic that exceeds LDS capabilities:
JavaScriptimport { LightningElement } from 'lwc';
import getAccounts from '@salesforce/apex/AccountController.getAccounts';

export default class AccountList extends LightningElement {
    accounts = [];
    error;

    connectedCallback() {
        this.loadAccounts();
    }

    async loadAccounts() {
        try {
            this.accounts = await getAccounts();
        } catch (error) {
            this.error = error;
        }
    }
}
Wire Service with Apex
Combines the reactivity of wire service with custom Apex:
JavaScriptimport { LightningElement, wire } from 'lwc';
import getAccountsByIndustry from '@salesforce/apex/AccountController.getAccountsByIndustry';

export default class IndustryAccounts extends LightningElement {
    selectedIndustry = 'Technology';

    @wire(getAccountsByIndustry, { industry: '$selectedIndustry' })
    accounts;
}
Lifecycle Hooks
Understanding component lifecycle hooks enables precise control over initialization, rendering, and cleanup:
constructor()
Called when the component instance is created. Use for initializing non-reactive properties:
JavaScriptconstructor() {
    super();
    this.configData = this.loadConfiguration();
}
connectedCallback()
Invoked when the component is inserted into the DOM. Perfect for initial data loading:
JavaScriptconnectedCallback() {
    this.loadData();
    this.setupEventListeners();
}
renderedCallback()
Called after every render. Use cautiously as it fires frequently:
JavaScriptrenderedCallback() {
    if (!this.chartInitialized) {
        this.initializeChart();
        this.chartInitialized = true;
    }
}
disconnectedCallback()
Triggered when the component is removed from the DOM. Essential for cleanup:
JavaScriptdisconnectedCallback() {
    this.removeEventListeners();
    this.clearTimers();
}
errorCallback(error, stack)
Catches errors in descendant components:
JavaScripterrorCallback(error, stack) {
    console.error('Component error:', error);
    this.showErrorMessage = true;
}
Testing Your Components
Professional lwc examples always include comprehensive tests. LWC uses Jest as its testing framework.
Setting Up Jest
Install the LWC testing tools:
Bashnpm install @salesforce/sfdx-lwc-jest --save-dev
Update package.json with test scripts:
JSON{
    "scripts": {
        "test:unit": "sfdx-lwc-jest",
        "test:unit:watch": "sfdx-lwc-jest --watch",
        "test:unit:debug": "sfdx-lwc-jest --debug"
    }
}
Writing Unit Tests
Create a __tests__ folder within your component directory and add taskManager.test.js:
JavaScriptimport { createElement } from 'lwc';
import TaskManager from 'c/taskManager';

describe('c-task-manager', () => {
    afterEach(() => {
        while (document.body.firstChild) {
            document.body.removeChild(document.body.firstChild);
        }
    });

    it('displays empty state when no tasks exist', () => {
        const element = createElement('c-task-manager', {
            is: TaskManager
        });
        document.body.appendChild(element);

        const emptyState = element.shadowRoot.querySelector('.slds-text-color_weak');
        expect(emptyState).not.toBeNull();
        expect(emptyState.textContent).toContain('No tasks yet');
    });

    it('adds task when Add Task button is clicked', () => {
        const element = createElement('c-task-manager', {
            is: TaskManager
        });
        document.body.appendChild(element);

        const input = element.shadowRoot.querySelector('lightning-input');
        input.value = 'Test Task';
        input.dispatchEvent(new CustomEvent('change'));

        const button = element.shadowRoot.querySelector('lightning-button');
        button.click();

        return Promise.resolve().then(() => {
            const tasks = element.shadowRoot.querySelectorAll('.task-item');
            expect(tasks.length).toBe(1);
        });
    });

    it('deletes task when delete button is clicked', async () => {
        const element = createElement('c-task-manager', {
            is: TaskManager
        });
        document.body.appendChild(element);

        // Add a task first
        const input = element.shadowRoot.querySelector('lightning-input');
        input.value = 'Task to Delete';
        input.dispatchEvent(new CustomEvent('change'));

        const addButton = element.shadowRoot.querySelector('lightning-button');
        addButton.click();

        await Promise.resolve();

        // Delete the task
        const deleteButton = element.shadowRoot.querySelector('lightning-button-icon');
        deleteButton.click();

        await Promise.resolve();

        const tasks = element.shadowRoot.querySelectorAll('.task-item');
        expect(tasks.length).toBe(0);
    });
});
Run tests with:
Bashnpm run test:unit
Performance Optimization
As your salesforce lwc tutorial knowledge grows, optimizing component performance becomes crucial.
Lazy Loading
Import modules only when needed:
JavaScripthandleShowChart() {
    import('c/chartComponent')
        .then(({ default: ChartComponent }) => {
            this.loadChart(ChartComponent);
        })
        .catch(error => console.error('Error loading chart', error));
}
Minimize Rerenders
Use getters strategically and avoid unnecessary computations:
JavaScript// Bad - recalculates on every render
get expensiveCalculation() {
    return this.data.reduce((sum, item) => sum + item.value, 0);
}

// Better - cache the result
_cachedTotal = 0;
_dataVersion = 0;

get optimizedCalculation() {
    if (this._dataVersion !== this.data.length) {
        this._cachedTotal = this.data.reduce((sum, item) => sum + item.value, 0);
        this._dataVersion = this.data.length;
    }
    return this._cachedTotal;
}
Virtualization for Large Lists
When displaying hundreds or thousands of items, use virtual scrolling libraries or implement custom virtualization:
JavaScript// Only render visible items plus buffer
get visibleItems() {
    const start = Math.max(0, this.scrollPosition - this.bufferSize);
    const end = Math.min(this.items.length, this.scrollPosition + this.visibleCount + this.bufferSize);
    return this.items.slice(start, end);
}
Common Pitfalls and Solutions
Learning from common mistakes accelerates your lightning web components beginner journey.
Shadow DOM Styling Limitations
Problem: Global styles don’t penetrate shadow DOM boundaries.
Solution: Use CSS custom properties or Lightning Design System tokens:
CSS/* Component CSS */
.custom-element {
    color: var(--lwc-brandAccessible, #0176d3);
}
Async Data Handling
Problem: Template tries to render before data loads, causing errors.
Solution: Use conditional rendering and optional chaining:
HTML<template if:true={data}>
    <p>{data.name}</p>
</template>

<template if:false={data}>
    <lightning-spinner alternative-text="Loading"></lightning-spinner>
</template>
Event Bubbling Issues
Problem: Events don’t bubble through shadow DOM boundaries by default.
Solution: Set bubbles: true and composed: true:
JavaScriptconst event = new CustomEvent('customaction', {
    detail: { data: this.data },
    bubbles: true,
    composed: true
});
this.dispatchEvent(event);
Memory Leaks
Problem: Event listeners and timers persist after component destruction.
Solution: Always clean up in disconnectedCallback:
JavaScriptconnectedCallback() {
    this.intervalId = setInterval(() => this.updateData(), 5000);
}

disconnectedCallback() {
    if (this.intervalId) {
        clearInterval(this.intervalId);
    }
}
Next Steps in Your LWC Journey
Congratulations on completing this comprehensive salesforce lwc tutorial! You’ve built a functional component, learned core concepts, and explored advanced patterns. Here’s how to continue your growth:
Expand Your Component Library
Build increasingly complex components:
- Data tables with sorting and filtering
- Charts and visualizations using third-party libraries
- Form builders with validation
- File uploaders with progress tracking
Master Salesforce Integration
Deepen your understanding of platform integration:
- Work with custom objects and fields
- Implement record editing and creation
- Use platform events for real-time updates
- Integrate with external APIs through Apex
Contribute to the Community
Share your knowledge and learn from others:
- Publish components to AppExchange
- Answer questions on Salesforce StackExchange
- Write blog posts about your solutions
- Contribute to open-source LWC projects
Earn Certifications
Validate your expertise with official credentials:
- Salesforce Platform Developer I
- Salesforce JavaScript Developer I
- Salesforce Platform Developer II
Conclusion
Lightning Web Components represents the future of Salesforce development, combining the power of modern web standards with enterprise-grade platform capabilities. This salesforce lwc tutorial has equipped you with the foundational knowledge and practical skills to build production-quality components.
Remember that mastery comes through practice. Start small, build consistently, and gradually tackle more complex challenges. The component we built today—simple yet functional—demonstrates the core patterns you’ll use throughout your LWC career.
Whether you’re comparing lwc vs aura for migration planning or starting fresh as a lightning web components beginner, you now have the tools and knowledge to succeed. The examples and patterns in this guide serve as templates for countless real-world scenarios you’ll encounter.
Keep experimenting, stay curious, and leverage the extensive Salesforce developer resources available. Your journey from beginner to expert developer starts with that first component—and you’ve just built yours in 30 minutes.
Happy coding, and welcome to the vibrant world of Lightning Web Components development!
About RizeX Labs
At RizeX Labs, we specialize in delivering cutting-edge Salesforce solutions with a strong focus on modern UI development using Lightning Web Components (LWC). Our expertise combines deep technical knowledge, real-world implementation experience, and best practices to help businesses build scalable, high-performance Salesforce applications.
We empower developers and organizations to move from outdated Aura components to efficient, reusable, and lightning-fast LWCs that enhance user experience and accelerate development cycles.
Internal Links:
- Salesforce Admin course page
Salesforce Flows vs Apex: When Should You Use Code vs No-Code Automation? - Salesforce Nonprofit Cloud: Features, Use Cases, and Career Opportunities (2026 Guide)
- Salesforce Net Zero Cloud: What It Is and Why It’s the Next Green Career Niche (2026 Guide)
- Salesforce Slack Integration: How It Works and What Developers Need to Know
- Salesforce Named Credentials: What They Are and How to Use Them Safely
- Salesforce Deployment Best Practices: Change Sets vs Salesforce CLI vs Gearset
External Links:
McKinsey Sales Growth Reports
Gartner Sales Automation Insights
Quick Summary
This 30-minute Salesforce LWC tutorial equips beginners to build production-ready components, starting with a breakdown of LWC’s advantages over Aura (performance, modern JS standards, better developer experience) and required setup tools. It covers core LWC architecture, including component structure, naming conventions, and data binding fundamentals, then walks through building a practical Task Manager component with key features like conditional rendering, list iteration, event handling, and computed properties. The guide also includes deployment steps, advanced concepts (component communication, Salesforce data integration via LDS/Apex, lifecycle hooks), Jest testing, performance optimization tips, common pitfalls to avoid, and next steps for advancing LWC skills—ultimately empowering users to transition from beginner to confident LWC developer aligned with Salesforce’s strategic future.

