Introduction to Salesforce Marketing Cloud Journey Builder
Modern customers do not experience brands in straight lines. They discover you through a social ad, visit your website, sign up for a newsletter, abandon a shopping cart, receive a follow-up email, and maybe make a purchase three weeks later — all across different devices, channels, and moments. Marketing that does not account for this complexity feels generic, out of sync, and forgettable.
This is precisely the problem that Salesforce Marketing Cloud Journey Builder was built to solve.
Journey Builder is the marketing automation engine within Salesforce Marketing Cloud (SFMC) that allows you to design intelligent, multi-step, multi-channel customer experiences that adapt based on each individual’s behavior, preferences, and engagement. Instead of sending a single email blast to your entire list and hoping for the best, Journey Builder lets you craft dynamic, personalized experiences that respond to what customers actually do — in real time.
For marketers who have heard about Journey Builder but do not know where to start, the tool can seem intimidating at first. The interface is feature-rich. The terminology is specific. And the potential complexity of what you can build is vast.
But here is the reassuring truth: building your first journey in SFMC is more approachable than it looks — especially when you understand the core components and follow a structured process.
This guide is your complete SFMC Journey Builder tutorial — designed for beginners who want to move from zero to confidently building and activating their first customer journey. We will cover what Journey Builder is, why it matters, how its components work, and a practical, step-by-step walkthrough for building your first journey from scratch.
Let us build something great.
What Is Journey Builder in SFMC?
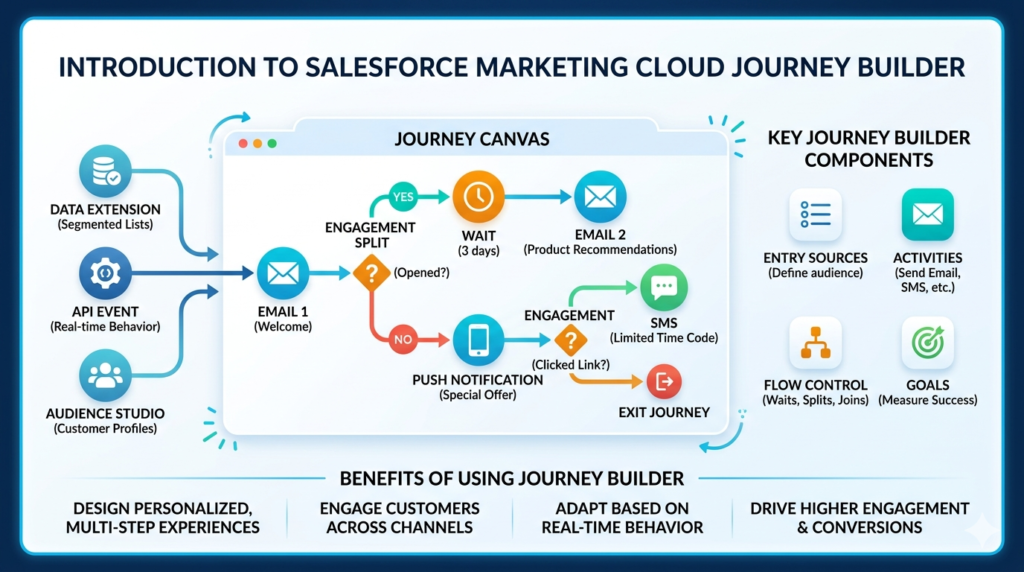
Journey Builder is a campaign automation tool within Salesforce Marketing Cloud that enables marketers to create automated, multi-channel customer journeys. It provides a visual canvas — a drag-and-drop interface — where you can design the complete experience a customer has with your brand over time, mapping out each touchpoint, decision point, and communication across their lifecycle.
At its core, Salesforce Marketing Cloud Journey Builder operates on a simple but powerful idea: instead of organizing your marketing around what you want to say, organize it around what your customer does and needs. A customer who opens a welcome email gets a different next step than one who ignores it. A customer who clicks a product link receives a more targeted follow-up than one who does not. Every action — or inaction — shapes what happens next.
Journey Builder sits within SFMC’s broader ecosystem alongside tools like:
- Email Studio — for creating email content and templates
- MobileConnect — for SMS messaging
- MobilePush — for push notifications
- Audience Builder — for segmentation
- Analytics Builder — for measuring journey performance
Journey Builder is the orchestration layer that ties all of these together into a coherent, automated customer experience.
Why Journey Builder Is Important for Customer Engagement
Before diving into the SFMC Journey Builder tutorial, it is worth understanding why this tool has become central to modern marketing strategy.
Personalization at scale is the most compelling reason. Manually personalizing communication for thousands or millions of customers is impossible without automation. Journey Builder allows you to set the rules once and deliver individualized experiences to every customer based on their unique behavior and data — automatically.
Multi-channel consistency ensures your customers receive a coherent experience regardless of whether they interact with you via email, SMS, push notification, or advertising. Journey Builder coordinates all of these channels within a single automated flow.
Timing and relevance are dramatically improved when messaging is triggered by customer behavior rather than scheduled on a marketer’s calendar. A welcome email sent five minutes after signup performs significantly better than one sent three days later as part of a weekly batch send.
Revenue impact is measurable and meaningful. Organizations using sophisticated customer journey automation consistently report higher conversion rates, improved customer retention, and stronger lifetime value metrics compared to batch-and-blast marketing approaches.
Efficiency for marketing teams is an often-underappreciated benefit. Once a journey is built and activated, it runs automatically — freeing marketers to focus on strategy, content, and optimization rather than manual execution.
For anyone studying the Salesforce Marketing Cloud Journey Builder for the first time, understanding these business benefits provides important context for why the investment in learning the tool pays off quickly.
Key Components of Salesforce Marketing Cloud Journey Builder
To use the SFMC Journey Builder tutorial effectively, you first need to understand the core building blocks of any journey. Think of these as the vocabulary you need to speak the language of Journey Builder fluently.
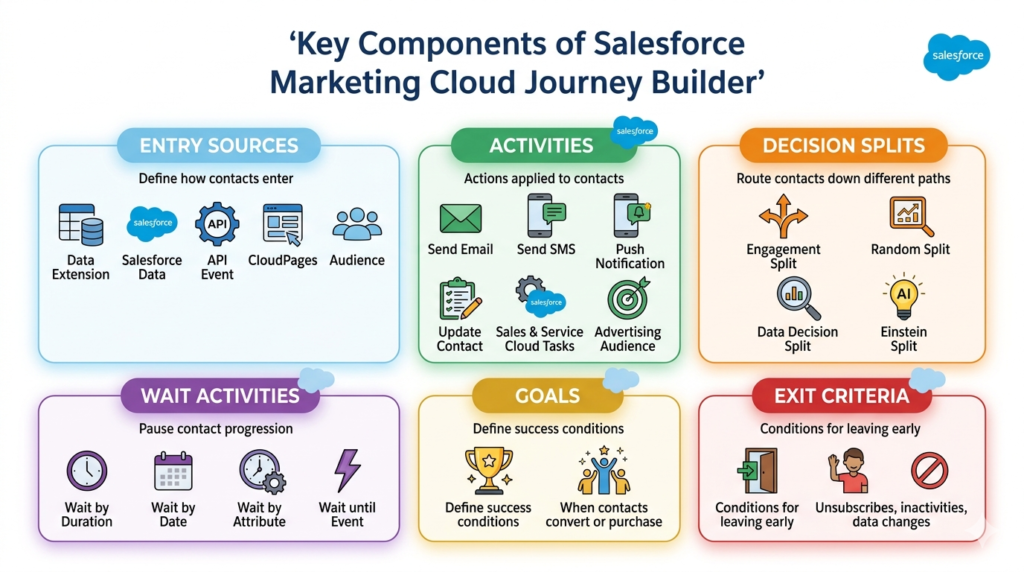
Entry Sources
Entry Sources define how and when contacts enter your journey. They are the starting point of every customer experience you build in Salesforce Marketing Cloud Journey Builder. The main entry source types are:
- Data Extension Entry — Contacts are added from a Salesforce Marketing Cloud Data Extension. This is the most common entry source and supports both scheduled (one-time batch entry) and triggered (real-time, event-based entry) modes
- Salesforce Data Entry — Contacts enter based on changes or events in Salesforce CRM, such as a lead being created or an opportunity closing
- API Entry — Contacts enter via an API call, typically used for real-time triggers from external systems or websites
- CloudPages Entry — Contacts enter after submitting a CloudPages form, such as a landing page sign-up
- Audience Entry — Contacts enter based on audience segments defined in Audience Builder
Activities
Activities are the actions that happen to a contact as they move through your journey. They appear as blocks on the journey canvas and include:
- Send Email — Sends a specific email to the contact at that point in the journey
- Send SMS — Sends a text message via MobileConnect
- Push Notification — Sends a push notification via MobilePush
- Update Contact — Updates a field or attribute in the contact’s data record
- Sales and Service Cloud Activities — Creates tasks, cases, or leads in Salesforce CRM
- Advertising Audience — Adds or removes contacts from advertising audiences on connected platforms
Decision Splits
Decision Splits are the intelligence layer of Salesforce Marketing Cloud Journey Builder. They evaluate conditions about each contact and route them down different paths based on the results. Types of Decision Splits include:
- Engagement Split — Routes contacts based on their interaction with a previous activity (opened email, clicked link, did not open)
- Random Split — Divides contacts randomly between paths, useful for A/B testing
- Decision Split — Routes contacts based on data attributes in their contact record or data extension
- Einstein Split — Uses AI-powered predictions to route contacts based on likelihood to engage, convert, or churn
Wait Activities
Wait Activities pause a contact’s progression through the journey for a defined period before the next activity fires. Types include:
- Wait by Duration — Pauses for a set amount of time (e.g., 3 days, 12 hours)
- Wait by Date — Pauses until a specific date or date attribute on the contact’s record
- Wait by Attribute — Pauses until a condition in the contact’s data changes
- Wait until Event — Pauses until a specific behavior or event occurs
Goals and Exit Criteria
Goals define what success looks like for your journey. When a contact meets the goal condition (e.g., makes a purchase, completes a form), they are marked as having achieved the goal and optionally exited from the journey.
Exit Criteria define conditions under which contacts should leave the journey regardless of where they are — for example, if they unsubscribe, become inactive, or meet a specific data condition that makes continued messaging inappropriate.
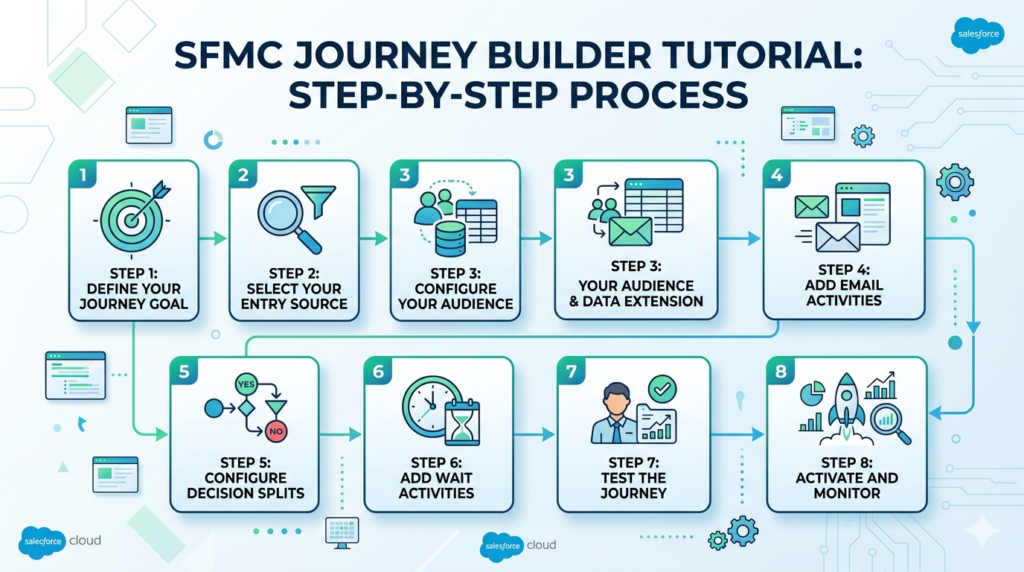
SFMC Journey Builder Tutorial: Step-by-Step Process
Now let us build your first journey. This SFMC Journey Builder tutorial walks through a realistic welcome email series for new subscribers — one of the most common and valuable journeys any marketer can build.
Scenario: A contact signs up for your email newsletter. You want to send them a welcome email immediately, follow up with a product introduction email two days later (only if they opened the first email), and send a special offer email to anyone who did not open the welcome email after four days.
Step 1: Define Your Journey Goal
Before you open Journey Builder, start with clarity on paper.
Answer these questions:
- What is the purpose of this journey? (Example: Welcome new subscribers and drive their first product engagement)
- Who is the audience? (Example: Contacts who have just subscribed to the newsletter)
- What does success look like? (Example: Contact clicks a product link within the first 7 days)
- What channels will you use? (Example: Email)
- How long should the journey run? (Example: 7 days from entry)
Write your goal in a single sentence: “Deliver a three-part welcome series to new subscribers that educates them about our brand and drives at least one product click within 7 days.”
This clarity will guide every decision you make as you build the journey in Salesforce Marketing Cloud Journey Builder.
Step 2: Select Your Entry Source
Log into Salesforce Marketing Cloud and navigate to Journey Builder from the main navigation. Click Create New Journey, give it a descriptive name (e.g., “Welcome Series — Newsletter Subscribers”), and select Multi-Step Journey.
On the journey canvas, click the Entry Source block at the top.
For this tutorial, select Data Extension as your entry source. You will need a Data Extension that contains your new subscribers. Configure the following:
- Data Extension: Select the Data Extension that captures new newsletter sign-ups
- Entry Mode: Select Re-entry if you want the same contact to be able to re-enter the journey if they subscribe again later; select No Re-entry if each contact should only go through the journey once
- Schedule: For a triggered welcome journey, set the entry to run at defined intervals (e.g., every 15 minutes) to pick up new subscribers in near real-time
Important: Ensure your Data Extension has a Contact Key or Subscriber Key field to identify unique contacts. This is essential for Salesforce Marketing Cloud Journey Builder to process contacts correctly.
Step 3: Configure Your Audience and Data Extension
The quality of your journey depends directly on the quality of your data. Before activating, verify that your entry Data Extension:
- Contains all the fields your journey will reference (First Name for personalization, Email Address for sending, Sign-Up Date for timing)
- Is properly linked to your Marketing Cloud Contact record
- Has been filtered to include only the contacts you intend to target (new subscribers only, not your entire list)
- Has been tested with sample records to confirm the correct contacts are being captured
If you are using a triggered entry source connected to a form or API, work with your developer to confirm that the Data Extension is being populated correctly before you build the journey logic around it.
Step 4: Add Email Activities
Now it is time to build the messaging layer of your journey.
Welcome Email (Immediate)
Drag a Send Email activity from the left panel onto the canvas, connecting it directly to the Entry Source. Configure:
- Email: Select your pre-built welcome email from Email Studio (create this in Email Studio first if you have not already)
- From Name and From Email: Set the appropriate sender information
- Subject Line: Confirm the subject line and preheader text
- Suppression List: Add any suppression lists to exclude unsubscribes
Pro tip for your first SFMC Journey Builder tutorial experience: Build and test all your email content in Email Studio before starting Journey Builder. Trying to build emails and a journey simultaneously slows you down and increases the chance of errors.
Product Introduction Email (Day 2)
After the Decision Split (which we will configure in the next step), you will add a second Send Email activity on the “Opened” path. This email introduces your key products or services in more detail. Configure it the same way, selecting your product introduction email.
Special Offer Email (Day 4 — Non-Openers)
On the “Did Not Open” path, you will add a third Send Email activity with a subject line and offer designed to re-engage contacts who did not respond to the first email.
Step 5: Configure Decision Splits
This is where your journey becomes intelligent. After the Welcome Email activity, add a Wait Activity of 1 day (to give contacts time to open the email), then add an Engagement Split.
Configure the Engagement Split as follows:
- Split Name: “Opened Welcome Email?”
- Path 1 — Yes: Contact opened the welcome email → Route to Product Introduction Email path
- Path 2 — No: Contact did not open the welcome email → Route to Re-engagement path
How to configure the split:
- Click the Decision Split block on the canvas
- Select Engagement Split
- Reference the Welcome Email activity you created in Step 4
- Set the condition: Email Opened = True for Path 1
- The remaining contacts automatically flow to Path 2
This split is what makes your journey adaptive. Contacts who are already engaged receive content that deepens that engagement. Contacts who have not yet responded receive a second attempt designed to capture their attention.
For more advanced journeys, you can add additional splits — for example, splitting the “Opened” group further based on whether they clicked a specific link, creating an even more targeted follow-up sequence.
Step 6: Add Wait Activities
Wait activities control the timing of your journey and ensure contacts receive messages at appropriate intervals rather than in rapid succession.
Configure these waits in your journey:
- Wait 1 day between the Welcome Email and the Engagement Split (giving contacts 24 hours to open the email before the split evaluates)
- Wait 1 day on the “Opened” path before sending the Product Introduction Email (so contacts receive it on Day 2, not immediately after the split)
- Wait 3 days on the “Did Not Open” path before sending the Special Offer Email (giving contacts the benefit of the doubt for a few days before the re-engagement attempt on Day 4)
Important configuration note: When adding a Wait by Duration activity, specify both the duration and the delivery window — the time of day within which the next activity can fire. Setting a delivery window of 9 AM to 6 PM in the contact’s local time zone ensures emails do not arrive at 3 AM, which can hurt engagement rates significantly.
Step 7: Test the Journey
Testing is non-negotiable before activating any journey in Salesforce Marketing Cloud Journey Builder. A journey that fires incorrectly can send emails to wrong audiences, trigger duplicate sends, or skip contacts entirely.
Testing steps:
- Use Preview and Test in Email Studio to verify each email renders correctly across email clients and devices
- In Journey Builder, click Test Mode at the top of the canvas. Test Mode allows you to simulate contacts moving through the journey without sending real emails
- Add a small test group (your own email addresses and colleagues’) to a test Data Extension
- Run the journey in Test Mode with your test contacts and verify:
- Contacts enter the journey correctly
- Emails are sent to the right people at the right times
- Decision Splits route contacts correctly based on engagement behavior
- Wait times are configured as expected
- Check the journey’s Activity History to confirm each step processed correctly
Do not skip this step. Testing is one of the most important skills to develop as you progress beyond your first SFMC Journey Builder tutorial experience.
Step 8: Activate and Monitor
Once testing is complete and you are confident the journey is configured correctly, click Activate to make the journey live.
After activation:
- Monitor the Journey Dashboard — Journey Builder provides real-time statistics on contacts in journey, contacts who have completed each activity, goal achievement rate, and exit counts
- Check Email Performance in Analytics Builder — Open rates, click rates, and conversion data give you insight into how your messaging is performing
- Review Error Reports — Journey Builder flags contacts who could not be processed (e.g., missing email address, suppression list match) so you can investigate and resolve issues
- Check back at 24, 48, and 72 hours after activation to verify the journey is flowing correctly and contacts are progressing as expected
Your first journey is now live. Congratulations — you have completed the core SFMC Journey Builder tutorial workflow.
Real-World Customer Journey Example
To illustrate how Salesforce Marketing Cloud Journey Builder applies beyond the welcome series example, here is a real-world use case from a retail financial services brand:
Journey: New Savings Account Onboarding
- Entry Source: API trigger fires when a new savings account is opened in the core banking system
- Day 0: Welcome email with account details, online banking setup guide, and mobile app download link
- Day 1 Engagement Split: Did the customer click the mobile app download link?
- Yes → Send a “Getting Started with Mobile Banking” email
- No → Send a simplified “3 Easy Ways to Access Your Account” email
- Day 3: SMS reminder to complete account setup (set up direct deposit, add beneficiary)
- Day 7 Decision Split: Has the customer logged into online banking?
- Yes → Send a personalized “Explore Your Account Benefits” email
- No → Escalate to a relationship manager task in Salesforce CRM
- Day 14: Survey email asking about their onboarding experience
- Goal: Customer logs into online banking at least twice within 14 days
This journey uses multiple channels (email, SMS, CRM task), real behavioral data (mobile app clicks, online banking logins), and intelligent routing to deliver a genuinely personalized onboarding experience — all automated through Salesforce Marketing Cloud Journey Builder.
Common Mistakes Beginners Make in Journey Builder
Even with a solid SFMC Journey Builder tutorial as a foundation, beginners make predictable mistakes. Knowing them in advance helps you avoid them:
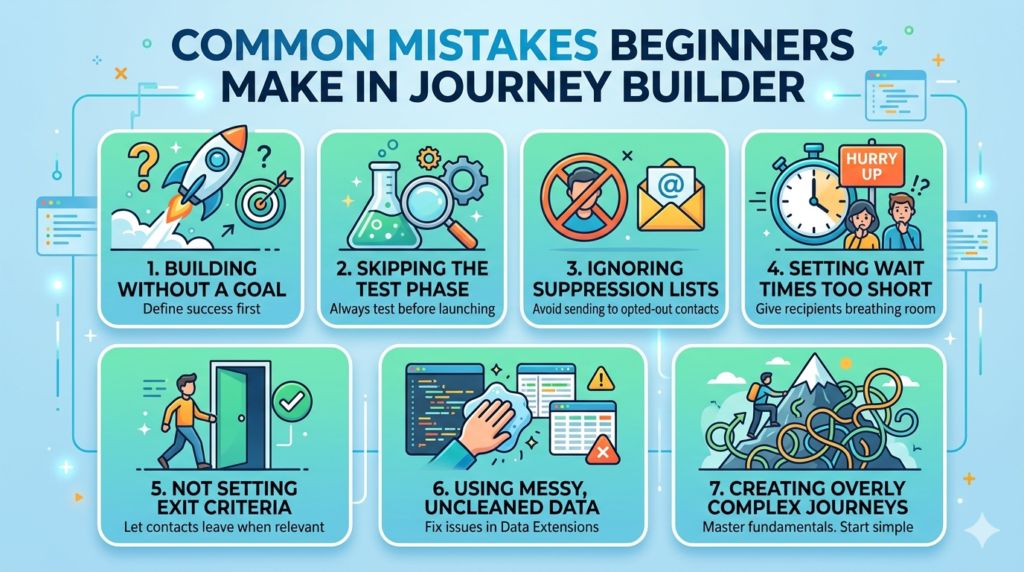
- Building before defining the goal — Jumping into the canvas before you know what success looks like leads to journeys that look busy but accomplish little
- Skipping the test phase — Testing feels like extra work until your first mistake fires 10,000 unwanted emails. Always test
- Ignoring suppression and unsubscribe lists — Failing to configure proper suppressions can result in sending emails to opted-out contacts, creating compliance and deliverability problems
- Setting wait times too short — Sending emails every few hours feels aggressive to recipients and can trigger spam complaints. Give contacts breathing room between touchpoints
- Not setting exit criteria — Without exit criteria, contacts can get stuck in a journey indefinitely even after achieving the goal or becoming irrelevant
- Using messy, uncleaned data — Journey Builder is only as good as the data in your Data Extensions. Contacts with missing email addresses, invalid fields, or incorrect data will cause processing errors
- Creating overly complex first journeys — Start simple. Master the fundamentals before building 20-step, multi-split journeys with five channels
Best Practices for Building Effective Customer Journeys
These best practices separate effective Salesforce Marketing Cloud Journey Builder implementations from mediocre ones:
- One journey, one goal — Each journey should have a single, clearly defined objective. Multi-goal journeys become difficult to measure and optimize
- Always set a journey goal — The goal feature tracks which contacts achieve success and allows Journey Builder to exit them at the right time
- Use descriptive naming conventions — Name your journeys, activities, and splits clearly (e.g., “WelcomeSeries_Email1_Opened_Split” rather than “Split 1”) so you can maintain and troubleshoot them easily months later
- Respect contact frequency — Be mindful of how many journeys a single contact may be enrolled in simultaneously. Too many parallel journeys can lead to communication fatigue
- Leverage personalization — Use AMPscript or Personalization Strings in your email content to dynamically include the contact’s name, account details, or behavioral data
- Build re-usable email templates — Invest in well-designed, responsive email templates in Email Studio that you can reuse and customize across multiple journeys
- Document your journey logic — Maintain documentation outside of Journey Builder (a flowchart, spreadsheet, or design document) that captures the journey’s purpose, entry criteria, branching logic, and performance benchmarks
Advanced Tips for Journey Optimization
Once you have built and activated several journeys and are comfortable with the SFMC Journey Builder tutorial fundamentals, these advanced approaches will help you squeeze more performance from your journeys:
Use Einstein Splits for AI-powered routing. Einstein Engagement Scoring predicts which contacts are most likely to engage with your content, allowing you to route high-likelihood contacts to premium offers and re-engage at-risk contacts with targeted win-back content.
Implement A/B testing with Random Splits. Use Random Splits to test two versions of subject lines, email content, or wait times against each other. Let the data tell you what works before scaling the winner.
Connect Journey Builder to Salesforce CRM. Use the Sales and Service Cloud activities to create tasks, update records, or trigger alerts for your sales team when a contact takes a high-value action within a journey — closing the loop between marketing automation and CRM.
Build a suppression strategy. Create a master exclusion Data Extension that captures contacts who should never receive certain types of communications — recent purchasers who should not receive promotional emails, contacts in active service cases, or high-value clients who prefer phone contact — and apply it to relevant journeys.
Monitor and iterate continuously. Journey Builder’s analytics give you rich data on every activity. Review open rates, click rates, and goal achievement percentages for each journey at least monthly and adjust content, timing, and logic based on what the data shows.
Conclusion
Salesforce Marketing Cloud Journey Builder is one of the most transformative tools in the modern marketer’s arsenal — and you now have the foundational knowledge to start using it confidently. From understanding Entry Sources and Decision Splits to following a clear, step-by-step process for building and activating your first journey, this SFMC Journey Builder tutorial has equipped you with everything you need to move from concept to live campaign.
The key takeaway is this: start simple, test thoroughly, define your goals clearly, and let data drive your decisions at every branch and split. Your first journey will not be perfect — and it does not need to be. Every journey you build teaches you something that makes the next one better.
As you grow more confident with Journey Builder, you will discover that the tool is capable of far more than any single tutorial can cover — from AI-powered personalization with Einstein to complex, multi-entry journeys spanning months of the customer lifecycle. That depth of capability is what makes mastering Salesforce Marketing Cloud Journey Builder such a valuable and rewarding professional investment.
At RizeX Labs, we help marketers, SFMC admins, and automation specialists unlock the full potential of Salesforce Marketing Cloud — from building their first journey to designing enterprise-scale, omnichannel customer engagement strategies. Our certified SFMC consultants bring deep hands-on experience across Journey Builder, Email Studio, Data Extensions, and the full SFMC platform ecosystem.
Whether you are setting up SFMC for the first time, optimizing an existing Journey Builder implementation, or planning a complex multi-channel campaign, RizeX Labs has the expertise to guide you from strategy to execution.
About RizeX Labs
At RizeX Labs, we specialize in delivering end-to-end Salesforce solutions across Marketing Cloud, Sales Cloud, Service Cloud, Financial Services Cloud, and Revenue Cloud. Our team combines deep technical expertise, real-world implementation experience, and strategic consulting to help businesses maximize their Salesforce investment.
From customer engagement automation to enterprise marketing transformation, we empower organizations to build scalable, personalized, and data-driven digital experiences using the Salesforce ecosystem.
Whether you’re implementing Salesforce Marketing Cloud for the first time or optimizing advanced customer journeys, RizeX Labs helps businesses unlock the full potential of marketing automation.
Internal Linking Opportunities:
- Link to your Salesforce training page
- DevOps Roadmap for Salesforce: Tools, Skills, and Certifications You Need in 2026
- How to Build a Salesforce Portfolio That Gets You Hired (With Project Ideas)
- Salesforce Admin vs Developer: Which Career Path is Right for You in 2026?
- Wealth Management App in Financial Services Cloud
External Linking Opportunities:
- Salesforce Official Website
- Salesforce Marketing Cloud Overview
- Salesforce Journey Builder Documentation
- Salesforce Trailhead Marketing Cloud Modules
- Salesforce Developer Documentation
Quick Summary
Salesforce Journey Builder in Salesforce Marketing Cloud (SFMC) is a powerful automation tool that helps businesses create personalized, multi-step customer journeys across email, SMS, push notifications, advertising, and more. It enables marketers to design automated engagement workflows based on customer behavior, data, and business rules.
For beginners, learning how to build your first customer journey in SFMC Journey Builder is essential for mastering marketing automation. By understanding entry sources, decision splits, wait activities, engagement actions, and journey goals, marketers can create highly targeted customer experiences that improve engagement, nurture leads, and drive conversions at scale.
This step-by-step guide will walk you through the fundamentals of building your first Salesforce SFMC Journey Builder workflow while sharing best practices to help you avoid common beginner mistakes.
Quick Summary
Salesforce Marketing Cloud Journey Builder is one of the most powerful marketing automation tools available to modern marketers — enabling you to design, automate, and optimize personalized customer journeys across email, SMS, push notifications, and more. This complete guide walks you through everything a beginner needs to know about Journey Builder in SFMC: what it is, why it matters, its key components, and a detailed step-by-step tutorial for building your first customer journey from scratch. Whether you are a marketer, SFMC admin, or automation specialist just getting started, this practical guide gives you the knowledge and confidence to launch your first journey and deliver meaningful, personalized experiences at scale.

