If you work with Salesforce in any capacity — whether you’re an admin, a junior developer, or a consultant — you’ll inevitably face the moment when you need to move your work from one Salesforce environment to another. Maybe you’ve built a shiny new workflow in your sandbox and need to push it to production. Maybe you’ve created custom fields, validation rules, or Apex classes that are ready for prime time. Whatever the case, deployment is the bridge between “it works in my sandbox” and “it works for real users.”
For many Salesforce professionals, Salesforce changeset deployment is the first deployment method they learn — and for good reason. Change sets are built directly into the Salesforce platform, require no external tools, and offer a point-and-click interface that feels familiar to anyone who has navigated Salesforce Setup.
In this Salesforce deployment tutorial, we’ll walk through everything you need to know about deploying metadata using change sets in 2026. We’ll cover the fundamentals, walk through every step with screenshots-level detail, discuss best practices that seasoned admins swear by, troubleshoot the most common issues, and compare change sets with the ANT Migration Tool so you can choose the right approach for your projects.
Whether you’re preparing for your first deployment or looking for a comprehensive refresher, this guide has you covered.
Let’s dive in.
<a name=”what-are-change-sets”></a>
What Are Change Sets in Salesforce?
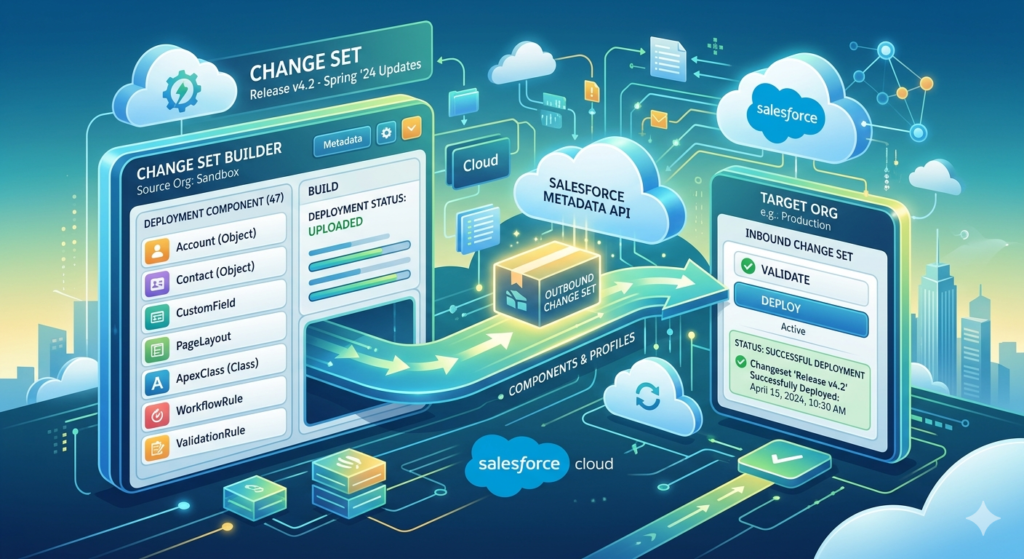
A change set is a native Salesforce tool that allows you to send customizations (metadata) from one Salesforce org to another. Think of it as a package or a container — you select the components you want to move, bundle them together, and ship them to a connected organization.
Key Characteristics of Change Sets
| Feature | Description |
|---|---|
| Direction | Change sets move metadata from one org to another (e.g., sandbox → production) |
| Contents | Metadata only — no actual data (records) are transferred |
| Connection Required | Both orgs must be related (i.e., connected via deployment connections) |
| Interface | Point-and-click; no coding or command-line tools required |
| Availability | Available in Enterprise, Performance, Unlimited, and Developer editions |
Two Types of Change Sets
- Outbound Change Set — Created in the source org (the org you’re deploying FROM). You select components and upload the change set to a target org.
- Inbound Change Set — Appears in the target org (the org you’re deploying TO). Once the outbound change set is uploaded, it shows up as an inbound change set in the receiving org, where it can be validated and deployed.
What Can You Include in a Change Set?
Change sets support a wide variety of Salesforce metadata components, including but not limited to:
- Custom Objects & Custom Fields
- Page Layouts & Record Types
- Validation Rules
- Workflow Rules & Process Builder flows
- Apex Classes & Apex Triggers
- Visualforce Pages & Components
- Lightning Web Components (LWC)
- Custom Labels & Custom Settings
- Permission Sets & Profiles
- Reports & Dashboards
- Flows (Screen Flows, Autolaunched Flows, etc.)
- Email Templates
- Custom Metadata Types
Important Note: Change sets do not transfer data records, user information, or certain org-specific settings like org-wide defaults and sharing rules.
<a name=”how-change-sets-work”></a>
How Change Sets Work — The Big Picture
Before we get into the step-by-step process, let’s understand the high-level flow of a Salesforce changeset deployment:
text┌─────────────────────┐         UPLOAD          ┌─────────────────────┐
│                     │ ──────────────────────►  │                     │
│   SOURCE ORG        │                          │   TARGET ORG        │
│   (e.g., Sandbox)   │   Outbound Change Set    │   (e.g., Production)│
│                     │                          │                     │
│  1. Create change   │                          │  4. Receive as      │
│     set             │                          │     inbound change  │
│  2. Add components  │                          │     set             │
│  3. Upload to       │                          │  5. Validate        │
│     target          │                          │  6. Deploy          │
└─────────────────────┘                          └─────────────────────┘
The flow :
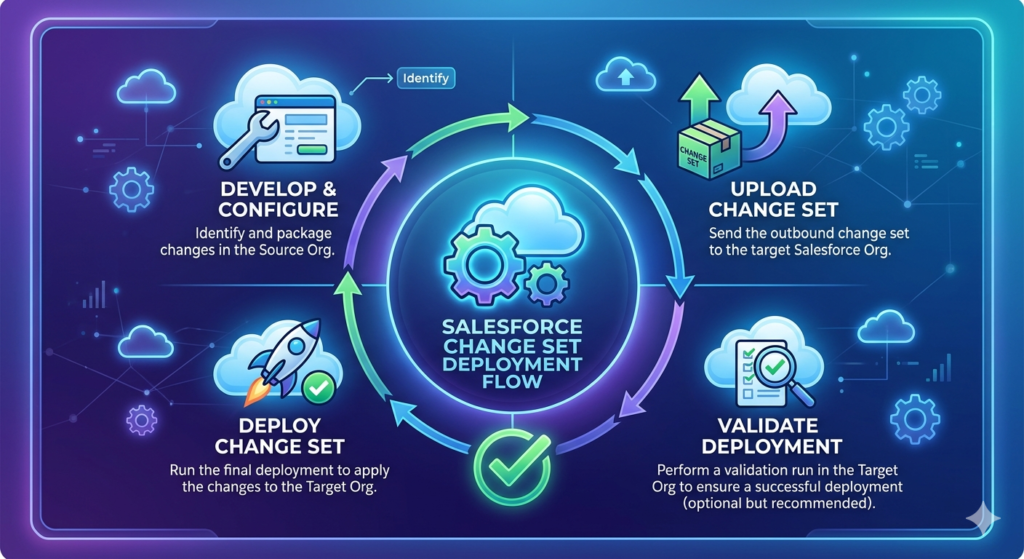
- You create an outbound change set in your source org (typically a sandbox).
- You add all the components you want to deploy.
- You upload the change set to the target org (typically production or another sandbox).
- In the target org, the change set appears as an inbound change set.
- You validate the change set to check for errors without actually deploying.
- If validation passes, you deploy the change set.
Simple, right? Now let’s make it real.
<a name=”prerequisites”></a>
Prerequisites for Salesforce Changeset Deployment
Before you start building your first change set, make sure the following prerequisites are in place:
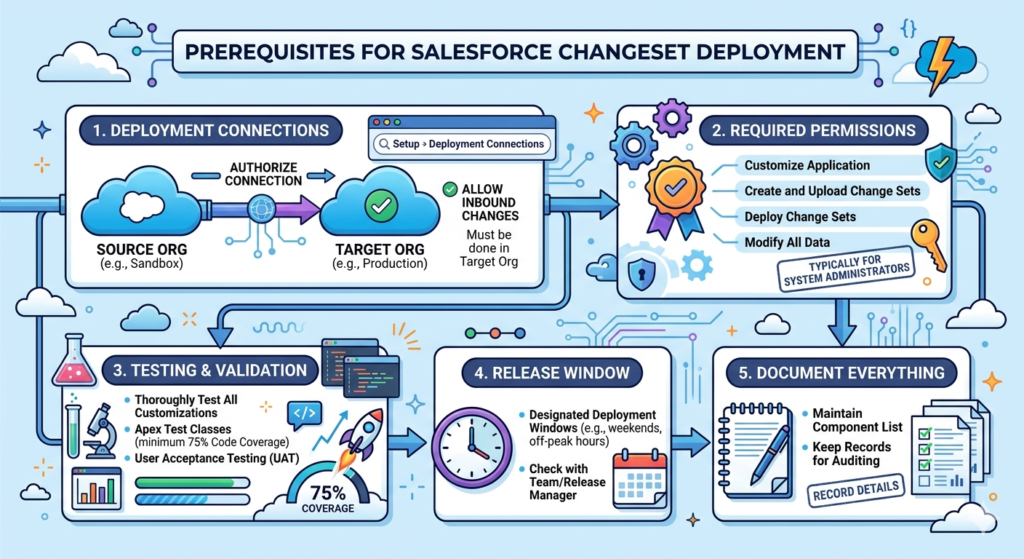
1. Deployment Connections Must Be Established
The source and target orgs must have a deployment connection between them. For sandboxes created from a production org, this connection exists automatically. However, the connection must be authorized for deployments.
To check/authorize:
- Go to Setup → search for “Deployment Connections” → click Deployment Connections
- You’ll see a list of connected orgs
- Click Edit next to the target org and check “Allow Inbound Changes”
Critical: This authorization must be done in the target org. The target org must explicitly allow inbound change sets from the source org.
2. Required Permissions
You need the following permissions in both orgs:
| Permission | Where Needed | Why |
|---|---|---|
| Customize Application | Source Org | To create outbound change sets |
| Create and Upload Change Sets | Source Org | To build and upload change sets |
| Deploy Change Sets | Target Org | To validate and deploy inbound change sets |
| Modify All Data (recommended) | Both | Full access for complex deployments |
Typically, System Administrator profiles have all of these permissions by default.
3. Testing and Validation in Sandbox
Before you even think about deploying to production, ensure that:
- All customizations have been thoroughly tested in your sandbox
- Apex test classes exist for any Apex code (triggers, classes) and achieve at least 75% code coverage (Salesforce’s minimum requirement for production deployments)
- User acceptance testing (UAT) has been completed if applicable
4. Understand Your Org’s Release Window
Many organizations have designated deployment windows (e.g., weekends or off-peak hours). Check with your team or release manager before initiating a deployment.
5. Document Everything
Maintain a list of all components you plan to deploy. This will be invaluable for troubleshooting and for creating your change set accurately.
<a name=”step-by-step-guide”></a>
Step-by-Step Guide to Deploy Salesforce Metadata Using Change Sets
Here’s your complete, actionable walkthrough for Salesforce changeset deployment in 2026.
Step 1: Authorize the Deployment Connection (Target Org)
Before you can send anything, the receiving org must allow it.
- Log into the target org (e.g., Production).
- Navigate to Setup.
- In the Quick Find box, type “Deployment Connections” and select it.
- You’ll see a list of all orgs connected to this org (your sandboxes).
- Click Edit next to the sandbox you want to receive change sets from.
- Check the box labeled “Allow Inbound Changes”.
- Click Save.
Pro Tip: If you don’t see your sandbox in the list, it may need to be refreshed, or the sandbox type might not support change sets (only Developer, Developer Pro, Partial Copy, and Full Copy sandboxes support change sets).
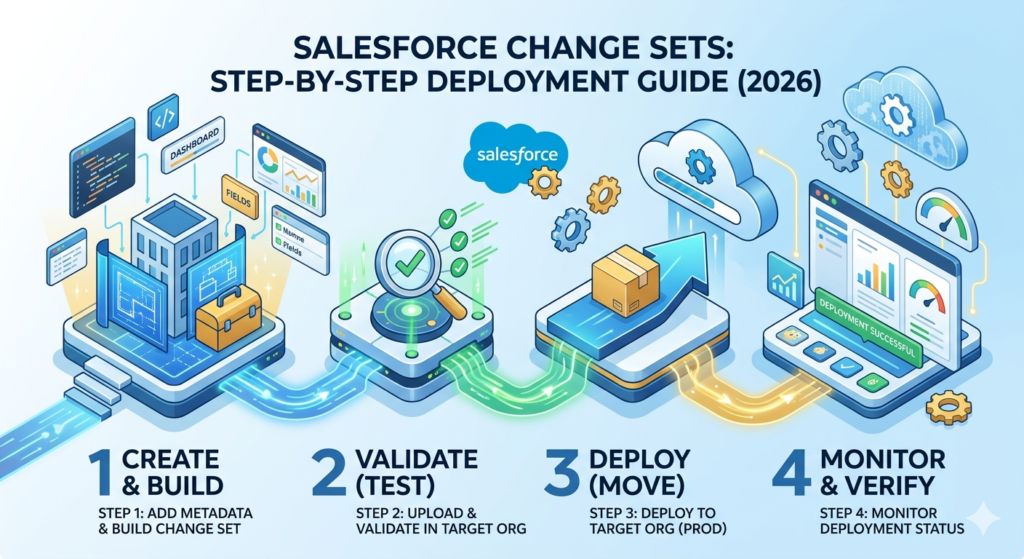
Step 2: Create an Outbound Change Set (Source Org)
Now, switch to your source org (the sandbox where your changes live).
- Log into the source org (e.g., your Developer or Full Copy sandbox).
- Navigate to Setup.
- In the Quick Find box, type “Outbound Change Sets” and select it.
- Click the “New” button.
- Fill in the following:
- Name: Give it a descriptive name (e.g.,
Sprint_42_CustomFields_and_Flows_Jan2026) - Description: Describe what’s included and why (e.g., “Adds new Account fields, updated Lead conversion flow, and related validation rules for Q1 release”)
- Name: Give it a descriptive name (e.g.,
- Click Save.
Your change set is now created but empty. Time to add components.
Step 3: Add Components to the Change Set
- On the change set detail page, scroll down to the Change Set Components section.
- Click “Add”.
- You’ll see a Component Type dropdown. Select the type of metadata you want to add (e.g., Custom Field, Apex Class, Flow Definition, etc.).
- A list of available components of that type will appear.
- Check the boxes next to each component you want to include.
- Click “Add to Change Set”.
- Repeat this process for every component type you need to include.
Example Component Selection
| Component Type | Component Name | Purpose |
|---|---|---|
| Custom Field | Account.Industry_Segment__c | New picklist field for account segmentation |
| Custom Field | Account.Risk_Score__c | Numeric field for risk assessment |
| Validation Rule | Account.Require_Risk_Score | Ensures Risk Score is populated when Stage = Active |
| Flow | Lead_Auto_Conversion_Flow | Automated lead conversion based on scoring |
| Apex Class | LeadScoringHelper | Helper class for lead scoring logic |
| Apex Class | LeadScoringHelperTest | Test class for LeadScoringHelper |
| Page Layout | Account-Sales Layout | Updated layout with new fields |
| Permission Set | Sales_Advanced_Permissions | Grants access to new fields and flows |
Step 4: Add Dependent Components (Don’t Skip This!)
This is where many deployments fail. Salesforce components often depend on each other. A page layout might reference a custom field. A flow might reference an Apex class. If a dependency is missing from the change set, deployment will fail.
- On the change set detail page, click “Add Dependencies” (or “View/Add Dependencies”).
- Salesforce will analyze your selected components and show you a list of dependent components.
- Review the list carefully. Check the boxes next to any dependencies you want to include.
- Click “Add to Change Set”.
Warning: The dependency checker is helpful but not perfect. It may not catch every dependency, especially for complex cross-object references. Always review manually as well.
Step 5: Upload the Change Set to the Target Org
Once you’re confident that all components and dependencies are included:
- On the change set detail page, click the “Upload” button.
- Select the target org from the dropdown (e.g., Production).
- Click “Upload”.
- You’ll see a confirmation message that the upload has been initiated.
Important: Upload times vary. Simple change sets may upload in a few minutes, while complex ones with many components can take 30 minutes or more. You’ll receive an email notification when the upload is complete.
Once uploaded, the outbound change set becomes read-only. You cannot add or remove components. If you need to make changes, you’ll need to clone the change set and create a new one.
Step 6: Validate the Inbound Change Set (Target Org)
Validation is a critical step that many beginners skip — don’t be one of them. Validation runs a test deployment without actually making changes, catching errors before they affect your org.
- Log into the target org (e.g., Production).
- Navigate to Setup → “Inbound Change Sets”.
- Find your change set in the list and click on its name.
- Click “Validate”.
- Choose your test options:
| Test Option | When to Use |
|---|---|
| Default | Runs the default test level based on the components. For production, this typically means running local tests if Apex is included. |
| Run Local Tests | Runs all test classes in your org except managed package tests. Recommended for most production deployments. |
| Run All Tests | Runs every test class including managed packages. Use when required by org policy. |
| Run Specified Tests | Runs only the test classes you specify. Useful for faster validation when you know exactly which tests cover your code. |
- Click “Validate” and wait for the results.
If validation succeeds, you’ll see a green checkmark. If it fails, you’ll see error messages indicating what went wrong (more on troubleshooting later).
Step 7: Deploy the Change Set
Once validation passes:
- On the inbound change set detail page, click “Deploy”.
- Select your test options again (same choices as validation).
- Click “Deploy”.
- Monitor the deployment status.
To check deployment status:
- Navigate to Setup → search for “Deployment Status” → click Deployment Status
- You’ll see your deployment in progress with a progress bar and component count
Note: For production deployments that include Apex code, Salesforce requires that your org maintains a minimum of 75% overall code coverage after deployment. Individual Apex classes triggered by the deployment must also have at least 1% coverage (though 75%+ per class is the recommended best practice).
Step 8: Post-Deployment Verification
Deployment doesn’t end when the status bar hits 100%. Always perform post-deployment verification:
- Check the Deployment Status page for any warnings (deployments can succeed with warnings).
- Manually verify that each component deployed correctly:
- Open custom fields and check their configurations
- Test flows and automation
- Verify page layouts render correctly
- Confirm permission sets are properly configured
- Run smoke tests — have end users or QA team members verify critical business processes.
- Check reports and dashboards if they were part of the deployment.
- Document the deployment — record what was deployed, when, and by whom.
<a name=”deployment-status”></a>
Understanding Deployment Status & Validation
Salesforce provides a dedicated Deployment Status page that gives you real-time insight into your deployments. Here’s how to read it:
| Status | Meaning |
|---|---|
| Pending | The deployment is queued and waiting to start |
| In Progress | Components are being deployed and tests are running |
| Succeeded | All components deployed and all tests passed |
| Succeeded (with warnings) | Deployed, but some non-critical issues were flagged |
| Failed | Deployment could not complete due to errors |
| Canceled | The deployment was manually canceled by an admin |
Quick Deploy (A Time-Saving Feature)
If you validated your change set and it passed, Salesforce offers a Quick Deploy option. Quick Deploy skips running tests again during the actual deployment (since they already passed during validation), making the deployment significantly faster.
Requirements for Quick Deploy:
- Validation must have completed successfully
- Validation must have been run within the last 10 days
- No Apex code changes have been made to the target org since validation
- The validation must have included test execution
To use Quick Deploy:
- Go to Deployment Status in the target org
- Find the validated deployment
- Click “Quick Deploy”
This feature is a lifesaver for production deployments during tight deployment windows.
<a name=”best-practices”></a>
Best Practices for Salesforce Changeset Deployment
Years of collective experience from the Salesforce community have produced a robust set of best practices. Follow these to deploy Salesforce metadata with confidence:
1. Always Validate Before Deploying
Never deploy directly to production without validating first. Validation catches errors without affecting your org. Make it a non-negotiable step in your process.
2. Use Descriptive Naming Conventions
Bad name: Change Set 1
Good name: Sprint42_AccountFields_LeadFlow_Jan2026_v2
Include the sprint/release, a brief description of contents, the date, and a version number. Your future self will thank you.
3. Deploy During Off-Peak Hours
Production deployments should happen when the fewest users are active. This minimizes disruption and gives you time to troubleshoot if something goes wrong.
4. Keep Change Sets Small and Focused
Instead of one massive change set with 200 components, create multiple smaller change sets organized by feature or user story. This makes troubleshooting easier and reduces the blast radius if something fails.
5. Test in a Staging Sandbox First
If possible, follow this deployment path:
textDeveloper Sandbox → QA/Testing Sandbox → Staging/UAT Sandbox → Production
Each environment serves as a checkpoint. By the time you reach production, your change set has been validated multiple times.
6. Include All Dependencies
Use the “Add Dependencies” button, but also manually review your component list. Common missed dependencies include:
- Custom fields referenced in validation rules or flows
- Record types referenced in page layouts
- Apex classes called by triggers
- Custom labels used in Apex code or Lightning components
7. Communicate with Your Team
Before deploying to a shared environment, notify your team. Use Slack, email, or your project management tool to announce:
- What’s being deployed
- When the deployment will happen
- Expected downtime or impact
- Rollback plan if something goes wrong
8. Have a Rollback Plan
Not every deployment goes smoothly. Before you deploy, know how you’ll undo your changes if needed. For change sets, Salesforce does not have an automatic rollback feature, so you’ll need to:
- Manually undo changes in the target org, OR
- Deploy a “reverse” change set that reverts configurations, OR
- Restore from a backup (if you have a metadata backup solution in place)
9. Track Your Deployments
Maintain a deployment log or use a tracking tool:
| Deployment Date | Change Set Name | Components | Deployed By | Status | Notes |
|---|---|---|---|---|---|
| 2026-01-15 | Sprint42_AccountFields | 12 components | Jane Admin | Success | Deployed during maintenance window |
| 2026-01-22 | Sprint42_LeadFlow | 8 components | Jane Admin | Failed → Redeployed | Initial failure due to missing dependency |
10. Write Meaningful Test Classes
For production deployments with Apex, invest time in writing comprehensive test classes. Don’t just aim for 75% — aim for 90%+ coverage with meaningful assertions. Good tests catch bugs and make deployments smoother.
<a name=”common-issues”></a>
Common Issues & How to Fix Them
Even with careful planning, deployments can fail. Here are the most common issues encountered during Salesforce changeset deployment and how to resolve them:
Issue 1: “Cannot find a dependent component”
Cause: A component in your change set references another component that doesn’t exist in the target org and wasn’t included in the change set.
Fix: Use “Add Dependencies” in the source org, then manually verify all references. Deploy the missing dependencies in a separate change set first if needed.
Issue 2: “Code coverage is below 75%”
Cause: Production deployments require a minimum of 75% Apex code coverage across the org. Your deployment either reduced overall coverage or includes classes without sufficient test coverage.
Fix:
- Write or update test classes to improve coverage
- Ensure test classes are included in the change set
- Run all tests locally before uploading the change set
- Consider using “Run Specified Tests” to target relevant test classes
Issue 3: “Test failure — System.DmlException or System.AssertException”
Cause: Test classes are failing in the target org, often because of data differences, configuration differences, or hardcoded IDs.
Fix:
- Never hardcode record IDs in test classes — use
@TestSetupmethods to create test data - Use
Test.startTest()andTest.stopTest()properly - Ensure your tests are org-independent (they should work in any Salesforce org)
Issue 4: Change Set Stuck in “Uploading” Status
Cause: Salesforce processes change set uploads asynchronously. Large change sets or platform congestion can cause delays.
Fix:
- Wait up to 1 hour — most uploads complete within this timeframe
- Check your email for upload confirmation
- If it persists beyond several hours, contact Salesforce Support
- Try uploading during off-peak Salesforce platform hours
Issue 5: “Component is not available for change sets”
Cause: Not all metadata types are supported by change sets. Some components (like org-wide defaults, login IP ranges, or certain Einstein configurations) cannot be included.
Fix:
- Check Salesforce’s official documentation for the current list of supported component types
- For unsupported components, manually configure them in the target org or use the Metadata API / ANT Migration Tool / Salesforce CLI
Issue 6: Profile/Permission Set Changes Not Deploying Correctly
Cause: Profiles in change sets only deploy the permissions related to components in the same change set, not the entire profile configuration. This is a common source of confusion.
Fix:
- Use Permission Sets instead of Profiles wherever possible — they’re more granular and deploy more reliably
- If you must use Profiles, verify the permissions manually after deployment
- Consider using the Metadata API for complex Profile deployments
Issue 7: “This change set was uploaded before a Salesforce release and can’t be deployed”
Cause: If a Salesforce major release (e.g., Spring ’26 to Summer ’26) occurs between upload and deployment, the change set may become invalid.
Fix:
- Re-create and re-upload the change set after the release
- Time your deployments to avoid straddling major Salesforce release windows
<a name=”changeset-vs-ant”></a>
Changeset vs ANT Migration Tool — A Detailed Comparison
As you grow in your Salesforce career, you’ll encounter alternative deployment methods. The ANT Migration Tool (also known as the Force.com Migration Tool) is one of the most established alternatives. Understanding the differences between these tools is essential for choosing the right approach.
Let’s break down the changeset vs ANT migration comparison:
| Feature | Change Sets | ANT Migration Tool |
|---|---|---|
| Interface | Point-and-click (GUI) | Command-line (XML + terminal) |
| Learning Curve | Low — beginner-friendly | Moderate to high — requires knowledge of XML, Ant builds, and the Metadata API |
| Setup Required | None — built into Salesforce | Requires Java, Apache Ant, and the Force.com Migration Tool JAR file |
| Org Connection | Requires deployment connection (related orgs only) | Works with any org (uses username/password or OAuth) |
| Component Selection | Manual point-and-click | Defined in package.xml manifest file |
| Version Control | Not natively supported | Easily integrates with Git and other version control systems |
| Automation | Not automatable | Fully scriptable and automatable (CI/CD pipelines) |
| Destructive Changes | Not supported — cannot delete components | Supported via destructiveChanges.xml |
| Rollback | No native rollback | Can script rollback deployments |
| Speed | Slower for large deployments | Generally faster, especially with selective retrieval |
| Data Migration | Not supported | Not supported (use Data Loader for data) |
| Supported Metadata Types | Limited subset | Broader coverage via Metadata API |
| Best For | Simple deployments, admin-led changes, small teams | Complex deployments, developer-led projects, CI/CD, large teams |
| Cost | Free (included with Salesforce) | Free (open-source tool) |
When to Choose Change Sets
- You’re an admin with little to no coding experience
- Your deployment is simple (a handful of fields, layouts, or rules)
- You’re working between related orgs (sandbox ↔ production)
- You need to do a one-time deployment quickly
- Your team is small and doesn’t need version control
When to Choose ANT Migration Tool
- You’re a developer comfortable with the command line
- Your deployments are complex with many interdependent components
- You need to automate deployments or integrate with CI/CD tools (Jenkins, GitHub Actions, etc.)
- You need to deploy between unrelated orgs
- You need to delete components from the target org (destructive changes)
- You want version control integration with Git
The Modern Alternative: Salesforce CLI (sf/sfdx)
It’s worth noting that in 2026, many teams have moved beyond both change sets and the ANT Migration Tool to Salesforce CLI (formerly SFDX). Salesforce CLI offers:
- Modern command-line interface
- Scratch org support for development
- Native Git integration
- Package-based development model
- Full Metadata API access
- Robust CI/CD support
If you’re just starting out, change sets are the perfect learning tool. As your needs grow, consider transitioning to Salesforce CLI for more powerful and flexible deployments.
<a name=”when-to-use”></a>
When Should You Use Change Sets (And When Should You Not)?
✅ Use Change Sets When:
- You’re making declarative changes (custom fields, page layouts, validation rules, flows)
- Your deployment involves fewer than 50 components
- You’re deploying between a sandbox and production within the same org family
- You don’t have access to or experience with command-line tools
- You need to perform a quick, one-off deployment
- Your organization doesn’t have a formal CI/CD pipeline in place
❌ Avoid Change Sets When:
- You need to deploy to an unrelated org (e.g., a client’s org that isn’t connected to yours)
- Your deployment requires deleting components (e.g., removing old fields or classes)
- You have hundreds of components to deploy — change sets become unwieldy at scale
- You need repeatable, automated deployments (CI/CD)
- You’re working on a large team where multiple developers may conflict with each other’s change sets
- You need full version control and audit trails
<a name=”faq”></a>
Frequently Asked Questions
Q: Can I deploy a change set from Production to Sandbox?
A: Yes! Change sets can move in both directions. You would create an outbound change set in Production and upload it to a sandbox. This is less common but useful when you’ve made configuration changes directly in production (which should be rare and carefully managed).
Q: Can I edit a change set after uploading it?
A: No. Once uploaded, an outbound change set becomes read-only. You’ll need to clone it and make modifications to the clone, then upload the new version.
Q: How long does a change set upload take?
A: It varies. Small change sets (under 20 components) typically upload in 5–15 minutes. Larger change sets can take 30–60 minutes or more. Salesforce sends an email when the upload is complete.
Q: Do I need to deploy change sets in a specific order?
A: If your components have dependencies, yes. For example, deploy custom objects before the page layouts that reference them. If all components are in a single change set, Salesforce handles ordering automatically, but across multiple change sets, you must manage the sequence yourself.
Q: Can I schedule a change set deployment?
A: Not natively. Salesforce doesn’t offer scheduled change set deployments through the UI. For scheduled deployments, you’d need to use the Metadata API, Salesforce CLI, or a third-party tool like Copado, Gearset, or Flosum.
Q: What happens if a deployment fails midway?
A: Salesforce change set deployments are atomic — they either fully succeed or fully roll back. If any component fails to deploy, the entire change set is rolled back, and no changes are applied to the target org. This is actually one of the safety benefits of using change sets.
Q: Can I deploy from one sandbox to another sandbox?
A: Yes, as long as both sandboxes are connected to the same production org and the deployment connection is authorized. This is common for promoting changes from a development sandbox to a QA or UAT sandbox.
<a name=”conclusion”></a>
Conclusion
Salesforce changeset deployment remains one of the most accessible and widely-used methods to deploy Salesforce metadata in 2026. For admins, consultants, and developers who need a straightforward, no-code deployment solution, change sets deliver exactly that — a reliable, built-in tool that gets your customizations from point A to point B.
In this Salesforce deployment tutorial, we covered:
- What change sets are and how they work at a conceptual level
- Prerequisites you need before your first deployment
- A detailed, step-by-step deployment guide from creating an outbound change set to post-deployment verification
- Best practices that prevent common pitfalls and keep your deployments smooth
- Common issues and their solutions, so you can troubleshoot with confidence
- A thorough changeset vs ANT migration comparison to help you choose the right tool
Here’s the bottom line: Change sets are perfect for getting started and for simple deployments. As your projects grow in complexity and your team scales, you’ll likely graduate to more powerful tools like Salesforce CLI, CI/CD pipelines, and DevOps platforms. But even then, understanding change sets gives you a solid foundation in Salesforce deployment concepts that will serve you throughout your career.
Start with your sandbox. Build something. Create a change set. Deploy it. Learn from the process. And remember — every Salesforce professional, no matter how experienced, started with their first deployment.
About RizeX Labs
We’re Pune’s leading IT training institute specializing in emerging technologies like Salesforce and cloud DevOps. At RizeX Labs, we help professionals master the intricacies of the Salesforce ecosystem—from core administration to complex architectural deployments—through hands-on training, real-world projects, and expert mentorship. Our programs are designed to transform learners into job-ready Salesforce professionals equipped with the deployment and lifecycle management skills required by top global firms.
Internal Links:
- Salesforce Admin & Development Training
- Salesforce DevOps: A Beginner’s Guide to Sandbox Management
- Salesforce CLI vs. Change Sets: Choosing the Right Deployment Tool
External Links:
- Salesforce Official Website
- Change Sets Implementation Guide (Official Docs)
- Trailhead: Platform Development Basics
- Apex Developer Guide: Testing and Code Coverage
Quick Summary
Mastering Salesforce changeset deployment is a fundamental skill for any professional navigating the transition from development to production. While modern DevOps tools offer automation, change sets remain the most accessible, native method for point-and-click metadata migration in 2026. The key to a successful deployment lies in meticulous dependency management and the non-negotiable practice of pre-deployment validation. For most admins and junior developers, starting with change sets provides the necessary foundation to understand Salesforce's underlying metadata architecture before moving toward more complex CI/CD pipelines and the Salesforce CLI. This guide ensures you have the roadmap to deploy with zero downtime and maximum confidence.

