Let’s start with a simple truth: customers today expect fast, personalized, and seamless support — and they expect it across every channel. Whether they reach out via email, phone, live chat, social media, or a self-service portal, they want answers quickly. They want to feel heard. And if they don’t get that experience, they’ll leave.
According to Salesforce’s own “State of the Connected Customer” report, 88% of customers say the experience a company provides is just as important as its products or services. That’s a staggering number, and it tells us something critical — investing in the right customer service technology isn’t optional anymore. It’s a business imperative.
This is exactly where Salesforce Service Cloud enters the picture.
If you’re new to Salesforce or just beginning to explore its ecosystem, you’ve probably heard the term “Service Cloud” mentioned frequently. But what does it actually do? How does Salesforce case management work in practice? What is omni-channel routing, and why does everyone keep talking about it? And most importantly, how can you set all of this up without feeling overwhelmed?
In this comprehensive guide from RizeX Labs, we’re going to answer all of those questions and more. We’ll walk you through Salesforce Service Cloud explained in clear, practical terms — from its core features and benefits to a detailed deep dive into case management and a step-by-step overview of setting up Omni-Channel routing. Whether you’re a business owner evaluating Salesforce, an admin just getting started, or a team lead trying to improve your support operations, this post is for you.
Let’s get started.
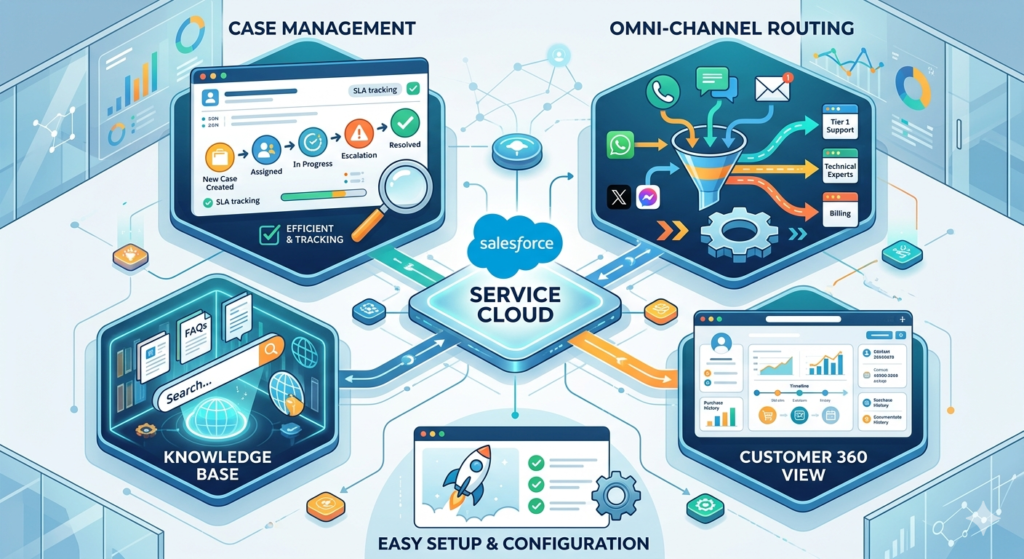
What Is Salesforce Service Cloud?
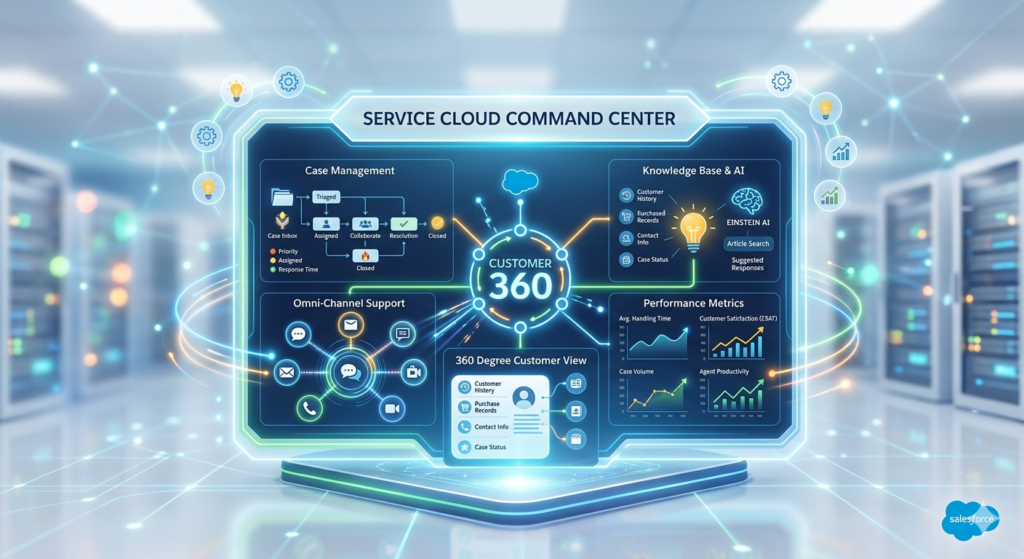
At its core, Salesforce Service Cloud is a customer service and support platform built on the Salesforce Customer 360 Platform. It’s designed to help businesses manage, track, and resolve customer inquiries and issues efficiently — all from a single, unified workspace.
Think of it as the command center for your entire customer support operation. Instead of juggling multiple tools, spreadsheets, and disconnected email threads, Service Cloud brings everything together in one place. Your agents can see a customer’s complete history, communicate across multiple channels, collaborate with teammates, and resolve issues faster — all without switching between applications.
Salesforce Service Cloud Explained in Simple Terms
Here’s a straightforward way to think about it:
- Sales Cloud helps you win customers.
- Service Cloud helps you keep them.
Service Cloud provides the tools, automation, and intelligence your support team needs to deliver exceptional customer experiences at scale. It’s used by companies of all sizes — from small businesses with a handful of support agents to global enterprises managing millions of customer interactions every year.
A Brief History
Salesforce launched Service Cloud in 2009, and it has evolved dramatically since then. What started as a basic case management and knowledge base tool has grown into a full-featured, AI-powered customer service platform. Today, it includes capabilities like:
- Intelligent case routing
- Omni-channel support
- AI-powered chatbots (Einstein Bots)
- Self-service portals
- Field service management
- Real-time analytics and reporting
- Workflow automation
- Knowledge management
Each of these service cloud features is designed to solve a specific challenge that support teams face every day. And together, they create a powerful ecosystem that transforms how businesses interact with their customers.
Understanding Salesforce Case Management
If Service Cloud is the command center, then case management is the engine that powers it. It’s the most fundamental and arguably most important feature of the entire platform.
What Is a “Case” in Salesforce?
In Salesforce terminology, a case is a record that represents a customer issue, question, feedback, or request. Every time a customer reaches out for help — whether they send an email, fill out a web form, call your support line, or send a message on social media — a case can be created to track that interaction from start to finish.
Each case record contains important information, including:
- Contact Information — Who is the customer? What account do they belong to?
- Case Subject & Description — What is the issue about?
- Case Status — Is it new, in progress, escalated, or closed?
- Case Priority — Is it low, medium, high, or critical?
- Case Origin — Where did this case come from (email, phone, web, chat, social)?
- Case Owner — Which agent or queue is responsible for resolving it?
- Case History — A complete timeline of every action, comment, and update.
- Related Records — Links to related cases, assets, entitlements, or knowledge articles.
This structured approach to tracking customer issues is what makes Salesforce case management so powerful. Nothing falls through the cracks. Every interaction is documented, every handoff is tracked, and every resolution is recorded.
How Cases Are Created
One of the great strengths of Salesforce case management is the flexibility in how cases can be created. Here are the most common methods:
1. Manual Case Creation
An agent can manually create a case record directly in Salesforce. This is common when a customer calls in and the agent logs the issue in real time.
2. Web-to-Case
Salesforce provides a feature called Web-to-Case that automatically generates a case whenever a customer submits a form on your website. You simply embed a Salesforce-generated form (or connect your own custom form) on your support page, and every submission becomes a new case in your system.
3. Email-to-Case
With Email-to-Case, any email sent to your support address (e.g., support@yourcompany.com) is automatically converted into a case in Salesforce. The email subject becomes the case subject, the body becomes the description, and the sender is linked as the contact. This is one of the most popular case creation methods because it requires zero effort from your agents.
4. Social Media Cases
Using Salesforce’s social customer service capabilities, you can monitor mentions and messages on platforms like Twitter and Facebook. When a customer reaches out on social media, a case is automatically created so your team can respond without leaving the Salesforce environment.
5. Chat and Messaging
When customers initiate a live chat or messaging conversation, a case can be created automatically (or by the agent) to document the interaction and any follow-up needed.
6. Phone (CTI Integration)
With Computer Telephony Integration (CTI), incoming phone calls can trigger automatic case creation. Agents see a screen pop with the caller’s information and can immediately begin working the case.
Key Features of Salesforce Case Management
Let’s break down the specific features that make case management in Service Cloud so effective:
Case Assignment Rules
You can create rules that automatically assign incoming cases to specific agents, teams, or queues based on criteria you define. For example:
- Cases from VIP customers → assigned to the senior support team
- Cases about billing → assigned to the finance support queue
- Cases with “urgent” in the subject line → assigned to the escalation team
This ensures that every case lands with the right person from the very beginning.
Case Escalation Rules
What happens when a case isn’t resolved within a certain timeframe? Escalation rules automatically elevate the case’s priority, reassign it to a manager, or trigger a notification. This prevents high-priority issues from sitting unresolved for too long.
For example, you could set a rule that says: “If a high-priority case remains open for more than 4 hours, escalate it to the support manager and send an email alert.”
Case Queues
Queues are shared “buckets” where cases can be placed before being assigned to a specific agent. They’re useful for organizing cases by type, region, product, or skill set. Agents can pull cases from queues based on their availability and expertise.
Case Comments and Feed Tracking
Every case includes a feed where agents can add internal comments (visible only to the team) or public comments (visible to the customer). This creates a clear conversation trail that any agent can review, making handoffs smooth and context-rich.
Case Milestones and Entitlements
For businesses with service level agreements (SLAs), Salesforce provides Entitlement Management. You can define entitlements that specify what level of support a customer is entitled to (e.g., 24/7 phone support, 4-hour response time) and create milestones that track whether your team is meeting those commitments.
This is a game-changer for B2B companies that have contractual support obligations.
Case Merge
Duplicate cases happen. A customer might email twice about the same issue, or two agents might create separate cases for the same problem. Case merge allows you to combine duplicate cases into a single record, keeping your data clean and your agents focused.
Macros
Macros allow agents to complete repetitive, multi-step tasks with a single click. For example, a macro could automatically update the case status, send a templated email response, and log a call activity — all at once. This saves time and reduces errors.
Real-World Use Case: Salesforce Case Management in Action
Let’s paint a picture of how this works in practice.
Scenario: Sarah is a customer of a SaaS company. She’s having trouble logging into her account. Here’s what happens:
- Sarah submits a support request through the company’s website contact form.
- Web-to-Case automatically creates a new case in Salesforce with the subject “Login Issue,” the description Sarah provided, and her contact information.
- A case assignment rule routes the case to the “Account Access” support queue because the subject contains the word “login.”
- Agent Mike sees the case in his queue, accepts it, and becomes the case owner.
- Mike opens the case and immediately sees Sarah’s complete customer profile — her account details, subscription plan, previous cases, and interaction history.
- Mike identifies the issue (Sarah’s password expired), resets it, and sends a response using a pre-built email template.
- He updates the case status to “Resolved” and adds an internal comment documenting the fix.
- Sarah receives the email, confirms the fix worked, and the case is closed.
- A customer satisfaction (CSAT) survey is automatically sent to Sarah, and she rates the experience 5 out of 5.
Total time from case creation to resolution: 12 minutes.
That’s the power of Salesforce case management — streamlined, efficient, and customer-friendly.
Benefits of Salesforce Case Management
Here’s a summary of why organizations invest in Salesforce case management:
- Centralized tracking — Every customer issue is documented in one system
- Faster resolution times — Smart routing and automation reduce manual effort
- Better agent productivity — Agents spend less time searching for information and more time solving problems
- Improved customer satisfaction — Customers get faster, more consistent support
- Data-driven insights — Reporting dashboards reveal trends, bottlenecks, and opportunities for improvement
- Accountability — Clear ownership and audit trails ensure nothing gets lost
- Scalability — The system grows with your business, handling hundreds or millions of cases with equal efficiency
Omni-Channel Routing: What It Is and How It Works
Now that you understand case management, let’s talk about one of the most powerful service cloud features that takes case management to the next level: Omni-Channel Routing.
What Is Omni-Channel Routing?
Omni-channel routing is a Salesforce feature that automatically pushes work items — such as cases, chats, phone calls, social media messages, and custom objects — to the right agent in real time, based on predefined routing rules.
Instead of agents manually picking cases from a queue (which can lead to cherry-picking, uneven workloads, and delayed responses), omni-channel routing distributes work intelligently and automatically.
Here’s the key difference:
- Without Omni-Channel: Agents browse queues and manually select cases. Some agents take easy cases; others get overloaded with complex ones. Priority cases might sit unnoticed.
- With Omni-Channel: The system automatically pushes the right case to the right agent at the right time, based on their skills, availability, and current workload.
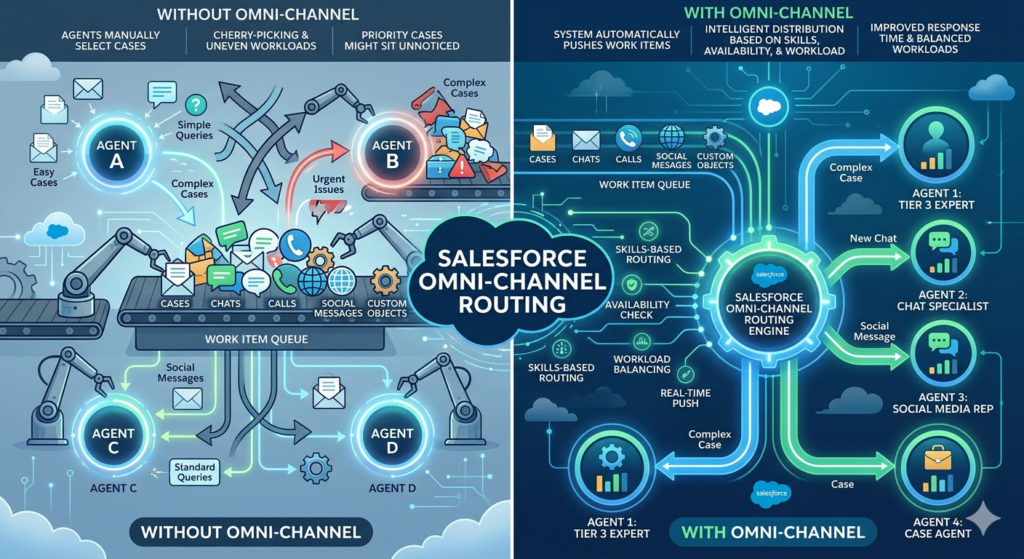
Why Omni-Channel Routing Matters
In a modern support environment, customers don’t use just one channel. A single customer might:
- Start with a question on your website chatbot
- Follow up via email
- Call your support line for an urgent issue
- Tweet about their frustration on social media
Without omni-channel routing, each of these interactions might be handled by a different agent with no context about the previous ones. The customer has to repeat their story every time, agents waste time gathering information, and the experience feels fragmented.
With omni-channel routing in Salesforce, all of these interactions are connected. Work is routed to agents who have the right skills, the right capacity, and — ideally — prior context about the customer’s issue. The result is a seamless, unified experience that feels effortless from the customer’s perspective.
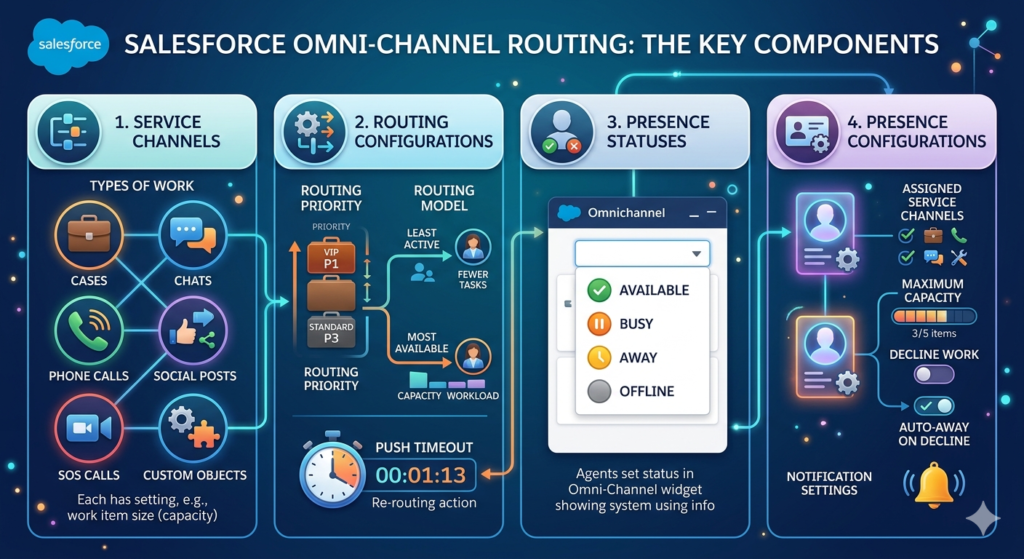
How Omni-Channel Routing Works: The Key Components
To understand how omni-channel routing works in Salesforce, you need to know about four key components:
1. Service Channels
A service channel defines the type of work that can be routed through Omni-Channel. Examples include:
- Cases
- Chats
- Phone calls
- Social posts
- SOS (video) calls
- Custom objects
Each service channel has its own settings, such as the work item size (capacity consumption) and whether agents can decline work.
2. Routing Configurations
A routing configuration defines how work items are prioritized and distributed. Key settings include:
- Routing Priority: Which types of work should be handled first? (e.g., VIP cases get priority 1, standard cases get priority 3)
- Routing Model: How should work be distributed?
- Least Active — Routes to the agent with the fewest active work items
- Most Available — Routes to the agent with the greatest difference between their capacity and current workload
- Push Timeout: How long the system waits for an agent to accept a work item before re-routing it
3. Presence Statuses
Presence statuses define what an agent is currently doing. Common statuses include:
- Available — Ready to receive work
- Busy — Currently handling work but at capacity
- Away — On break or temporarily unavailable
- Offline — Not logged in
Agents set their presence status in the Omni-Channel widget (a small panel in the Salesforce console), and the system uses this information to determine who can receive new work.
4. Presence Configurations
A presence configuration is assigned to specific users or profiles and defines:
- Which service channels the agent can receive work from
- The agent’s maximum capacity (how many work items they can handle simultaneously)
- Whether the agent can decline work
- Whether the agent is automatically set to “Away” after declining work
- Notification settings
Omni-Channel Routing Models: Queue-Based vs. Skills-Based
Salesforce offers two primary routing models for omni-channel:
Queue-Based Routing
This is the simpler approach. Work items are placed in queues, and Omni-Channel routes items from those queues to available agents who are members of that queue.
How it works:
- A case arrives and is placed in the “Technical Support” queue
- Omni-Channel checks which agents are members of that queue
- Among available agents, it selects the one with the least active work (or most available capacity)
- The case is pushed to that agent
Queue-based routing is straightforward and works well for teams where agents handle similar types of work.
Skills-Based Routing
This is the more sophisticated approach. Instead of relying on queue membership, skills-based routing matches work items to agents based on their specific skills.
How it works:
- A case arrives with certain attributes (e.g., product = “Enterprise Platform,” language = “Spanish,” issue type = “Integration”)
- The system checks which agents have the matching skills (e.g., Enterprise Platform expertise + Spanish language proficiency + Integration troubleshooting)
- Among qualified agents, it selects the best fit based on availability and capacity
- The case is pushed to that agent
Skills-based routing is ideal for organizations with diverse products, complex support scenarios, or multilingual teams. It ensures that customers are connected with agents who actually have the expertise to help them.
Step-by-Step Overview: Setting Up Omni-Channel in Salesforce
Ready to set up omni-channel routing in your Salesforce org? Here’s a step-by-step overview of the process. While we won’t cover every single click (that would require its own technical guide), this will give you a clear roadmap of what’s involved.
Step 1: Enable Omni-Channel
First, you need to turn on the Omni-Channel feature in your Salesforce org.
- Go to Setup
- In the Quick Find box, type “Omni-Channel Settings”
- Click Omni-Channel Settings
- Check the box for “Enable Omni-Channel”
- Click Save
That’s it — Omni-Channel is now active. But we need to configure it before it does anything useful.
Step 2: Create Service Channels
Next, define the types of work you want to route through Omni-Channel.
- In Setup, go to Service Channels (search in Quick Find)
- Click New
- Give the service channel a name (e.g., “Cases” or “Live Chats”)
- Select the Salesforce object that corresponds to this channel (e.g., Case)
- Set the capacity weight — this determines how much of an agent’s capacity one work item consumes (e.g., a live chat might consume 10% capacity while a complex case consumes 50%)
- Click Save
Repeat this process for each type of work item you want to route.
Step 3: Create Routing Configurations
Now, define how work should be distributed.
- In Setup, go to Routing Configurations
- Click New
- Name the configuration (e.g., “Standard Case Routing”)
- Set the routing priority (lower numbers = higher priority)
- Choose the routing model: Least Active or Most Available
- Set the push timeout (e.g., 30 seconds — if the agent doesn’t accept within this time, the work item is re-routed)
- Configure overflow settings if needed
- Click Save
Step 4: Create Queues and Associate Routing Configurations
Queues are where work items land before being routed to agents.
- In Setup, go to Queues
- Click New
- Name the queue (e.g., “Tier 1 Support”)
- Select the routing configuration you created in Step 3
- Add the relevant Salesforce objects (e.g., Case) to the queue
- Add queue members — the agents who should receive work from this queue
- Click Save
Step 5: Create Presence Statuses
Define the statuses your agents can set.
- In Setup, go to Presence Statuses
- Click New
- Name the status (e.g., “Available – Cases,” “Available – Chat,” “On Break”)
- For each “Available” status, select which service channels the agent can receive work from while in this status
- Set the status category:
- Online — Agent is available for work
- Busy — Agent is occupied
- Away — Agent is not available
- Click Save
Create multiple presence statuses to give agents flexibility. For example, an agent might set themselves as “Available – Cases Only” when they want to focus exclusively on email cases without receiving chat requests.
Step 6: Create Presence Configurations
Presence configurations define capacity and behavior rules for your agents.
- In Setup, go to Presence Configurations
- Click New
- Name the configuration (e.g., “Standard Agent Presence”)
- Set the overall capacity (e.g., 100 units — meaning the agent can handle work items totaling 100 capacity units at once)
- Choose whether agents can decline work or if work is auto-accepted
- Set behaviors for declining (e.g., set agent to “Away” after declining, or re-route the work immediately)
- Select which presence statuses are available to agents with this configuration
- Assign the configuration to users or profiles
- Click Save
Step 7: Add the Omni-Channel Widget to the Service Console
Agents need a way to set their status and receive work. This is done through the Omni-Channel widget.
- Go to Setup → App Manager
- Find your Service Console app and click Edit
- In the app settings, go to Utility Items (or Utility Bar in Lightning)
- Click Add Utility Item
- Select Omni-Channel
- Configure the widget settings (e.g., default size, whether it auto-opens)
- Click Save
Now, when agents open the Service Console, they’ll see the Omni-Channel widget in the utility bar at the bottom of the screen. They can set their presence status and start receiving work automatically.
Step 8: Create Case Assignment Rules (or Configure Skills-Based Routing)
If you’re using queue-based routing, make sure your case assignment rules are placing cases in the correct queues.
If you’re using skills-based routing, you’ll need to:
- Define skills (e.g., “Billing,” “Technical,” “Spanish Language”)
- Assign skills to agents
- Create skill requirements on work items (either manually or through automation like Process Builder or Flow)
- Configure the routing to match work item skill requirements with agent skills
Skills-based routing requires a bit more setup but delivers significantly more intelligent routing.
Step 9: Test Everything
Before going live, test your Omni-Channel setup thoroughly:
- Log in as a test agent
- Set your presence status to “Available”
- Create a test case (via web form, email, or manually)
- Confirm that the case is routed to you automatically via the Omni-Channel widget
- Accept the case and verify that your capacity is updated
- Close the case and confirm that your capacity is freed up
- Test with multiple agents to verify that routing logic (least active, most available) works correctly
- Test edge cases: What happens when all agents are at capacity? What happens when a push times out?
Step 10: Monitor and Optimize
Once Omni-Channel is live, use Salesforce’s built-in reporting and analytics to monitor performance:
- Omni-Channel Supervisor — A real-time monitoring tool that shows agent availability, queue wait times, and work item status
- Reports and Dashboards — Track metrics like average handle time, first response time, case volume by channel, and agent utilization
- Einstein Analytics — For advanced insights and predictive analytics (available in higher-tier editions)
Review these metrics regularly and adjust your routing configurations, capacity settings, and queue structures as needed.
Key Service Cloud Features: A Comprehensive Overview
We’ve covered case management and omni-channel routing in depth, but Salesforce Service Cloud offers much more. Here’s a comprehensive overview of the key service cloud features that make it such a powerful platform:
1. Lightning Service Console
A unified agent workspace that brings everything together — cases, customer profiles, knowledge articles, collaboration tools, and more — in a single, tabbed interface. Agents can handle multiple cases simultaneously without losing context.
2. Knowledge Management
Build and maintain a centralized knowledge base of articles, FAQs, troubleshooting guides, and best practices. Agents can search for and attach relevant articles to cases, and customers can access a self-service knowledge base to find answers on their own.
3. Einstein AI for Service
Salesforce’s artificial intelligence layer brings intelligent capabilities to Service Cloud:
- Einstein Case Classification — Automatically categorizes and prioritizes incoming cases
- Einstein Article Recommendations — Suggests relevant knowledge articles to agents based on case content
- Einstein Reply Recommendations — Suggests responses to agents during chat and messaging conversations
- Einstein Bots — AI-powered chatbots that handle routine inquiries, collect information, and escalate complex issues to human agents
4. Live Agent (Chat)
Enable real-time chat support on your website. Agents can handle multiple chat conversations simultaneously, use pre-built quick text responses, transfer chats to other agents, and convert chats into cases for follow-up.
5. Messaging
Support customers on their preferred messaging platforms, including SMS, Facebook Messenger, WhatsApp, and Apple Messages for Business. Conversations are persistent (unlike chat, which ends when the session closes), allowing agents and customers to pick up where they left off.
6. Service Cloud Voice
Integrate telephony directly into the Service Console. Agents can receive and make calls, see real-time transcriptions, and get AI-powered recommendations — all without leaving Salesforce. Service Cloud Voice uses Amazon Connect as its telephony backbone (or you can bring your own telephony partner).
7. Self-Service Communities (Experience Cloud)
Create branded customer portals where users can:
- Search the knowledge base
- Submit and track their own cases
- Participate in community forums
- Access their account information
Self-service portals deflect routine inquiries from your support team, reducing case volume and empowering customers to find answers independently.
8. Field Service
For companies that provide on-site service (e.g., repairs, installations, inspections), Salesforce Field Service extends Service Cloud with capabilities like:
- Work order management
- Scheduling and dispatching
- Mobile workforce management
- Inventory tracking
- Route optimization
9. Entitlement Management
Define and enforce service level agreements (SLAs) with entitlements, milestones, and service contracts. Track whether your team is meeting its commitments and automatically escalate cases that are at risk of breaching SLA targets.
10. Case Auto-Response Rules
Automatically send confirmation emails to customers when they submit a case. You can customize the response based on case criteria (e.g., different messages for billing cases vs. technical cases).
11. Workflow and Process Automation
Use Salesforce Flow, Process Builder (being retired in favor of Flow), and Apex to automate repetitive tasks:
- Auto-assign cases based on complex criteria
- Send follow-up emails after a case is resolved
- Create tasks for agents when a high-priority case is received
- Update case fields automatically when certain conditions are met
12. Reporting and Dashboards
Build custom reports and dashboards to track every aspect of your support operation:
- Case volume trends
- Average resolution time
- First contact resolution rate
- Customer satisfaction scores
- Agent performance metrics
- Channel distribution
- Queue wait times
13. CTI (Computer Telephony Integration)
Integrate your phone system with Salesforce using Open CTI. When a customer calls, agents see an automatic screen pop with the caller’s information, recent cases, and account details — allowing them to provide personalized service from the first second of the call.
14. Macros
As mentioned earlier, macros allow agents to execute multi-step actions with a single click, dramatically improving efficiency for repetitive tasks.
15. Customer Satisfaction Surveys
Automatically send CSAT or NPS surveys to customers after case closure. Track satisfaction scores over time and identify patterns that indicate where your service needs improvement.
Benefits of Salesforce Service Cloud for Your Business
Now that we’ve covered the features, let’s talk about the tangible benefits that Salesforce Service Cloud delivers:
Faster Case Resolution
With intelligent routing, automation, knowledge management, and AI-powered recommendations, agents can resolve cases significantly faster. Less time spent searching for information means more time spent solving problems.
Improved Customer Satisfaction
When customers get fast, accurate, personalized support across any channel, satisfaction naturally increases. And higher satisfaction leads to stronger loyalty, higher retention, and more referrals.
Increased Agent Productivity
The Lightning Service Console, macros, automated workflows, and AI assistance eliminate friction from the agent’s workflow. Agents can focus on what they do best — helping customers — instead of wrestling with tools and processes.
Consistent Service Across Channels
With omni-channel routing and a unified agent workspace, customers receive the same high-quality experience regardless of how they contact you. No more disjointed interactions where the left hand doesn’t know what the right hand is doing.
Better Visibility and Decision-Making
Real-time dashboards and detailed reporting give managers and executives clear visibility into support performance. You can identify bottlenecks, spot trends, measure team performance, and make data-driven decisions about staffing, training, and process improvements.
Scalability
Whether you’re handling 50 cases a day or 50,000, Service Cloud scales with you. As your business grows, you can add new channels, create more sophisticated routing rules, expand your knowledge base, and onboard new agents — all within the same platform.
Reduced Costs
Self-service portals and AI chatbots deflect routine inquiries, reducing the volume of cases that require human intervention. Automation eliminates manual tasks. And efficient routing ensures that your agents’ time is used as productively as possible. The result: lower cost per case and higher return on your support investment.
360-Degree Customer View
Because Service Cloud sits on the Salesforce platform alongside Sales Cloud, Marketing Cloud, and other products, you get a complete, unified view of every customer. Support agents can see a customer’s purchase history, marketing interactions, open opportunities, and past service interactions — enabling truly personalized support.
Real-World Use Cases and Examples
To bring everything together, here are some examples of how different businesses use Salesforce Service Cloud to transform their customer service operations:
Use Case 1: E-Commerce Company
Challenge: A rapidly growing e-commerce company was struggling to keep up with customer inquiries during peak seasons. Agents were overwhelmed, response times were increasing, and customer satisfaction was dropping.
Solution: The company implemented Service Cloud with:
- Email-to-Case for automatic case creation from customer emails
- Omni-Channel routing to distribute cases evenly across the team
- A self-service portal where customers could track orders, initiate returns, and find answers to common questions
- Einstein Bots to handle routine inquiries like “Where’s my order?” automatically
Result: Case volume handled by human agents dropped by 35%, average response time decreased from 24 hours to 4 hours, and CSAT scores improved by 20%.
Use Case 2: Financial Services Firm
Challenge: A financial services firm needed to provide differentiated support to clients based on their account tier — platinum clients expected faster, more personalized service, while standard clients were served through self-service channels.
Solution: The firm implemented Service Cloud with:
- Entitlement management to define SLAs for each account tier
- Skills-based omni-channel routing to match clients with agents who had the appropriate product expertise and certifications
- Case escalation rules to automatically escalate cases approaching SLA deadlines
- Service Cloud Voice for integrated phone support with real-time transcription
Result: SLA compliance improved from 72% to 96%, platinum client retention increased by 15%, and agents reported significantly higher job satisfaction due to better tooling.
Use Case 3: Healthcare Technology Company
Challenge: A healthcare technology company needed to support customers across multiple channels (phone, email, chat, and a customer portal) while maintaining strict compliance requirements and detailed audit trails.
Solution: The company implemented Service Cloud with:
- Lightning Service Console for a unified agent workspace
- Omni-channel routing across all channels
- Knowledge management with approval workflows to ensure article accuracy
- Case milestones to track response and resolution times
- Comprehensive reporting to demonstrate compliance to regulators
Result: First-contact resolution improved by 28%, knowledge base usage reduced repeat contacts by 40%, and the company successfully passed its compliance audit with full documentation of service interactions.
Use Case 4: Technology Startup
Challenge: A fast-growing SaaS startup with a small support team needed to deliver enterprise-grade support without hiring a large team.
Solution: The startup implemented Service Cloud with:
- Web-to-Case and Email-to-Case for automatic case creation
- Queue-based omni-channel routing with two queues (Tier 1 and Tier 2)
- Macros to automate common responses (password resets, feature requests, known issues)
- A customer community built on Experience Cloud for self-service
- Einstein Case Classification to auto-categorize and auto-prioritize incoming cases
Result: A team of 5 agents was able to handle the case volume that previously required 8, the startup saved over $150,000 annually in support costs, and NPS scores reached an industry-leading 72.
Common Mistakes to Avoid When Implementing Service Cloud
As a Salesforce consulting partner, RizeX Labs has seen many Service Cloud implementations. Here are some common pitfalls to watch out for:
1. Overcomplicating Routing Rules
Start simple. Begin with queue-based routing and basic assignment rules. You can always add complexity later. Overly complex routing from day one leads to confusion and maintenance headaches.
2. Ignoring Agent Feedback
Your support agents are the ones using the system every day. Involve them in the design and testing process. Their input on workflow, layout, and automation will be invaluable.
3. Neglecting the Knowledge Base
A well-maintained knowledge base is one of the highest-ROI investments you can make. If you launch Service Cloud without investing in knowledge content, you’re leaving significant value on the table.
4. Not Defining SLAs and Metrics Upfront
Before you configure case management and omni-channel routing, define your target metrics. What’s your target first response time? Resolution time? CSAT score? Without clear goals, you won’t know if your implementation is successful.
5. Skipping Training
Service Cloud is powerful, but it’s only effective if your team knows how to use it. Invest in thorough training for agents, supervisors, and administrators.
6. Forgetting About Reporting
Build your reports and dashboards as part of the initial implementation — not as an afterthought. You need visibility from day one to identify issues and optimize your setup.
Why Partner with RizeX Labs for Your Service Cloud Implementation?
Implementing Salesforce Service Cloud is a significant investment — in technology, in process redesign, and in change management. Getting it right the first time matters.
At RizeX Labs, we specialize in helping businesses design, implement, and optimize Salesforce solutions that deliver real results. Our team of certified Salesforce consultants brings deep expertise in Service Cloud, including:
- Discovery and strategy — We work with you to understand your support operations, define your goals, and design a solution that fits your unique needs.
- Implementation and configuration — From case management and omni-channel routing to knowledge base setup and AI integration, we handle the technical heavy lifting.
- Customization and integration — We build custom solutions and integrate Service Cloud with your existing tools and systems.
- Training and adoption — We ensure your team is confident and capable with comprehensive training programs.
- Ongoing support and optimization — Our relationship doesn’t end at go-live. We provide continuous support and optimization to ensure your Service Cloud investment continues to deliver value.
Whether you’re implementing Service Cloud for the first time or looking to optimize an existing setup, RizeX Labs is here to help.
Conclusion: Transform Your Customer Service with Salesforce Service Cloud
Customer service is no longer just a cost center — it’s a competitive differentiator. The companies that deliver fast, personalized, seamless support are the ones that win customer loyalty and drive long-term growth.
Salesforce Service Cloud provides everything you need to deliver that kind of experience. With powerful Salesforce case management capabilities, intelligent omni-channel routing, AI-powered automation, self-service options, and a comprehensive suite of service cloud features, it’s the platform of choice for organizations that take customer service seriously.
In this guide, we’ve walked through Salesforce Service Cloud explained from the ground up — what it is, how case management works, what omni-channel routing does, how to set it up, and what benefits you can expect. We hope this gives you a clear understanding of what’s possible and inspires you to take the next step.
If you’re ready to explore how Service Cloud can transform your customer service operations, RizeX Labs is here to guide you every step of the way. Our team of Salesforce experts will help you design, build, and optimize a solution that’s tailored to your business — so you can focus on what matters most: delivering exceptional experiences for your customers.
About RizeX Labs
We’re Pune’s leading IT training institute specializing in emerging technologies like Salesforce and customer success automation. At RizeX Labs, we help professionals master the intricacies of Service Cloud, Omni-Channel architecture, and AI-driven support through hands-on, real-world projects and expert mentorship. Our programs are designed to transform learners into job-ready Salesforce professionals with the technical and strategic skills to manage global support operations.
Internal Links:
- Salesforce Admin & Development Training
- Salesforce Integration Patterns: REST, SOAP, & Middleware Guide
- Salesforce Flow Builder: Automating Case Management for Beginners
External Links:
- Salesforce Service Cloud Official Overview
- Trailhead: Service Cloud Agent Productivity
- Salesforce Help Docs: Omni-Channel Routing Limits & Details
Quick Summary
Understanding the synergy between Salesforce Case Management and Omni-Channel Routing is essential for building a high-performing support team. Case Management provides the structure for tracking and resolving customer issues with precision, ensuring no request is ever lost. Meanwhile, Omni-Channel Routing acts as the intelligent traffic controller, automatically pushing work to the most qualified, available agents in real time. By combining these features, organizations can move from reactive support to a proactive, seamless service model that reduces resolution times and delivers world-class customer experiences.

