Introduction
Managing data in Salesforce at scale requires more than point-and-click tools. Whether you’re migrating legacy CRM records, performing bulk updates across thousands of accounts, or establishing automated data sync processes, Salesforce Data Loader remains the gold standard for enterprise data operations.
This comprehensive Salesforce Data Loader tutorial walks you through everything from installation to advanced automation, helping you master bulk data operations that the Import Wizard simply can’t handle. You’ll learn how to import data into Salesforce efficiently, execute Data Loader insert update operations with precision, and leverage the Salesforce Bulk API for maximum performance.
By the end of this guide, you’ll understand when to use Data Loader, how to configure it properly, and how to avoid the common pitfalls that lead to failed operations and data quality issues.
What is Salesforce Data Loader?
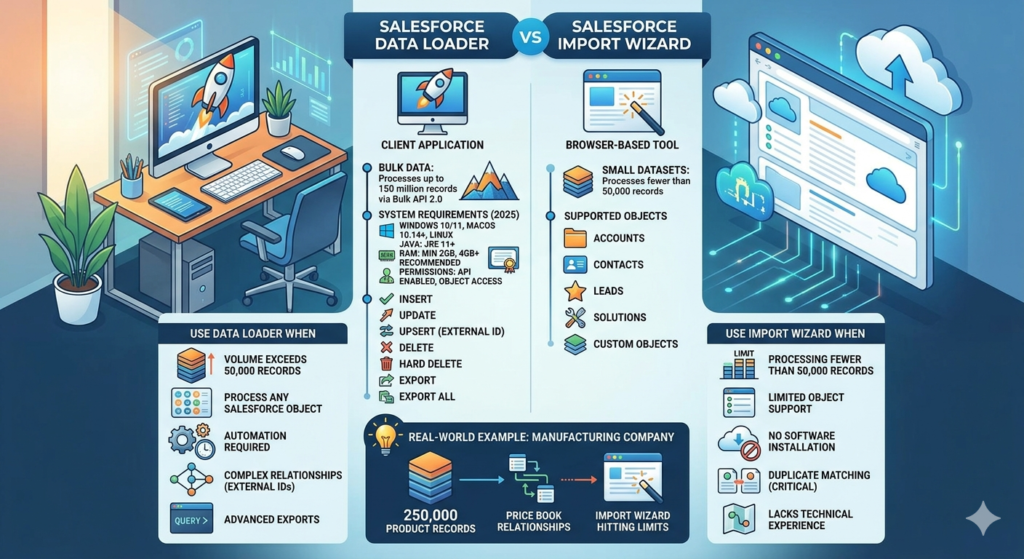
Salesforce Data Loader is a client application designed for bulk import and export of Salesforce data. Unlike browser-based tools, Data Loader operates as a standalone desktop application (with command-line interface capabilities) that can process up to 150 million records through the Bulk API 2.0.
Key Capabilities
- Insert: Add new records to any standard or custom object
- Update: Modify existing records using record IDs or external IDs
- Upsert: Insert or update records in a single operation based on external ID matching
- Delete: Remove records permanently (subject to recycle bin)
- Hard Delete: Permanently delete records bypassing the recycle bin (requires specific permissions)
- Export: Extract data from Salesforce objects to CSV files
- Export All: Include archived and deleted records in exports
System Requirements (2025)
- Operating Systems: Windows 10/11, macOS 10.14+, or Linux (Ubuntu 18.04+)
- Java: JRE 11 or higher (bundled with Windows installer)
- RAM: Minimum 2GB, 4GB+ recommended for large operations
- Permissions: Salesforce user with API Enabled permission and appropriate object-level access
Data Loader vs. Import Wizard: When to Use Each
Understanding when to use Data Loader versus the Import Wizard prevents wasted time and ensures you’re using the right tool for your use case.
Use Import Wizard When:
- Processing fewer than 50,000 records
- Working with Accounts, Contacts, Leads, Solutions, or Custom Objects only
- You need browser-based accessibility without installing software
- Duplicate matching and prevention is critical (built-in duplicate rules)
- Your team lacks technical experience with CSV mapping
Use Data Loader When:
- Volume exceeds 50,000 records — Import Wizard hits hard limits
- You need to process any Salesforce object — Including Campaign Members, Opportunities, Cases, or junction objects
- Automation is required — Command-line interface enables scheduled operations
- Complex relationships exist — External ID mapping for lookups and master-detail relationships
- Hard deletes are necessary — Bypassing recycle bin for compliance
- Export requirements are advanced — SOQL queries for filtered, cross-object data extraction
Real-World Example: A manufacturing company migrating 250,000 product records with complex price book relationships would use Data Loader with external IDs to maintain referential integrity. The Import Wizard couldn’t handle the volume or the relationship complexity.
Installing and Configuring Salesforce Data Loader
Step 1: Download Data Loader
- Log into your Salesforce org
- Navigate to Setup → Quick Find: “Data Loader”
- Click Data Loader under Integrations
- Select your operating system and download the installer
- For command-line only usage, download the standalone .zip file
Pro Tip: Salesforce releases Data Loader updates quarterly. Check for updates regularly through Setup to access Bulk API 2.0 improvements and bug fixes.
Step 2: Installation Process
For Windows:
text1. Run the downloaded .exe installer
2. Accept license agreement
3. Choose installation directory (default: C:\Program Files\salesforce.com\Data Loader)
4. Complete installation wizard
5. Launch Data Loader from Start Menu or desktop shortcut
For macOS:
text1. Open the downloaded .dmg file
2. Drag Data Loader to Applications folder
3. First launch: Right-click → Open (to bypass Gatekeeper)
4. Grant necessary permissions when prompted
Step 3: Initial Configuration
Upon first launch, configure these essential settings:
Settings → Settings Menu
| Setting | Recommended Value | Purpose |
|---|---|---|
| Batch Size | 200 (Bulk API), 2000 (Bulk API 2.0) | Balances throughput with governor limits |
| Insert Null Values | Unchecked | Prevents accidental data erasure |
| Use Bulk API | Checked | Better performance for large datasets |
| Assignment Rule | As needed | Triggers assignment rules on insert |
| Workflow Rule | As needed | Activates automation (use cautiously) |
| Time Zone | Your org’s timezone | Ensures accurate datetime field handling |
Critical Setting — Bulk API 2.0: In Settings, enable “Enable Bulk API serial mode” for operations requiring record sequence (rare). For most operations, parallel mode (default) maximizes throughput.
Connecting Data Loader to Salesforce
Production/Developer Org Authentication
- Launch Data Loader
- Enter your Salesforce username
- Enter your password + security token (Password123 + TOKEN456 = Password123TOKEN456)
- Click Log in
OAuth Authentication (Recommended for 2025)
Modern Data Loader versions support OAuth 2.0:
- Click Log in using OAuth
- Browser window opens to Salesforce login
- Authenticate and authorize Data Loader
- Return to Data Loader (automatically authenticated)
OAuth eliminates security token management and supports SSO configurations.
Sandbox Authentication
- Before logging in, go to Settings → Settings
- Check “Use Bulk API” (for sandbox testing)
- Change Server host from
login.salesforce.comtotest.salesforce.com - Proceed with normal authentication
Pro Tip: Create separate Data Loader installations or shortcuts for production vs. sandbox to prevent accidental data operations in the wrong environment.
Salesforce Data Loader Tutorial: Insert Operations
Preparing Your CSV File
Data quality starts before you ever click “Insert.” Follow these CSV preparation guidelines:
File Structure Requirements:
- UTF-8 encoding (prevents special character issues)
- First row contains API field names (Account.Name, not “Account Name”)
- No empty rows or columns
- Date format: YYYY-MM-DD (2025-03-15)
- DateTime format: YYYY-MM-DDTHH:MM:SSZ (2025-03-15T14:30:00Z)
- Boolean values: TRUE/FALSE or 1/0
- Picklist values must match exactly (case-sensitive)
Sample CSV for Account Insert:
csvName,Type,Industry,BillingStreet,BillingCity,BillingState,BillingPostalCode,Phone
Acme Corporation,Customer,Technology,123 Tech Blvd,San Francisco,CA,94105,415-555-0100
Global Industries,Partner,Manufacturing,456 Industrial Way,Detroit,MI,48201,313-555-0200
Step-by-Step Insert Process
Step 1: Launch Insert Operation
- Open Data Loader
- Click Insert
- Select object from dropdown (e.g., “Account”)
- Click Next
Step 2: Select CSV File
- Click Browse to locate your CSV file
- Data Loader displays first few rows for verification
- Review data preview for formatting issues
- Click Next
Step 3: Map Fields
This is where most errors occur. Take time to map correctly.
- Auto-Match Fields (if CSV headers match API names)
- Click Auto-Match Fields to Columns
- Data Loader maps matching names automatically
- Manual Mapping (for custom mappings)
- Drag CSV column names from bottom panel
- Drop onto corresponding Salesforce fields in top panel
- Required fields show in red until mapped
- Relationship Fields (lookups and master-detail)
- For lookup by ID: Map to
AccountId,OwnerId, etc. - For lookup by External ID: Map to
Account:External_ID__c
- For lookup by ID: Map to
Pro Tip: Save your mapping file (.sdl) by clicking Save Mapping. Reuse this for recurring operations to eliminate repetitive mapping work.
Step 4: Configure Operation Settings
- Choose directory for success and error files
- Review batch size (default: 200 for Bulk API)
- Enable “Use Bulk API” for operations over 5,000 records
- Click Finish
Step 5: Monitor and Verify
Data Loader displays real-time progress:
- Total records processed
- Successful inserts
- Failed records
After completion:
- success.csv: Contains record IDs for inserted records
- error.csv: Lists failed records with error messages
Common Insert Errors and Solutions:
| Error Message | Cause | Solution |
|---|---|---|
| REQUIRED_FIELD_MISSING | Mandatory field not populated | Review field requirements, update CSV |
| DUPLICATE_VALUE | Unique field constraint violated | Check for duplicate External IDs or emails |
| FIELD_CUSTOM_VALIDATION | Validation rule failed | Review validation rules, adjust data |
| INVALID_CROSS_REFERENCE_KEY | Lookup relationship ID doesn’t exist | Verify related records exist first |
Import Data Into Salesforce: Update Operations
Update operations modify existing records. The critical difference: you must include the Salesforce Record ID or use an External ID.
Using Record IDs for Updates
Step 1: Export Current Records
Before updating, export existing data to obtain Record IDs:
- Click Export
- Select object
- Choose fields including Id
- Execute query
- Open exported CSV — the Id column contains 18-character Salesforce IDs
Step 2: Prepare Update CSV
csvId,Name,Phone,Industry
0011X00001AbcDEQAZ,Acme Corporation - Updated,415-555-9999,Technology
0011X00001AbcFGQAZ,Global Industries Inc,313-555-8888,Manufacturing
Step 3: Execute Update
- Click Update
- Select object
- Browse to update CSV
- Map fields (Id field must be mapped)
- Finish operation
Using External IDs for Updates (Recommended)
External IDs eliminate dependency on Salesforce Record IDs, making updates more maintainable.
What is an External ID?
An External ID is a custom field flagged as “External ID” during field creation. It represents unique identifiers from external systems (ERP customer numbers, legacy CRM IDs, etc.).
Creating an External ID Field:
- Setup → Object Manager → Select Object (e.g., Account)
- Fields & Relationships → New
- Choose field type (Text or Number)
- Check “External ID” and “Unique”
- Save
Update CSV Using External ID:
csvLegacy_Customer_ID__c,Name,Phone,Annual_Revenue__c
CUST-10001,Acme Corporation,415-555-0100,5000000
CUST-10002,Global Industries,313-555-0200,12000000
Mapping External ID Updates:
- In field mapping screen
- Map your External ID column to
Account:Legacy_Customer_ID__c(note the object prefix) - Map remaining fields normally
- Data Loader matches records by External ID and updates
Pro Tip: External IDs support the colon notation for relationship fields: Account:External_ID__c tells Data Loader “find the Account where External_ID__c matches this value.”
Data Loader Insert Update: Upsert Operations
Upsert combines insert and update into a single operation — the most powerful and time-efficient Data Loader function.
How Upsert Works
Upsert uses an External ID field to determine action:
- Match found: Update existing record
- No match: Insert new record
Real-World Use Case: Product Catalog Sync
A retail company synchronizes 50,000 products nightly from their ERP system. Some products are new, others require price updates.
Without Upsert: Two separate operations (export, filter, update existing, insert new)
With Upsert: Single operation using Product Code as External ID
Step-by-Step Upsert Process:
Step 1: Ensure External ID Exists
Verify your object has an External ID field (or create one as shown previously).
Step 2: Prepare Upsert CSV
csvProduct_Code__c,Name,Unit_Price__c,Stock_Level__c,Description__c
SKU-10001,Premium Widget,299.99,150,High-performance widget for industrial use
SKU-10002,Standard Widget,149.99,500,Cost-effective widget for general applications
SKU-10003,Economy Widget,79.99,1000,Budget-friendly widget option
Step 3: Execute Upsert
- Click Upsert
- Select object (Product__c)
- Critical: Select External ID field from dropdown (Product_Code__c)
- Browse to CSV file
- Map fields
- Finish
Step 4: Review Results
Upsert returns three files:
- success.csv: Successfully processed records (both inserts and updates)
- error.csv: Failed records
- upsert_result.csv: Indicates which records were created vs. updated
Upsert vs. Separate Insert/Update Operations
Advantages:
- 50% reduction in processing time
- Eliminates pre-operation filtering
- Simplifies automation scripts
- Reduces API call consumption
Disadvantages:
- Requires External ID field creation
- All-or-nothing: Can’t apply different validation to inserts vs. updates
- Slightly more complex troubleshooting when errors occur
Advanced: Handling Relationship Fields
Salesforce’s relational data model requires careful handling of lookups and master-detail relationships.
Lookup Relationship Example: Contacts to Accounts
Scenario: Importing 10,000 contacts, linking each to their Account.
Method 1: Using Salesforce Record IDs
csvFirstName,LastName,Email,AccountId
John,Smith,jsmith@acme.com,0011X00001AbcDEQAZ
Jane,Doe,jdoe@global.com,0011X00001AbcFGQAZ
Map AccountId column to the AccountId field in Data Loader.
Method 2: Using Account External ID (Best Practice)
csvFirstName,LastName,Email,Account_External_ID
John,Smith,jsmith@acme.com,ACCT-10001
Jane,Doe,jdoe@global.com,ACCT-10002
Map Account_External_ID column to Account:Legacy_Account_ID__c (assuming Legacy_Account_ID__c is an External ID on Account).
The colon notation tells Data Loader:
- Look up the Account object
- Find the record where Legacy_Account_ID__c matches the value
- Use that Account’s Salesforce ID for the relationship
Master-Detail Relationship Example: Opportunity Line Items
Master-detail relationships require the parent record to exist before inserting child records.
Two-Step Process:
Step 1: Import Opportunities
csvOpportunity_External_ID__c,Name,StageName,CloseDate,AccountId
OPP-2025-001,Q1 Enterprise Deal,Prospecting,2025-06-30,0011X00001AbcDEQAZ
OPP-2025-002,Platform Upgrade,Negotiation,2025-04-15,0011X00001AbcFGQAZ
Step 2: Import Opportunity Products (Line Items)
csvOpportunity_External_ID,Product2Id,Quantity,UnitPrice
OPP-2025-001,01t1X000001XYZABC,10,1500.00
OPP-2025-001,01t1X000001XYZDEF,5,750.00
OPP-2025-002,01t1X000001XYZGHI,25,200.00
Map Opportunity_External_ID to Opportunity:Opportunity_External_ID__c.
Pro Tip: Always import parent records before child records in master-detail relationships. For complex hierarchies (Account → Opportunity → Line Item), process in three separate operations in dependency order.
Leveraging Salesforce Bulk API for Performance
The Salesforce Bulk API is designed specifically for large-dataset operations, processing records asynchronously in batches.
Bulk API vs. SOAP API
| Feature | Bulk API | SOAP API |
|---|---|---|
| Optimal use case | >5,000 records | <5,000 records |
| Processing mode | Asynchronous batches | Synchronous |
| Maximum records | 150M (Bulk API 2.0) | Limited by timeout |
| Processing time | Slower start, faster overall | Immediate start |
| Governor limits | Separate limits | Shares with other API calls |
Enabling Bulk API in Data Loader
Settings → Settings:
- Check “Use Bulk API”
- Bulk API batch size: Set to 10,000 for Bulk API 2.0 (default: 2,000)
- For ordered operations: Check “Enable Bulk API serial mode”
Bulk API 2.0 (2025 Improvement)
Bulk API 2.0 offers significant improvements:
- Faster processing: Up to 3x speed improvement
- Simplified monitoring: Single job status vs. multiple batch statuses
- Larger batches: Up to 100MB per batch (vs. 10MB in Bulk API 1.0)
Activating Bulk API 2.0:
Available in Data Loader version 58.0+:
- Settings → Settings
- Bulk API version: Select “Bulk API 2.0”
- Adjust batch size to 10,000 for optimal performance
When to Use Serial Mode:
Serial mode processes batches sequentially rather than parallel. Use only when:
- Record processing order matters (rare)
- Parallel processing causes locking issues (high-contention objects)
Note: Serial mode is significantly slower. Use parallel mode (default) for 95% of operations.
Export and Export All Operations
Data Loader’s export capabilities extend far beyond simple data downloads.
Basic Export
Step 1: Launch Export
- Click Export
- Select object
- Choose output directory
- Click Next
Step 2: Write SOQL Query
Data Loader requires SOQL queries for exports. Basic template:
SQLSELECT Id, Name, CreatedDate, Industry, Annual_Revenue__c
FROM Account
WHERE CreatedDate > 2024-01-01T00:00:00Z
Query Builder Assistance:
- Click “Select Fields” to choose fields via UI
- Click “Generate Query” for basic SELECT statement
- Manually add WHERE, ORDER BY clauses as needed
Step 3: Execute Export
Click Finish — exported CSV appears in chosen directory.
Export All (Including Deleted Records)
Export All retrieves archived and deleted records from the Recycle Bin (available for 15 days post-deletion).
Use Cases:
- Recovering accidentally deleted data
- Compliance audits requiring deleted record history
- Pre-hard delete verification
Process:
- Click Export All
- Follow same steps as Export
- Add
IsDeleted = trueto WHERE clause for deleted-only records
SQLSELECT Id, Name, IsDeleted, SystemModstamp
FROM Account
WHERE IsDeleted = true
Advanced SOQL for Relationship Queries
Parent-to-Child Export:
SQLSELECT Id, Name, (SELECT FirstName, LastName, Email FROM Contacts)
FROM Account
Note: Parent-to-child queries create nested CSV structures. Use standard exports with relationship fields for cleaner CSV output:
SQLSELECT Id, FirstName, LastName, Email, Account.Name, Account.Industry
FROM Contact
This produces flat CSV with Account fields as separate columns.
Command-Line Interface for Automation
Data Loader’s command-line interface enables scheduled, automated data operations—critical for nightly syncs, scheduled backups, and integration pipelines.
Setting Up CLI Operations
Step 1: Create Process Configuration Files
Configuration files define operation parameters. Located in <DataLoader>/samples/conf/.
process-conf.xml (database connection and field mappings):
XML<!DOCTYPE beans PUBLIC "-//SPRING//DTD BEAN//EN" "http://www.springframework.org/dtd/spring-beans.dtd">
<beans>
    <bean id="accountInsert" class="com.salesforce.dataloader.process.ProcessRunner">
        <property name="name" value="AccountInsert"/>
        <property name="configOverrideMap">
            <map>
                <entry key="sfdc.endpoint" value="https://login.salesforce.com"/>
                <entry key="sfdc.username" value="your.username@company.com"/>
                <entry key="sfdc.password" value="YourPasswordYourSecurityToken"/>
                <entry key="process.operation" value="insert"/>
                <entry key="sfdc.entity" value="Account"/>
                <entry key="process.mappingFile" value="accountInsert.sdl"/>
                <entry key="dataAccess.name" value="/path/to/accounts.csv"/>
                <entry key="dataAccess.writeSuccess" value="/path/to/success.csv"/>
                <entry key="dataAccess.writeError" value="/path/to/error.csv"/>
            </map>
        </property>
    </bean>
</beans>
Step 2: Create Field Mapping File (.sdl)
Export this from Data Loader GUI during your first manual operation via “Save Mapping”.
accountInsert.sdl:
textName=Name
Type=Type
Industry=Industry
BillingStreet=BillingStreet
BillingCity=BillingCity
BillingState=BillingState
Step 3: Execute via Command Line
Windows:
batchcd "C:\Program Files\salesforce.com\Data Loader\bin"
process.bat "C:\DataLoaderConfigs\process-conf.xml" accountInsert
macOS/Linux:
Bashcd /Applications/Data\ Loader/bin
./process.sh /path/to/process-conf.xml accountInsert
Scheduling Automated Operations
Windows Task Scheduler:
- Create batch script (e.g.,
run_dataloader.bat) - Open Task Scheduler → Create Basic Task
- Set trigger (daily at 2:00 AM)
- Action: Start a program → select your .bat file
- Save and test
macOS/Linux Cron:
Bash# Edit crontab
crontab -e

# Add entry (runs daily at 2 AM)
0 2 * * * /path/to/run_dataloader.sh >> /var/log/dataloader.log 2>&1
Security Considerations:
Passwords in plain text XML files pose security risks. Use:
- Encrypted passwords: Use Data Loader’s encryption utilitytext
encrypt.bat -e YourPasswordYourTokenReplace password in XML with encrypted version - OAuth authentication: Configure OAuth tokens (recommended for production)
Common Mistakes and How to Avoid Them
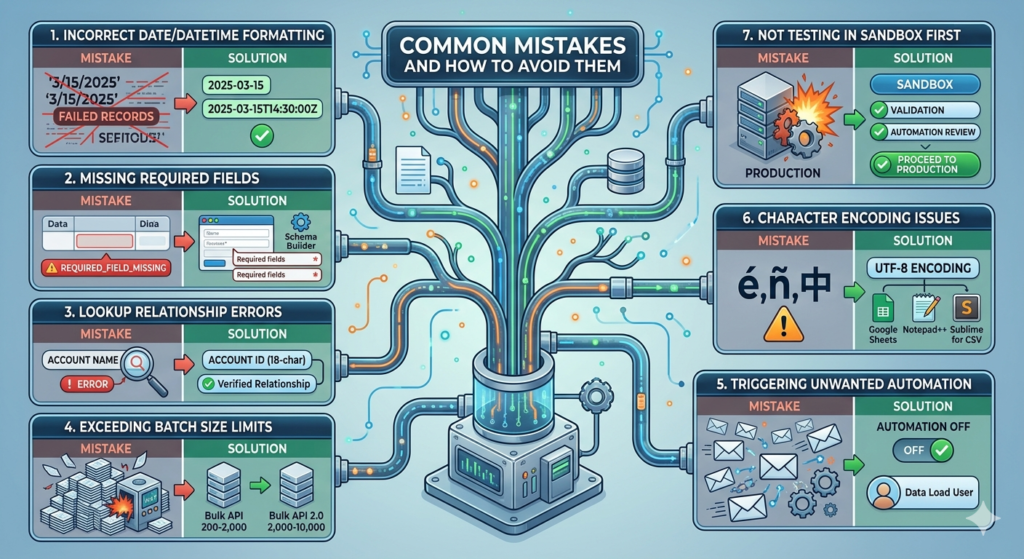
1. Incorrect Date/DateTime Formatting
Mistake: Using formats like “3/15/2025” or “15-Mar-2025”
Impact: FIELD_INTEGRITY_EXCEPTION errors, failed records
Solution: Always use ISO 8601 formats
- Date:
2025-03-15 - DateTime:
2025-03-15T14:30:00Z(Z indicates UTC)
2. Missing Required Fields
Mistake: CSV doesn’t include all required fields
Impact: REQUIRED_FIELD_MISSING errors
Solution:
- Review object field requirements before preparing CSV
- Use Schema Builder (Setup → Schema Builder) to identify required fields (marked with red asterisks)
- Map all required fields even if populated by default values
3. Lookup Relationship Errors
Mistake: Using record names instead of IDs for lookups (e.g., Account name instead of Account ID)
Impact: INVALID_CROSS_REFERENCE_KEY errors
Solution:
- Use Salesforce 18-character Record IDs or External IDs
- Never use record names for relationships
- Verify related records exist before import
4. Exceeding Batch Size Limits
Mistake: Setting batch size too high causes timeout errors
Impact: Batch failures, incomplete processing
Solution:
- Bulk API: 200-2,000 records per batch (default: 200)
- Bulk API 2.0: 2,000-10,000 records per batch
- Start conservative, increase gradually while monitoring success rates
5. Triggering Unwanted Automation
Mistake: Leaving “Use workflow rules” enabled during bulk operations
Impact: Thousands of workflow emails, process builder executions, API limit consumption
Solution:
- Disable workflows during bulk operations: Settings → uncheck “Process workflow rules”
- Re-enable after operation completes
- Consider creating separate data load user profile with automation bypasses
6. Character Encoding Issues
Mistake: Using non-UTF-8 encoding causes special characters to display as gibberish
Impact: Data corruption, especially with international characters (é, ñ, 中)
Solution:
- Always save CSVs as UTF-8 encoding
- In Excel: Save As → More Options → Tools → Web Options → Encoding → UTF-8
- Better: Use Google Sheets or text editors (Notepad++, Sublime) for CSV preparation
7. Not Testing in Sandbox First
Mistake: Running bulk operations directly in production
Impact: Irreversible data corruption, system downtime
Solution:
- Always test in sandbox with representative data sample
- Validate success/error rates
- Review automation impacts (workflows, triggers)
- Only proceed to production after successful sandbox testing
Pro Tips for Power Users
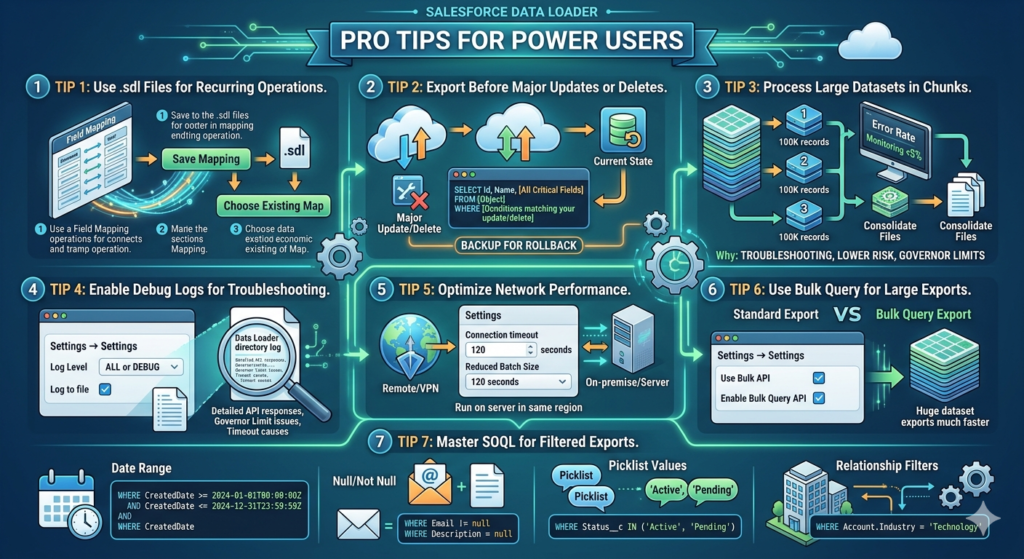
Tip 1: Use .sdl Files for Recurring Operations
Every time you complete field mapping in Data Loader, save the mapping file (.sdl). Reuse this file for identical operations to eliminate repetitive mapping.
How to Save:
Field Mapping screen → “Save Mapping” → Choose location and filename
How to Load:
Field Mapping screen → “Choose Existing Map” → Select saved .sdl file
Tip 2: Export Before Major Updates or Deletes
Always export current state before destructive operations:
SQLSELECT Id, Name, [All Critical Fields]
FROM [Object]
WHERE [Conditions matching your update/delete]
This creates a backup for rollback if needed.
Tip 3: Process Large Datasets in Chunks
For 1M+ record operations:
- Split CSV into 100K record chunks
- Process sequentially
- Monitor error rates — if >5%, pause and troubleshoot
- Consolidate success/error files after completion
Why: Easier troubleshooting, lower risk of complete operation failure, better governor limit management.
Tip 4: Enable Debug Logs for Troubleshooting
When operations fail mysteriously:
Settings → Settings:
- Set “Log Level” to ALL or DEBUG
- Check “Log to file”
- Review log files in Data Loader directory
Logs reveal detailed API responses, governor limit issues, and timeout causes.
Tip 5: Optimize Network Performance
For remote/VPN users experiencing slow operations:
Settings → Settings:
- Increase “Connection timeout” from 60 to 120 seconds
- Reduce batch size to decrease payload size
- Consider running Data Loader on server in same region as Salesforce instance
Tip 6: Use Bulk Query for Large Exports
When exporting >1M records, use Bulk Query API:
Settings → Settings:
- Check “Use Bulk API”
- “Enable Bulk Query API” (for exports)
- Dramatically faster for large datasets
Tip 7: Master SOQL for Filtered Exports
Learn these SOQL patterns for targeted exports:
Date Range:
SQLWHERE CreatedDate >= 2024-01-01T00:00:00Z AND CreatedDate <= 2024-12-31T23:59:59Z
Null/Not Null:
SQLWHERE Email != null
WHERE Description = null
Picklist Values:
SQLWHERE Status__c IN ('Active', 'Pending')
Relationship Filters:
SQLWHERE Account.Industry = 'Technology'
Real-World Use Cases
Use Case 1: Annual Account Cleanup
Scenario: Remove 75,000 dormant accounts (no activity in 3 years, no open opportunities)
Process:
- Export with filter:SQL
SELECT Id, Name, Last_Activity_Date__c FROM Account WHERE Last_Activity_Date__c < 2022-01-01T00:00:00Z AND Id NOT IN (SELECT AccountId FROM Opportunity WHERE IsClosed = false) - Review exported records for false positives
- Delete operation:
- Load export CSV
- Map Id field only
- Execute delete
- Review error.csv for deletion failures (common: master-detail children exist)
- Hard delete after 30-day review period (if needed)
Result: Database cleanup improves query performance, reduces storage costs.
Use Case 2: Migrating from Legacy CRM
Scenario: 500,000 contact records from legacy system with complex account relationships
Process:
Phase 1: Account Import
csvLegacy_Account_ID__c,Name,Type,Industry,Phone
LEGACY-1001,Acme Corp,Customer,Manufacturing,555-0100
LEGACY-1002,TechStart Inc,Prospect,Technology,555-0200
- Upsert accounts using Legacy_Account_ID__c as External ID
- Preserve source system identifier for future syncs
Phase 2: Contact Import
csvLegacy_Contact_ID__c,FirstName,LastName,Email,Account_Legacy_ID
CONT-5001,John,Smith,jsmith@acme.com,LEGACY-1001
CONT-5002,Jane,Doe,jdoe@techstart.com,LEGACY-1002
- Map Account_Legacy_ID to Account:Legacy_Account_ID__c
- Data Loader resolves account relationships automatically
Phase 3: Activity History (Tasks/Events)
- Export activities from legacy system
- Transform to Salesforce format
- Link to contacts via External IDs
- Import in 50K record batches
Result: Complete migration in 3 phases, maintaining all relationships, with ability to re-sync if needed.
Use Case 3: Nightly Product Catalog Sync
Scenario: E-commerce company syncs 25,000 products from ERP to Salesforce nightly
Automated Solution:
1. ERP Export (scheduled 1:00 AM):
- ERP system exports to CSV on shared drive
2. Data Loader Process (scheduled 2:00 AM):
XML<bean id="productUpsert" class="com.salesforce.dataloader.process.ProcessRunner">
    <property name="name" value="ProductSync"/>
    <property name="configOverrideMap">
        <map>
            <entry key="process.operation" value="upsert"/>
            <entry key="sfdc.entity" value="Product2"/>
            <entry key="sfdc.externalIdField" value="Product_SKU__c"/>
            <entry key="dataAccess.name" value="\\shared\erp\products_export.csv"/>
        </map>
    </property>
</bean>
3. Error Monitoring (scheduled 6:00 AM):
- Script checks error.csv
- If >100 failures, alerts sent to admin team
Result: Automated synchronization, sales team has current product data daily, minimal manual intervention.
Troubleshooting Common Issues
Issue 1: “Unable to connect to Salesforce”
Causes:
- Incorrect credentials or expired password
- Security token changed
- IP restrictions blocking connection
- Firewall blocking Data Loader
Solutions:
- Verify username/password in Salesforce web interface
- Reset security token: Setup → My Personal Information → Reset Security Token
- Append new token to password in Data Loader
- Add your IP to Trusted IP Ranges: Setup → Network Access
- Check firewall allows outbound HTTPS (port 443)
Issue 2: “Batch failed” with Bulk API
Causes:
- Batch size exceeds processing capacity
- Record locking conflicts
- Governor limit exceeded
Solutions:
- Reduce batch size to 100-200 records
- Enable serial mode (Settings → “Enable Bulk API serial mode”)
- Schedule operation during off-peak hours
- Review debug logs for specific governor limit issues
Issue 3: Mapping file (.sdl) won’t load
Causes:
- Field API names changed
- Object permissions changed
- CSV column headers don’t match mapping
Solutions:
- Recreate mapping file with current field names
- Verify user has Read/Write access to all mapped fields
- Ensure CSV headers exactly match mapping file entries (case-sensitive)
Issue 4: Some records succeed, others fail
Causes:
- Data quality varies across records
- Validation rules trigger selectively
- Required fields missing in some rows
Solutions:
- Open error.csv — “ERROR” column explains each failure
- Group errors by type
- Fix CSV data for common errors
- Re-run operation with only failed records (from error.csv)
- Iterate until all records succeed
Issue 5: Operation runs extremely slowly
Causes:
- SOAP API used instead of Bulk API for large dataset
- Network latency
- Complex workflows/triggers executing per record
Solutions:
- Enable Bulk API: Settings → “Use Bulk API”
- Disable workflows during load: Settings → uncheck “Process workflow rules”
- Increase timeout: Settings → “Connection timeout” = 120 seconds
- Process during off-peak hours (less server load)
Security and Compliance Considerations
Data Privacy During Export
Exporting production data requires careful handling:
Best Practices:
- Encrypt exported files: Use 7-Zip, WinZip with AES-256 encryption
- Limit field selection: Only export necessary fields, exclude sensitive data (SSN, credit cards)
- Audit trail: Enable Data Loader logging to track all export operations
- Secure deletion: Use secure file deletion tools for temporary CSV files
- Access controls: Restrict Data Loader installation to authorized personnel only
Compliance with Data Regulations
GDPR Considerations:
- Export operations for data subject requests (right to access)
- Delete operations for right to erasure requests
- Document all bulk operations involving EU resident data
HIPAA Considerations:
- Encrypt all PHI data in CSV files
- Use encrypted connections (OAuth vs. username/password)
- Maintain audit logs of all PHI access via Data Loader
Field-Level Security Respect
Data Loader respects Salesforce field-level security:
- Hidden fields won’t export
- Read-only fields can’t be updated
- Operations fail gracefully with permission errors
Pro Tip: Create dedicated “Data Integration User” profile with API access and appropriate field permissions, rather than using admin credentials for automated processes.
Performance Optimization Strategies
Strategy 1: Bulk API 2.0 for Large Datasets
For operations >100K records:
- Upgrade to Data Loader 58.0+
- Settings → Bulk API version → “Bulk API 2.0”
- Batch size: 10,000 records
- Parallel mode (default)
Performance Gain: 2-3x faster than Bulk API 1.0
Strategy 2: Pre-Process Data Quality
Clean data before loading:
- Remove duplicate rows in CSV
- Validate required fields are populated
- Standardize formats (dates, phone numbers, states)
- Trim whitespace from all fields
Tools: OpenRefine, Python pandas, or Excel Power Query
Result: Higher success rates, fewer error-handling iterations
Strategy 3: Defer Complex Computations
For fields with complex formulas or triggers:
- Temporarily disable triggers (requires developer)
- Load data
- Re-enable triggers
- Run batch job to recalculate formulas if needed
Caution: Only use when trigger logic isn’t required during load (e.g., audit timestamps, complex validations)
Strategy 4: Parallel Processing with Multiple Data Loader Instances
For extremely large datasets (10M+ records):
- Split CSV into multiple files (by record range or criteria)
- Launch separate Data Loader instances
- Process simultaneously
- Consolidate success/error files
Requirements: Sufficient API limits, multiple user licenses, careful coordination to avoid conflicts
Conclusion
Mastering Salesforce Data Loader transforms you from a basic Salesforce user to a data operations expert capable of handling enterprise-scale migrations, integrations, and maintenance tasks that would otherwise require expensive middleware or consulting engagements.
Key Takeaways:
- Choose the right tool: Data Loader for volume and complexity, Import Wizard for simple, small operations
- Leverage External IDs: They’re the key to maintainable upserts and relationship management
- Use Bulk API appropriately: Essential for operations >5,000 records
- Test in sandbox always: Production data operations are irreversible
- Automate with CLI: Scheduled operations eliminate manual work and ensure consistency
- Handle errors systematically: Review error.csv patterns, fix in batches, iterate
Next Steps to Mastery:
- Practice in Developer Edition: Create free org at developer.salesforce.com
- Build automation: Set up one command-line process for recurring task
- Explore advanced SOQL: Master relationship queries for complex exports
- Document your processes: Create runbooks for future operations
At RizeX Labs, we specialize in Salesforce data architecture and integration solutions. Whether you’re migrating from legacy systems, building automated data pipelines, or optimizing existing Salesforce implementations, our team brings deep expertise in Data Loader, API integrations, and enterprise data management.
Need help with complex data migrations or automation projects? Contact RizeX Labs for expert consultation.
About RizeX Labs
At RizeX Labs, we specialize in delivering cutting-edge Salesforce solutions, helping businesses streamline operations through automation and smart data management. Our expertise spans Salesforce Administration, Data Management, and Revenue Cloud solutions, enabling organizations to handle large-scale data efficiently.
We empower companies to move from manual data handling to fully automated, scalable workflows using tools like Salesforce Data Loader—ensuring accuracy, speed, and compliance.
Internal Links:
- Salesforce Admin course page
Salesforce Flows vs Apex: When Should You Use Code vs No-Code Automation? - Salesforce Nonprofit Cloud: Features, Use Cases, and Career Opportunities (2026 Guide)
- Salesforce Net Zero Cloud: What It Is and Why It’s the Next Green Career Niche (2026 Guide)
- Salesforce Slack Integration: How It Works and What Developers Need to Know
- Salesforce Named Credentials: What They Are and How to Use Them Safely
- Salesforce Deployment Best Practices: Change Sets vs Salesforce CLI vs Gearset
External Links:
McKinsey Sales Growth Reports
Gartner Sales Automation Insights
Quick Summary
Salesforce Data Loader is an enterprise-grade client application that enables bulk import, export, update, upsert, and delete operations on Salesforce data—handling up to 150 million records through the Bulk API 2.0. Unlike the browser-based Import Wizard limited to 50,000 records and specific objects, Data Loader works with all Salesforce objects, supports complex relationship mapping through External IDs, and provides command-line automation capabilities for scheduled operations. This comprehensive guide covers installation and configuration, step-by-step tutorials for all operation types (insert, update, upsert, delete, export), advanced techniques for handling relationships and leveraging the Bulk API, common mistakes to avoid, and real-world use cases including CRM migrations and automated nightly syncs. Key best practices include always testing in sandbox environments first, using External IDs for maintainable upsert operations, enabling Bulk API for operations exceeding 5,000 records, properly formatting dates in ISO 8601 format, saving field mapping files for recurring operations, and implementing proper security measures when handling sensitive data. Whether you're migrating hundreds of thousands of records from a legacy system, establishing automated integration pipelines, or performing routine data maintenance, mastering Data Loader transforms complex, time-consuming manual processes into efficient, repeatable operations that respect Salesforce's governor limits and data integrity requirements.

