Introduction: Why Email Configuration in SFMC Can Make or Break Your Campaigns
Let’s be honest — most marketers spend the vast majority of their time obsessing over subject lines, creative assets, and audience segmentation. And rightfully so. These elements are the visible, tangible parts of email marketing that directly influence engagement.
But here’s the uncomfortable truth: none of that matters if your emails never reach the inbox.
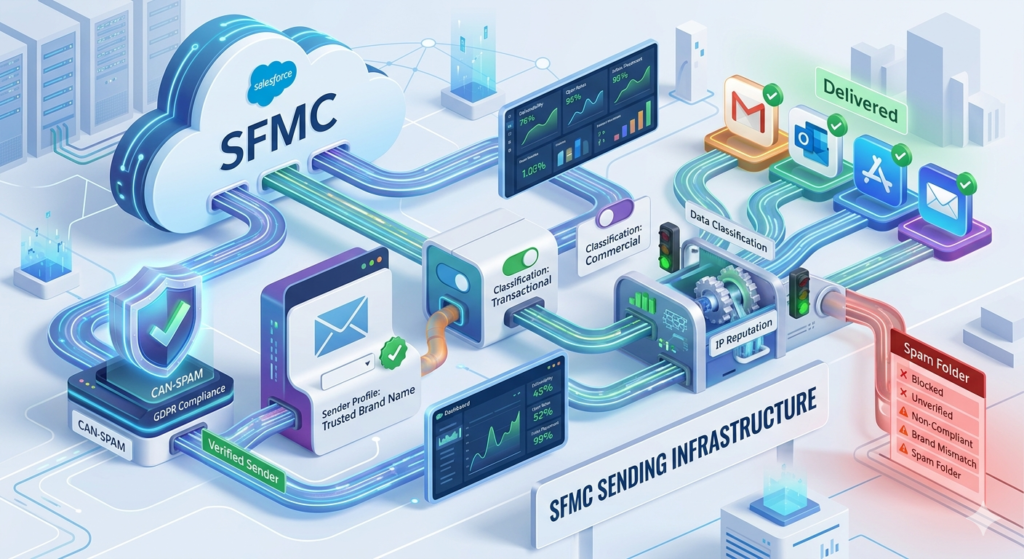
Behind every successful email campaign in Salesforce Marketing Cloud (SFMC) lies a carefully configured sending infrastructure — one that determines who the email appears to come from, how it’s classified, and whether it complies with regulations like the CAN-SPAM Act. Get these foundational elements wrong, and you’re looking at deliverability issues, spam folder placements, brand inconsistency, and even legal exposure.
At RizeX Labs, we’ve audited hundreds of SFMC instances, and we consistently find that SFMC send classification and Salesforce Marketing Cloud sender profile configurations are among the most misunderstood — and most frequently misconfigured — components of the platform. Teams either rely entirely on default settings without understanding what they do, or they create a tangled web of configurations that becomes impossible to manage at scale.
This guide is designed to change that.
Whether you’re a marketer setting up your first SFMC Business Unit, a Salesforce admin responsible for governance, or an SFMC developer building automated journeys, this post will walk you through everything you need to know about Send Classifications and Sender Profiles — what they are, how they work together, how to set them up correctly, and how to use them to ensure CAN-SPAM compliance and optimal deliverability.
Let’s dive in.
What Is a Sender Profile in Salesforce Marketing Cloud?
Definition
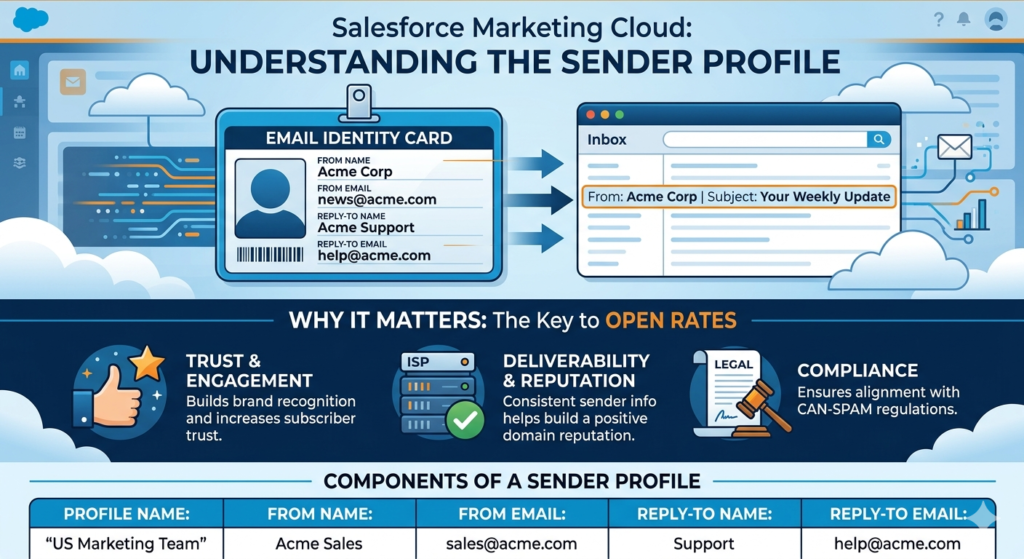
A Salesforce Marketing Cloud sender profile is a reusable configuration object that defines the “From Name” and “From Email Address” that recipients see when they receive your email. It can also include a custom reply-to address and reply-to name.
Think of it as your email’s identity card. When a subscriber opens their inbox and sees an email from “Sarah at Acme Corp” with the address sarah@acme.com, that information was defined in a Sender Profile.
Why It Matters
The sender profile is one of the single most important factors influencing open rates. Multiple studies — including research from Litmus and Campaign Monitor — have consistently shown that the “From Name” is the primary reason people decide whether to open an email or ignore it.
Beyond engagement, the sender profile also plays a critical role in:
- Brand consistency: Ensuring every email from your organization presents a unified, recognizable sender identity.
- Trust and reputation: ISPs (Internet Service Providers) evaluate sender reputation at the domain and IP level. Consistent sender information contributes to a positive reputation.
- Compliance: Regulations like CAN-SPAM require accurate identification of the sender. A misconfigured sender profile can put you on the wrong side of the law.
- Reply management: Defining where replies go (and whether they go anywhere at all) is a key operational decision.
Components of a Sender Profile
| Component | Description | Example |
|---|---|---|
| Profile Name | Internal name for identification within SFMC | “Marketing Team – US” |
| From Name | The display name recipients see | “Acme Marketing” |
| From Email | The email address shown as the sender | marketing@acme.com |
| Reply-to Name | The display name if a recipient replies (optional) | “Acme Support” |
| Reply-to Email | The email address that receives replies (optional) | support@acme.com |
| Custom Reply Mail Management | Toggle for handling reply emails within SFMC | Enabled/Disabled |
Static vs. Dynamic Sender Profiles
SFMC offers two approaches to defining sender information:
Static Sender Profiles use fixed values. Every email sent using this profile will show the exact same From Name and From Email. This is ideal for centralized marketing teams or automated transactional sends.
Dynamic Sender Profiles pull values from data extensions, personalization strings, or attributes. For example, you might want emails to come from a subscriber’s assigned account manager:
textFrom Name: %%AccountManagerName%%
From Email: %%AccountManagerEmail%%
This approach is powerful for relationship-driven industries like financial services, real estate, and B2B sales — but it requires careful data hygiene. If a personalization string resolves to an empty value, the email will error out or use a fallback, which can create a poor experience.
RizeX Labs Pro Tip: If you’re using dynamic sender profiles, always define fallback values and validate your data extension before launching. A single null value in your account manager email column can derail an entire send.
What Is SFMC Send Classification?
Definition
An SFMC send classification is a configuration object that bundles together three critical sending components into a single, reusable package:
- Sender Profile (who the email is from)
- Delivery Profile (which IP address and domain to use for sending)
- CAN-SPAM classification (whether the message is Commercial or Transactional)
In essence, a send classification is a container — a pre-packaged set of rules that tells SFMC exactly how to handle a specific type of email send.
Why It Matters
Without send classifications, you would need to manually configure the sender profile, delivery profile, and CAN-SPAM classification every single time you set up an email send or a Journey Builder email activity. At scale, this would be:
- Error-prone: Human mistakes in repetitive configuration tasks are inevitable.
- Inconsistent: Different team members might choose different settings for similar sends.
- Time-consuming: Configuring three separate settings for every send adds unnecessary friction.
- Risky for compliance: Accidentally marking a commercial email as transactional (or vice versa) can violate CAN-SPAM regulations.
Send classifications solve all of these problems by creating standardized, reusable templates for different categories of email communication.
Components of a Send Classification
Let’s break down each component:
1. Sender Profile (Linked)
As discussed above, this determines the From Name, From Email, and reply-to information. The send classification simply references a sender profile — it doesn’t duplicate it.
2. Delivery Profile
The delivery profile specifies:
- IP Address: Which dedicated or shared IP address(es) to use for sending. Organizations with dedicated IPs often have separate IPs for marketing vs. transactional email.
- Header and Footer: Whether to include the account-level header and footer content (which typically contains physical address and unsubscribe links for CAN-SPAM compliance).
- Domain: The sending domain associated with the delivery.
Most SFMC accounts have a “Default” delivery profile, but organizations with multiple Business Units, brands, or sending domains will often create custom delivery profiles.
3. CAN-SPAM Classification
This is a critical — and often misunderstood — setting. SFMC allows you to classify each send as one of two types:
- Commercial: Promotional or marketing messages. These must include an unsubscribe mechanism and honor opt-out requests within 10 business days (per CAN-SPAM). SFMC enforces subscriber status for commercial sends — meaning unsubscribed contacts will be automatically excluded.
- Transactional: Messages related to an existing transaction or relationship, such as order confirmations, password resets, or account alerts. Transactional messages are not required to include an unsubscribe link (though it’s still a best practice), and they can be sent to unsubscribed contacts.
We’ll cover CAN-SPAM compliance in much greater detail later in this post.

The Relationship Between Send Classification and Sender Profile
Understanding how these two objects relate to each other is essential for clean SFMC architecture.
Here’s the simplest way to think about it:
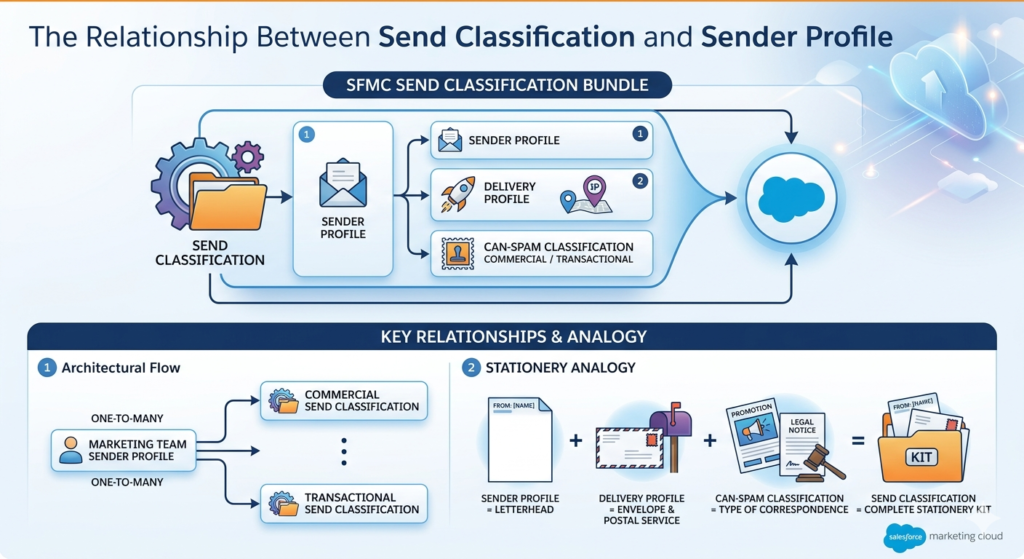
A Sender Profile is a component. A Send Classification is a bundle that includes a Sender Profile.
textSend Classification
├── Sender Profile (From Name, From Email, Reply-to)
├── Delivery Profile (IP Address, Domain, Header/Footer)
└── CAN-SPAM Classification (Commercial or Transactional)
Key Relationships to Understand
- One Sender Profile can be used across multiple Send Classifications. For example, your “Marketing Team” sender profile might be referenced in both your “Commercial – Marketing” send classification and your “Transactional – Account Alerts” send classification.
- A Send Classification always references exactly one Sender Profile and one Delivery Profile. You cannot have a send classification without these two components.
- When you initiate a send — whether through Email Studio, Journey Builder, or Automation Studio — you select (or default to) a Send Classification. SFMC then uses the linked sender profile and delivery profile automatically.
- Send-level overrides are possible. In some contexts (like Journey Builder), you can override the sender profile at the individual email activity level. However, the send classification still serves as the default.
A Practical Analogy
Think of it like a company’s branded stationery system:
- The Sender Profile is the letterhead — it identifies who’s writing the letter.
- The Delivery Profile is the envelope and postal service — it determines how the letter gets physically delivered.
- The CAN-SPAM Classification is the type of correspondence — whether it’s a promotional mailer (commercial) or a legal notice (transactional).
- The Send Classification is the complete stationery kit — letterhead, envelope, and classification bundled together so anyone in the organization can send consistent, compliant correspondence without assembling each piece individually.
Step-by-Step Guide: How to Create a Sender Profile in SFMC
Let’s walk through the exact process of creating a Salesforce Marketing Cloud sender profile.
Prerequisites
Before creating a sender profile, ensure you have:
- Admin-level access to SFMC (or at minimum, the “Manage Send Classification” permission)
- Authenticated sending domain (SAP – Sender Authentication Package) configured and verified
- A clear naming convention for your organization (trust us, this matters at scale)
Step-by-Step Instructions
Step 1: Navigate to Admin Settings
- Log in to Salesforce Marketing Cloud.
- Hover over your username in the top navigation bar.
- Click on Setup from the dropdown menu.
- In the left navigation panel, expand Feature Settings → Email Studio → Email Sending.
- Click on Sender Profiles.
Note: In some SFMC interface versions, you may navigate via Admin → Send Management → Sender Profiles. The exact path can vary depending on your SFMC edition and UI version.
Step 2: Create a New Sender Profile
- Click the Create button (or New depending on your interface).
- You’ll be presented with a configuration form.
Step 3: Configure Profile Settings
Fill in the following fields:
Profile Name:
Choose a descriptive internal name. We recommend a naming convention that includes the brand, department, and type:
text[Brand] - [Department/Team] - [Purpose]
Example: Acme - Marketing - Newsletter
Example: Acme - Support - Transactional
From Name:
Enter the display name recipients will see. Options include:
- Brand name: “Acme Corp”
- Person + Brand: “Sarah from Acme”
- Department: “Acme Customer Support”
- Dynamic:
%%SalesRepName%%
From Email Address:
Enter the email address that will appear as the sender. This must use an authenticated domain. Options:
- Static:
newsletter@acme.com - Dynamic:
%%RepEmail%%
Important: If you’re using a static From Email, make sure the domain is verified in your SAP (Sender Authentication Package). Sends from unauthenticated domains will fail or be flagged as spam.
Reply-to Settings (Optional but Recommended):
- Use default reply-to address: Check this if you want replies to go to the same From Email address.
- Custom Reply Email: Enter a different address if replies should be routed elsewhere (e.g.,
support@acme.com). - Custom Reply Name: Enter the display name for the reply address.
Step 4: Save the Sender Profile
- Review all settings.
- Click Save.
- The sender profile is now available for use in Send Classifications, Journey Builder email activities, and manual sends.
Step 5: Test the Sender Profile
Before using the sender profile in a live campaign:
- Send a test email using this profile.
- Verify the From Name and From Email appear correctly in multiple email clients (Gmail, Outlook, Apple Mail).
- Send a reply to confirm the reply-to address works as expected.
- Check email headers to ensure authentication (SPF, DKIM, DMARC) is passing.
Step-by-Step Guide: How to Set Up Send Classification in SFMC
Now let’s configure an SFMC send classification that references the sender profile you just created.
Prerequisites
- At least one Sender Profile configured (completed above)
- At least one Delivery Profile configured (SFMC creates a “Default” delivery profile, but you may want custom ones)
- Understanding of whether this send classification will be used for Commercial or Transactional messages
Step-by-Step Instructions
Step 1: Navigate to Send Classification Settings
- Go to Setup (via username dropdown).
- Navigate to Feature Settings → Email Studio → Email Sending.
- Click on Send Classifications.
Alternatively: Admin → Send Management → Send Classifications.
Step 2: Create a New Send Classification
- Click Create (or New).
- The Send Classification configuration form will appear.
Step 3: Configure the Send Classification
Name:
Use a clear, descriptive naming convention:
text[CAN-SPAM Type] - [Brand/Department] - [Purpose]
Example: Commercial - Acme Marketing - Promotional
Example: Transactional - Acme - Order Confirmations
External Key (Optional):
A unique identifier used for API integrations. If your organization uses SFMC APIs extensively, define a meaningful external key:
textExample: SC_Commercial_AcmeMarketing_Promo
Send Classification (CAN-SPAM Type):
Select one of the following:
- Commercial: For marketing, promotional, and advertising emails. SFMC will enforce unsubscribe status and require an unsubscribe link.
- Transactional: For messages directly related to a transaction, account, or existing relationship. SFMC allows sends to unsubscribed contacts and does not require an unsubscribe link (though we recommend including one).
⚠️ Critical Warning: Misclassifying a commercial email as transactional is a violation of CAN-SPAM and can result in penalties of up to $51,744 per email. When in doubt, classify as Commercial. We’ll discuss this in more detail in the compliance section below.
Sender Profile:
From the dropdown, select the sender profile you want to associate with this send classification. You should see the profile you created in the previous section.
Delivery Profile:
Select the appropriate delivery profile. Options typically include:
- Default: Uses your account’s primary sending IP and domain.
- Custom profiles: If you have dedicated IPs for different email types, select the appropriate one.
Honor Business Rule for Opt-outs:
- For Commercial classifications, this is enforced automatically. SFMC will not send to subscribers who have unsubscribed.
- For Transactional classifications, you can choose whether to honor opt-out status. In most cases, you’ll want this unchecked for true transactional messages (like password resets), but there are nuances here.
Step 4: Save the Send Classification
- Review all settings carefully.
- Click Save.
- The send classification is now available for use across SFMC.
Step 5: Set a Default Send Classification (Optional but Recommended)
SFMC allows you to designate one send classification as the default for your Business Unit. This means any new send that doesn’t have a send classification explicitly assigned will use this default.
To set a default:
- Navigate back to the Send Classifications list.
- Locate the classification you want as the default.
- Click Edit or Set as Default (depending on your interface).
- Confirm the change.
RizeX Labs Recommendation: Set your most commonly used Commercial send classification as the default. This ensures that if someone forgets to assign a classification, the system defaults to the more restrictive (and safer) commercial treatment rather than accidentally sending a commercial message as transactional.
CAN-SPAM Compliance: How SFMC Helps You Stay on the Right Side of the Law
What Is CAN-SPAM?
The CAN-SPAM Act (Controlling the Assault of Non-Solicited Pornography And Marketing Act) is a U.S. federal law enacted in 2003 that sets the rules for commercial email. Despite its age, it remains the primary legal framework governing email marketing in the United States, and its requirements are straightforward — but violations carry serious penalties.
Core CAN-SPAM Requirements
Here are the key requirements and how SFMC features help you comply:
1. Don’t Use False or Misleading Header Information
Requirement: Your “From,” “To,” “Reply-To,” and routing information must be accurate and identify the person or business who initiated the message.
How SFMC Helps:
- Sender Profiles ensure consistent, accurate From Name and From Email information.
- Authenticated sending domains (via SAP) verify that your organization actually controls the domain being used.
- Centralized management of sender profiles prevents individual users from entering arbitrary sender information.
2. Don’t Use Deceptive Subject Lines
Requirement: The subject line must accurately reflect the content of the message.
How SFMC Helps:
- While SFMC doesn’t auto-enforce subject line accuracy (that’s a content decision), Content Builder and approval workflows can include compliance review steps.
- Einstein Content Testing can help optimize subject lines while keeping them honest and relevant.
3. Identify the Message as an Ad
Requirement: If the message is commercial in nature, the law gives you flexibility in how to disclose this, but the disclosure must be clear and conspicuous.
How SFMC Helps:
- SFMC send classification forces you to explicitly categorize each send as Commercial or Transactional, creating an audit trail.
- The Commercial classification triggers automatic inclusion of required compliance elements.
4. Tell Recipients Where You’re Located
Requirement: Your message must include your valid physical postal address.
How SFMC Helps:
- Delivery Profiles can include header and footer content that automatically appends your physical address to every email.
- SFMC’s Account Settings allow you to configure your physical address at the account or Business Unit level, and it’s inserted into emails via the
%%Member_Addr%%and related personalization strings. - Content Builder templates should include the
%%Member_Addr%%string in the footer.
5. Tell Recipients How to Opt Out
Requirement: You must provide a clear and conspicuous explanation of how the recipient can opt out of future commercial email. You must include a functioning return email address or internet-based mechanism.
How SFMC Helps:
- SFMC provides built-in Profile Center and Subscription Center links that allow subscribers to manage preferences or unsubscribe completely.
- The
%%unsubscribeurl%%personalization string generates a one-click unsubscribe link. - List-Unsubscribe headers can be configured for mailbox provider-level unsubscribe buttons (the “unsubscribe” link that appears in Gmail’s header, for instance).
- For Commercial send classifications, SFMC will warn you or block sends that don’t include an unsubscribe mechanism.
6. Honor Opt-Out Requests Promptly
Requirement: You must honor opt-out requests within 10 business days. You cannot charge a fee, require information beyond an email address, or make the recipient take any step other than sending a reply email or visiting a single web page to opt out.
How SFMC Helps:
- SFMC processes unsubscribes immediately — far faster than the 10-day requirement. When a subscriber clicks the unsubscribe link, their status is updated in real time.
- Commercial send classifications automatically check subscriber status before sending, ensuring that unsubscribed contacts are excluded.
- All Subscribers list maintains a master record of subscription status across the account.
7. Monitor What Others Do on Your Behalf
Requirement: Even if you hire another company to handle your email marketing, you can’t contract away your legal responsibility. Both the company whose product is promoted and the company that sends the message may be held legally responsible.
How SFMC Helps:
- Role-based access control allows you to restrict who can modify sender profiles, send classifications, and delivery profiles.
- Audit Trail and Tracking features provide visibility into who sent what, when, and to whom.
- Business Unit architecture can segregate sending capabilities across different brands, agencies, or partners.
Commercial vs. Transactional: The Critical Distinction
This is where CAN-SPAM compliance intersects directly with your SFMC send classification setup. Let’s be crystal clear on the distinction:
| Characteristic | Commercial | Transactional |
|---|---|---|
| Primary Purpose | Promote or advertise a product, service, or content | Facilitate an agreed-upon transaction or update a customer about an existing relationship |
| Examples | Newsletters, promotions, product announcements, re-engagement campaigns | Order confirmations, shipping notifications, password resets, account alerts, appointment reminders |
| Unsubscribe Required? | Yes | No (but recommended) |
| Physical Address Required? | Yes | No (but recommended) |
| Sent to Unsubscribed Contacts? | No | Yes (if configured) |
| Subject Line Restrictions | Must be accurate, non-deceptive | Must be accurate, non-deceptive |
The Gray Area: Mixed-Content Emails
What if an email contains both commercial and transactional content? For example, an order confirmation email that includes a promotional banner for related products.
Per FTC guidance, the primary purpose of the message determines its classification. If the transactional content is the primary purpose, and the commercial content is secondary, the message can be classified as transactional. However, if the commercial content dominates — or if the subject line emphasizes the commercial aspect — the message should be classified as commercial.
RizeX Labs Recommendation: When in doubt, classify as Commercial. The consequences of under-classifying are far worse than the minor inconvenience of including an unsubscribe link in a transactional email. We generally advise our clients to include unsubscribe links in all emails, regardless of classification.
Best Practices for Configuring Sender Profiles and Send Classifications
Based on our extensive work with SFMC clients, here are our top recommendations for optimizing your sender profile and send classification setup.
Sender Profile Best Practices
1. Use Recognizable, Consistent From Names
Your From Name should be instantly recognizable to your audience. Consistency builds trust and improves deliverability.
Do:
- “Acme Corp” (brand name)
- “Sarah from Acme” (personal + brand)
- “Acme Customer Care” (department + brand)
Don’t:
- “noreply” (impersonal, often flagged as spam)
- “Sarah” (no brand context — who is Sarah?)
- “ACME CORP SPECIAL OFFER!!!” (spammy, all caps)
2. Use a Reply-Friendly Email Address
Even if you don’t plan to monitor replies actively, avoid noreply@ addresses. They:
- Signal to subscribers (and ISPs) that you don’t care about engagement
- Prevent valuable customer feedback from reaching you
- Can hurt deliverability, as ISPs factor engagement signals into spam filtering
Instead, use a monitored address like hello@, info@, or support@ and set up appropriate routing.
3. Authenticate Everything
Ensure your sending domain has proper authentication configured:
- SPF (Sender Policy Framework)
- DKIM (DomainKeys Identified Mail)
- DMARC (Domain-based Message Authentication, Reporting, and Conformance)
SFMC’s Sender Authentication Package (SAP) handles SPF and DKIM. DMARC must be configured separately in your DNS.
4. Limit the Number of Sender Profiles
More isn’t always better. Each unique From Email address effectively creates a separate “sender reputation” with ISPs. Spreading your volume across too many sender identities dilutes your reputation.
Recommendation: Maintain 3-5 core sender profiles per Business Unit, aligned with major communication categories:
- Marketing/Promotional
- Transactional/Operational
- Customer Service/Support
- Executive/Personal (if applicable)
- Events/Webinars (if applicable)
5. Test Sender Profiles Across Email Clients
The way From Name and From Email are displayed varies significantly across email clients:
- Gmail shows the From Name prominently but abbreviates long names on mobile.
- Outlook shows both From Name and From Email in some views.
- Apple Mail displays the From Name in large text and the email address below it.
Test your sender profiles in tools like Litmus or Email on Acid to ensure they display correctly across all major clients.
Send Classification Best Practices
1. Create Distinct Classifications for Each Message Type
At minimum, most organizations should have:
- Commercial – Default: For standard marketing emails
- Transactional – Default: For operational and transaction-related messages
- Commercial – [Brand/Region]: If you operate multiple brands or regions with different sender identities
Larger organizations might have 5-10 send classifications across brands, regions, and message types.
2. Name Send Classifications Clearly
Your team members will be selecting send classifications from dropdown menus. Make the names self-explanatory:
Good:
Commercial - Acme US - Marketing NewsletterTransactional - Acme Global - Order ConfirmationsCommercial - SubBrand - Promotional
Bad:
SC1DefaultTest
3. Set the Right Default
As mentioned earlier, set your Commercial send classification as the default. This is a safety net — if someone forgets to assign a classification, the system will default to the more restrictive (and legally safer) commercial treatment.
4. Audit Send Classifications Regularly
At least quarterly, review your send classifications to ensure:
- They reference current, active sender profiles
- The CAN-SPAM classification is still appropriate for how they’re being used
- Unused classifications are archived or deleted
- New business requirements (new brands, regions, or message types) are accommodated
5. Document Your Configuration
Maintain a clear document (spreadsheet, Confluence page, etc.) that maps:
- Each send classification → its sender profile → its delivery profile → its CAN-SPAM type
- Which teams/departments use each classification
- Which Journey Builder journeys and Email Studio sends reference each classification
This documentation is invaluable during audits, troubleshooting, and team onboarding.
6. Lock Down Permissions
Not everyone should be able to create or modify sender profiles and send classifications. Restrict these permissions to:
- SFMC admins
- Email operations leads
- Compliance officers (view access)
Use SFMC’s role-based access to prevent unauthorized changes that could affect deliverability or compliance.
Real-World Use Cases and Examples
Let’s look at how different organizations might configure their sender profiles and send classifications.
Use Case 1: E-Commerce Company
Scenario: An online retailer with one brand, one region, and a mix of marketing and transactional emails.
Sender Profiles:
| Profile Name | From Name | From Email |
|---|---|---|
| Marketing – Brand | “ShopBright” | hello@shopbright.com |
| Transactional – Orders | “ShopBright Orders” | orders@shopbright.com |
| Support | “ShopBright Support” | support@shopbright.com |
Send Classifications:
| Classification Name | Sender Profile | Delivery Profile | CAN-SPAM Type |
|---|---|---|---|
| Commercial – Marketing | Marketing – Brand | Default | Commercial |
| Transactional – Order Updates | Transactional – Orders | Default | Transactional |
| Commercial – Win-Back | Marketing – Brand | Default | Commercial |
Key Decisions:
- Order confirmations and shipping updates use the Transactional classification, so they reach customers even if they’ve unsubscribed from marketing emails.
- Win-back campaigns targeting lapsed customers are still classified as Commercial because their primary purpose is promotional.
- The Support sender profile uses a separate Reply-to email routed to the customer service team’s shared inbox.
Use Case 2: Multi-Brand Enterprise
Scenario: A holding company operates three consumer brands, each with its own marketing team, sending domain, and audience.
Sender Profiles:
| Profile Name | From Name | From Email | Brand |
|---|---|---|---|
| AlphaFit – Marketing | “AlphaFit” | news@alphafit.com | AlphaFit |
| BetaHome – Marketing | “BetaHome Living” | hello@betahome.com | BetaHome |
| GammaPet – Marketing | “GammaPet Care” | woof@gammapet.com | GammaPet |
| Corporate – Transactional | “Customer Accounts” | accounts@holdingco.com | Corporate |
Send Classifications:
| Classification Name | Sender Profile | Delivery Profile | CAN-SPAM Type |
|---|---|---|---|
| Commercial – AlphaFit | AlphaFit – Marketing | AlphaFit IP Pool | Commercial |
| Commercial – BetaHome | BetaHome – Marketing | BetaHome IP Pool | Commercial |
| Commercial – GammaPet | GammaPet – Marketing | GammaPet IP Pool | Commercial |
| Transactional – All Brands | Corporate – Transactional | Transactional IP Pool | Transactional |
Key Decisions:
- Each brand has its own dedicated IP pool (via separate Delivery Profiles) to isolate sender reputation. If one brand’s email practices cause deliverability issues, the other brands aren’t affected.
- Transactional emails use a shared corporate sender profile and a dedicated transactional IP pool, ensuring high-priority messages like password resets aren’t affected by marketing volume spikes.
- Each brand is configured in a separate Business Unit for governance and data separation.
Use Case 3: B2B SaaS Company with Sales-Led Email
Scenario: A SaaS company wants marketing emails to come from the brand, but sales nurture emails should appear to come from each prospect’s assigned sales representative.
Sender Profiles:
| Profile Name | From Name | From Email | Type |
|---|---|---|---|
| Marketing – Brand | “Acme Software” | marketing@acmesoftware.com | Static |
| Sales – Dynamic Rep | %%RepFirstName%% from Acme | %%RepEmail%% | Dynamic |
| Product – Transactional | “Acme Software” | notifications@acmesoftware.com | Static |
Send Classifications:
| Classification Name | Sender Profile | Delivery Profile | CAN-SPAM Type |
|---|---|---|---|
| Commercial – Marketing | Marketing – Brand | Default | Commercial |
| Commercial – Sales Nurture | Sales – Dynamic Rep | Default | Commercial |
| Transactional – Product Alerts | Product – Transactional | Default | Transactional |
Key Decisions:
- The sales nurture send classification uses a dynamic sender profile. Before any journey activation, the team validates that the
RepFirstNameandRepEmailfields are populated for every contact in the entry source. - Fallback values are configured: if
RepEmailis null, the system defaults tosales@acmesoftware.com. - Sales nurture emails are classified as Commercial despite being 1:1 in nature because their primary purpose is to promote the product — a common and important classification decision.
Use Case 4: Healthcare Organization (Compliance-Heavy)
Scenario: A healthcare network sends appointment reminders, wellness newsletters, and promotional offers for new services.
Sender Profiles:
| Profile Name | From Name | From Email |
|---|---|---|
| Clinical – Appointments | “HealthFirst Patient Services” | appointments@healthfirst.org |
| Marketing – Wellness | “HealthFirst Wellness” | wellness@healthfirst.org |
| Marketing – Promotions | “HealthFirst” | offers@healthfirst.org |
Send Classifications:
| Classification Name | Sender Profile | CAN-SPAM Type | Notes |
|---|---|---|---|
| Transactional – Appointments | Clinical – Appointments | Transactional | Must reach patient regardless of marketing opt-out |
| Commercial – Wellness Newsletter | Marketing – Wellness | Commercial | General health tips, promotable |
| Commercial – Service Promotions | Marketing – Promotions | Commercial | Promoting new services, screenings |
Key Decisions:
- Appointment reminders are classified as Transactional because they relate to an existing patient-provider relationship and a scheduled service. This ensures patients receive these critical communications even if they’ve opted out of marketing emails.
- The wellness newsletter and service promotions are both Commercial despite containing health-related content. The primary purpose test determines classification — and promoting services is inherently commercial.
- HIPAA considerations add an additional layer: the organization ensures that no PHI (Protected Health Information) flows through SFMC’s standard email sends without appropriate BAA (Business Associate Agreement) in place.
Advanced Configuration Tips
Tip 1: Use Send Classifications in Journey Builder
When you add an Email Activity in Journey Builder, you can assign a send classification at the activity level. This is essential for journeys that contain both commercial and transactional emails.
For example, a post-purchase journey might include:
- Order confirmation → Transactional Send Classification
- Shipping update → Transactional Send Classification
- Product review request (3 days after delivery) → Commercial Send Classification
- Cross-sell recommendation (7 days after delivery) → Commercial Send Classification
Each email activity in the journey can use a different send classification, even within the same journey.
Tip 2: API-Driven Send Classification Selection
If you’re triggering sends via SFMC’s REST or SOAP API, you can specify the send classification by its External Key. This is critical for developer-driven integrations:
JSON{
  "To": {
    "Address": "customer@example.com",
    "SubscriberKey": "12345"
  },
  "OPTIONS": {
    "SendClassification": {
      "CustomerKey": "SC_Transactional_OrderConfirmation"
    }
  }
}
Consistent external key naming conventions make API integrations cleaner and less error-prone.
Tip 3: Test with Subscriber Preview
Before launching any send with a new or modified send classification, use SFMC’s Subscriber Preview feature to verify:
- The correct From Name appears
- The correct From Email is used
- Dynamic personalization (if used) resolves correctly
- The email footer includes the physical address and unsubscribe link (for Commercial sends)
Tip 4: Separate IPs for Commercial and Transactional
If your organization sends significant volume (100,000+ emails/month), strongly consider using separate IP addresses for commercial and transactional email. Here’s why:
- Commercial email volume fluctuates (sales, promotions, seasonal spikes). This variability can cause ISPs to throttle your IP.
- Transactional emails (password resets, order confirmations) are time-sensitive and must reach the inbox immediately.
- By separating IPs via different delivery profiles (and thus different send classifications), you insulate your transactional deliverability from your marketing send patterns.
Common Mistakes to Avoid
Over the years, the RizeX Labs team has seen these mistakes repeatedly. Don’t let them happen to you:
Mistake 1: Using Only the Default Send Classification
Many organizations never create custom send classifications and rely entirely on the system default. This means:
- Every email is treated the same way (usually Commercial)
- Transactional emails can’t reach unsubscribed contacts
- No differentiation in sender identity across communication types
Fix: Create at minimum separate Commercial and Transactional send classifications.
Mistake 2: Classifying Marketing Emails as Transactional
This is the most dangerous mistake on this list. Some marketers classify promotional emails as Transactional to bypass unsubscribe status and reach more people.
This is:
- A violation of CAN-SPAM
- A violation of SFMC’s acceptable use policy
- A fast track to spam folder placement and domain blacklisting
- Potentially subject to fines of up to $51,744 per email
Fix: Classify honestly. If the primary purpose is promotional, it’s Commercial. Period.
Mistake 3: Using Unauthenticated Sending Domains
Sending from a domain that doesn’t have proper SPF, DKIM, and DMARC authentication is a major deliverability risk. Many ISPs will outright reject or spam-filter unauthenticated emails.
Fix: Complete your SAP setup and configure DMARC before sending any production email.
Mistake 4: Neglecting Reply-to Configuration
Failing to configure reply-to settings — or worse, using a noreply@ address — harms engagement and frustrates customers.
Fix: Use a monitored reply-to address and set up appropriate email routing (to your CRM, help desk, or shared inbox).
Mistake 5: Inconsistent Naming Conventions
In large organizations, we often see dozens of sender profiles and send classifications with cryptic or inconsistent names — making it nearly impossible to determine which one to use.
Fix: Establish and enforce a naming convention from day one. Document it in your governance playbook.
Troubleshooting Common Issues
“Why Are My Transactional Emails Not Reaching Unsubscribed Contacts?”
Likely Cause: The send classification is set to Commercial instead of Transactional, or the “Honor Business Rule for Opt-outs” setting is checked.
Fix: Verify the send classification’s CAN-SPAM type is set to Transactional and that opt-out business rules are configured appropriately.
“Why Is the Wrong From Name Showing Up?”
Likely Cause: The send is using a different send classification (or sender profile) than expected, or a Journey Builder email activity is overriding the send classification’s sender profile.
Fix: Check the send classification assigned to the specific send or journey activity. Look for send-level overrides.
“Why Are My Emails Landing in Spam?”
Possible Causes:
- Unauthenticated sending domain (no SPF/DKIM/DMARC)
- Poor sender reputation (new IP without warmup, high complaint rates)
- Missing or broken unsubscribe link in Commercial emails
- Content-level spam triggers
Fix: This requires a comprehensive deliverability audit. Start by checking authentication, then review sender reputation via tools like Google Postmaster and Microsoft SNDS.
Conclusion: Get the Foundation Right, and Everything Else Follows
If there’s one takeaway from this guide, it’s this: your SFMC send classification and Salesforce Marketing Cloud sender profile setup aren’t just administrative tasks — they’re the foundation of your entire email program.
Get them right, and you create a system that:
- Delivers emails consistently to the inbox, not the spam folder
- Maintains brand trust with recognizable, professional sender identities
- Ensures CAN-SPAM compliance automatically, reducing legal risk
- Scales cleanly as your organization adds brands, regions, and communication types
- Empowers your team with clear, standardized configurations that reduce errors
Get them wrong, and you’re building your email marketing house on sand.
About RizeX Labs
We’re Pune’s leading IT training institute specializing in emerging technologies like Salesforce and data analytics. At RizeX Labs, we specialize in helping organizations build and optimize their Salesforce Marketing Cloud infrastructure — from initial architecture and SAP configuration to advanced Journey Builder implementations and deliverability recovery. We’ve seen firsthand how a well-configured sending foundation transforms email performance.
If your SFMC instance is running on default configurations, if your team is unsure about the difference between Commercial and Transactional classifications, or if your deliverability metrics are trending in the wrong direction — it’s time for a conversation.
Your emails deserve to reach the inbox. Your subscribers deserve a consistent, trustworthy experience. And your organization deserves the peace of mind that comes with airtight compliance.
Start with the foundation. Start with sender profiles and send classifications. And if you need a guide along the way, RizeX Labs is here to help
Internal Links:
- Mastering Salesforce Marketing Cloud Email Studio: A Comprehensive Guide
- Data Extensions vs. Lists in SFMC: Which One Should You Use?
- How to Implement Sender Authentication Package (SAP) in Salesforce Marketing Cloud
External Links:
- Salesforce Marketing Cloud Official Documentation
- Federal Trade Commission (FTC): CAN-SPAM Act Compliance Guide
- Trailhead: Email Studio Basics
- Salesforce Help Docs (Send Classifications)
Quick Summary
Understanding the relationship between SFMC Send Classifications and Sender Profiles is the foundation of successful, compliant email delivery. A Sender Profile acts as your email's "identity card," defining the From Name and Email address that build subscriber trust. Conversely, a Send Classification is a "sending bundle" that combines your identity with critical delivery rules and CAN-SPAM labels (Commercial vs. Transactional). By mastering these configurations, organizations can ensure their emails bypass the spam folder, comply with federal regulations, and provide a consistent brand experience across every customer touchpoint. For most businesses, the best approach is a streamlined architecture with clear naming conventions and dedicated classifications for promotional and operational content.

