Introduction: Why Flow Builder Is the #1 Skill You Need in 2026
If you’re starting your Salesforce journey in 2026, there’s one tool that will define your career more than any other: Salesforce Flow Builder.
Here’s the reality. Salesforce officially retired Workflow Rules and Process Builder in 2023. They didn’t just deprecate them—they stopped allowing new ones entirely. Every piece of automation in the Salesforce ecosystem now runs through Flow Builder. It’s not optional. It’s not “nice to know.” It’s the foundation of all Salesforce automation in 2026.
So what exactly is Flow Builder?
Salesforce Flow Builder is a point-and-click automation tool that lets you build complex business logic, screen-based wizards, scheduled jobs, and data operations—all without writing Apex code. Think of it as a visual programming language where you drag elements onto a canvas, connect them with logic, and deploy powerful automations that previously required a developer.
This Salesforce tutorial will take you from zero to confident. Whether you’re preparing for a Salesforce Admin certification, transitioning from another CRM, or simply trying to automate your org’s manual processes, this salesforce flow builder tutorial covers everything you need.
By the end of this guide, you will:
- Understand every type of flow and when to use each one
- Know every component inside the Flow Builder canvas
- Build a real-world automation from scratch (flow builder step by step)
- Study practical salesforce flow examples used in production orgs
- Learn best practices that separate beginners from professionals
Let’s get started.
What Is Salesforce Flow Builder?
Salesforce Flow Builder is a declarative automation tool built directly into the Salesforce platform. “Declarative” means you configure it through clicks, drag-and-drop, and visual design—no programming required.
Flow Builder allows you to:
- Collect information from users through custom screens
- Create, update, read, and delete Salesforce records automatically
- Execute complex business logic with decisions, loops, and assignments
- Call external systems through APIs and invocable actions
- Trigger automations when records are created, updated, or deleted
- Schedule automations to run at specific times
Where Does Flow Builder Fit in Salesforce Automation?
Salesforce has had several automation tools over the years. Here’s the evolution:
- Workflow Rules (Legacy — fully retired)
- Process Builder (Legacy — fully retired)
- Flow Builder (Current — the single tool for all automation)
- Apex Code (For developers — used when Flow can’t handle the requirement)
In 2026, Flow Builder is the default and only recommended declarative automation tool. Salesforce has invested heavily in making it capable enough to handle 95%+ of business automation needs. If you’re learning Salesforce automation, Flow Builder is where you start and, for most use cases, where you finish.
Types of Flows in Salesforce
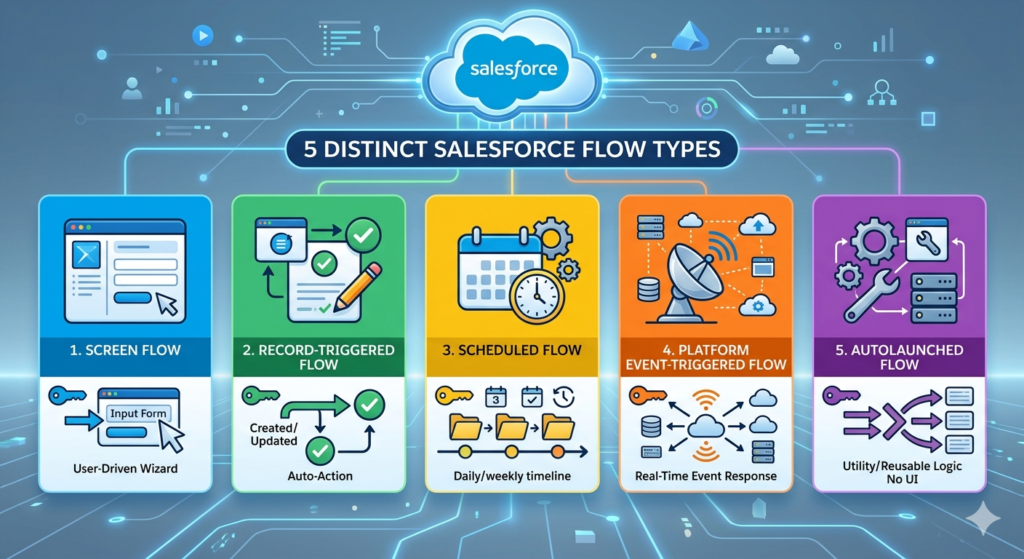
Not all flows are created equal. Salesforce provides five distinct flow types, each designed for a specific trigger and use case. Choosing the right type is the first decision you’ll make when building any flow.
1. Screen Flow
What it does: Presents an interactive, step-by-step wizard to users.
When it runs: When a user clicks a button, link, or accesses a Lightning page with an embedded flow.
Use cases:
- Guided case creation form with conditional fields
- Customer onboarding wizard
- Internal request submission (e.g., IT equipment request)
- Survey or feedback collection
Key characteristic: This is the only flow type that supports Screen elements—the visual forms where users input data.
2. Record-Triggered Flow
What it does: Runs automatically when a record is created, updated, or deleted.
When it runs: Triggered by DML (Data Manipulation Language) events on a specific object.
Use cases:
- Auto-assign a lead owner based on region
- Send an email notification when an opportunity closes
- Update a parent account when a child contact is modified
- Validate data before a record saves
Key characteristic: Offers three timing options:
- Before Save — Runs before the record is committed to the database (fastest, no DML limits consumed for the triggering record)
- After Save — Runs after the record is committed (can affect other records and send emails)
- Before Delete — Runs before a record is deleted
3. Scheduled Flow (Scheduled-Triggered Flow)
What it does: Runs at a specific time and frequency on a set of records.
When it runs: Based on a schedule you define (daily, weekly, or custom frequency).
Use cases:
- Send renewal reminders 30 days before contract expiration
- Flag opportunities with no activity in the last 14 days
- Purge old temporary records nightly
- Weekly summary updates to management
Key characteristic: Starts with a Get Records element or a defined entry condition to batch-process records.
4. Platform Event-Triggered Flow
What it does: Responds to platform events published on the Salesforce event bus.
When it runs: When a specific platform event message is received.
Use cases:
- Processing real-time data from an external ERP system
- Responding to IoT device signals
- Handling asynchronous operations between systems
Key characteristic: Used primarily in integration scenarios. Less common for beginners but increasingly important in enterprise orgs.
5. Autolaunched Flow (No Trigger)
What it does: Runs in the background without any user interface.
When it runs: Called by other flows, Apex code, REST API, or as a subflow.
Use cases:
- Reusable business logic shared across multiple flows
- Complex calculations called from a screen flow
- API-triggered automations from external systems
Key characteristic: Cannot contain Screen elements. Think of it as a “utility function” in flow architecture.
Key Components of Flow Builder
When you open Flow Builder, you’ll see a visual canvas. Understanding the three core building blocks is essential before you build anything.
1. Elements
Elements are the building blocks you drag onto the canvas. Each element performs a specific action.
| Element | What It Does | Category |
|---|---|---|
| Screen | Displays a form to collect user input | Interaction |
| Decision | Creates branching logic (if/then) | Logic |
| Assignment | Sets or modifies variable values | Logic |
| Loop | Iterates over a collection of records | Logic |
| Get Records | Reads records from the database (SOQL) | Data |
| Create Records | Inserts new records | Data |
| Update Records | Modifies existing records | Data |
| Delete Records | Removes records | Data |
| Action | Calls invocable actions, send emails, post to Chatter | Integration |
| Subflow | Calls another flow | Integration |
| Wait | Pauses the flow until a condition is met (only in certain flow types) | Timing |
| Custom Error | Displays validation error on a record page (Before Save flows) | Validation |
2. Connectors
Connectors are the arrows between elements. They define the execution path—the order in which elements run.
- A Decision element creates multiple connectors (one for each outcome)
- Every element must have at least one outgoing connector (unless it’s the final element)
- Connectors can loop back to previous elements (useful in Loop constructs)
3. Resources
Resources are the variables, formulas, constants, and templates that store and manipulate data within your flow.
| Resource Type | Purpose | Example |
|---|---|---|
| Variable | Stores a single value | varAccountId storing a record ID |
| Collection Variable | Stores multiple values (list) | colContactIds storing a list of contact IDs |
| Record Variable | Stores a single record with all fields | recCurrentOpportunity |
| Record Collection Variable | Stores multiple records | colOpenCases |
| Constant | A fixed value that never changes | conSupportEmail = support@company.com |
| Formula | A calculated value | TODAY() + 30 for due dates |
| Text Template | Rich text content for emails or screens | Email body with merge fields |
| Choice | An option in a picklist/radio button on a screen | “High,” “Medium,” “Low” |
| Stage | Tracks progress in a multi-step screen flow | Step 1, Step 2, Step 3 |
Pro tip: Name your resources with prefixes (var, col, rec, con, for, tt) so you can instantly identify their type. This is a professional naming convention used in production orgs.
Step-by-Step Guide: Build Your First Flow
Let’s build a real, production-quality automation. No toy examples. This is a flow you’d actually deploy in a working Salesforce org.
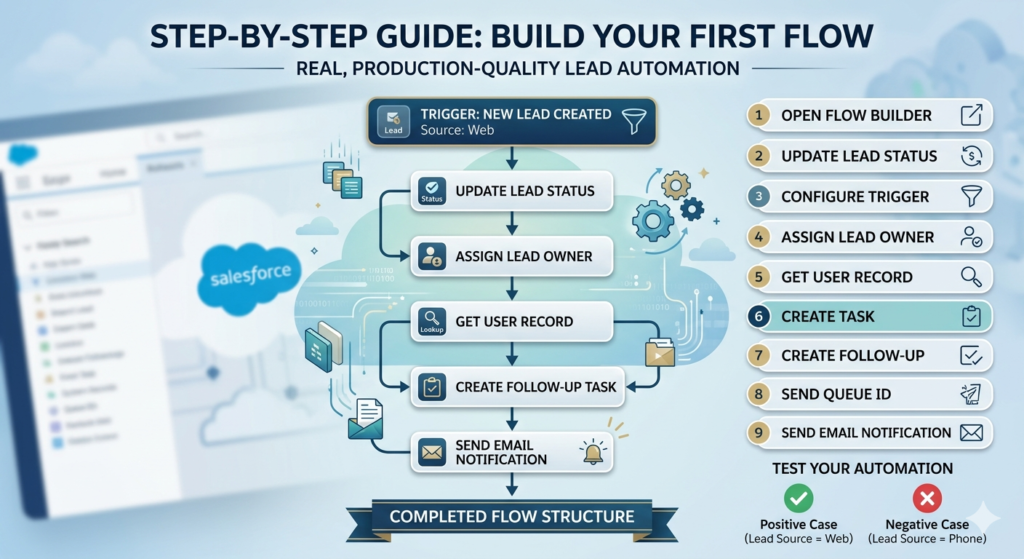
The Use Case
Requirement: When a new Lead is created with the source “Web,” automatically:
- Set the Lead Status to “New — Web”
- Assign the lead owner to a specific user (the Web Leads queue or user)
- Create a Task for the assigned owner: “Follow up with web lead within 24 hours”
- Send an email notification to the lead owner
This single automation replaces what previously required a Workflow Rule, a Process Builder, and potentially an Apex trigger. In 2026, you build it in one flow.
Step 1: Open Flow Builder
- Navigate to Setup (gear icon → Setup)
- In the Quick Find box, type Flows
- Click Flows under Process Automation
- Click New Flow
Step 2: Select the Flow Type
- Select Record-Triggered Flow
- Click Create
You’ll see the flow configuration panel.
Step 3: Configure the Trigger
- Object: Select
Lead - Trigger the Flow When: Select
A record is created - Condition Requirements: Select
All Conditions Are Met (AND) - Add Condition:
- Field:
LeadSource - Operator:
Equals - Value:
Web
- Field:
- Optimize the Flow for: Select
Actions and Related Records
This tells Salesforce: “Run this flow after save, only when a new Lead is created with LeadSource = Web.”
Why “After Save”? Because we need to create a related Task record and send an email. Before Save flows can only modify the triggering record itself.
Step 4: Add an Update Records Element (Set Lead Status)
Even though this is an After Save flow, we can still update the triggering record.
- Click the + icon after the trigger
- Select Update Records
- Configure:
- Label:
Update Lead Status - API Name:
Update_Lead_Status - How to Find Records:
Use the Lead record that triggered the flow - Set Field Values:
- Field:
Status→ Value:New — Web
- Field:
- Label:
- Click Done
Step 5: Add an Assignment Element (Set Owner — Optional)
If you want to assign the lead to a specific queue:
- Click + after the Update element
- Select Update Records
- Configure:
- Label:
Assign to Web Leads Queue - API Name:
Assign_Web_Leads_Queue - How to Find Records:
Use the Lead record that triggered the flow - Set Field Values:
- Field:
OwnerId→ Value: (paste the Queue ID or use a Constant resource)
- Field:
- Label:
- Click Done
Alternatively, you can combine this with Step 4 into a single Update Records element by setting both fields at once.
Step 6: Add a Create Records Element (Create Follow-Up Task)
- Click + after the Assignment element
- Select Create Records
- Configure:
- Label:
Create Follow Up Task - API Name:
Create_Follow_Up_Task - How Many Records:
One - Set Field Values:
Subject→Follow up with web lead within 24 hoursPriority→HighStatus→Not StartedActivityDate→ Create a Formula resource:{!$Flow.CurrentDate} + 1(due tomorrow)WhoId→{!$Record.Id}(links task to the Lead)OwnerId→{!$Record.OwnerId}(assigns task to the lead owner)
- Label:
- Click Done
Step 7: Add a Send Email Action
- Click + after the Create Records element
- Select Action
- Search for Send Email
- Configure:
- Label:
Notify Lead Owner - API Name:
Notify_Lead_Owner - Recipient Email: You’ll need to get the owner’s email. Create a Get Records element before this step:
- Object:
User - Filter:
Id Equals {!$Record.OwnerId} - Store in:
recLeadOwner(single record variable)
- Object:
- Now in the Send Email action:
- Email Addresses (comma-separated):
{!recLeadOwner.Email} - Subject:
New Web Lead Assigned: {!$Record.FirstName} {!$Record.LastName} - Body: Create a Text Template resource:
- Email Addresses (comma-separated):
- Label:
textHi {!recLeadOwner.FirstName},

A new web lead has been assigned to you.

Lead Name: {!$Record.FirstName} {!$Record.LastName}
Company: {!$Record.Company}
Email: {!$Record.Email}
Phone: {!$Record.Phone}

Please follow up within 24 hours.

Thank you,
Salesforce Automation
- Click Done
Step 8: Save and Activate
- Click Save
- Flow Label:
Lead — Auto Process Web Leads - API Name:
Lead_Auto_Process_Web_Leads - Click Save
- Click Activate
Your Completed Flow Should Look Like This:
text[Trigger: Lead Created, Source = Web]
         │
         ▼
[Update Lead Status to "New — Web"]
         │
         ▼
[Get Lead Owner User Record]
         │
         ▼
[Create Follow-Up Task]
         │
         ▼
[Send Email to Lead Owner]
         │
         ▼
       [End]
Step 9: Test Your Flow
Never skip testing.
- Open the Developer Console or use Debug mode in Flow Builder
- Create a new Lead:
- First Name: Test
- Last Name: WebLead
- Company: Test Corp
- Lead Source: Web
- Verify:
- ✅ Lead Status changed to “New — Web”
- ✅ Owner assigned correctly
- ✅ Task created with correct due date
- ✅ Email received by the lead owner
- Also test the negative case: Create a Lead with LeadSource = “Phone.” The flow should not fire.
Real-World Salesforce Flow Examples
Theory is important, but seeing how flows solve real business problems will solidify your understanding. Here are five salesforce flow examples used in production orgs across industries.
Example 1: Opportunity Stage Validation
Business Problem: Sales reps move opportunities to “Closed Won” without attaching a signed contract.
Flow Type: Record-Triggered Flow (Before Save)
Logic:
- Trigger: Opportunity is updated
- Condition: StageName changes to “Closed Won”
- Decision: Check if any files (ContentDocumentLink) exist related to this opportunity
- If no files → Display a Custom Error: “You must attach a signed contract before closing this opportunity.”
- If files exist → Allow the save
Why Before Save? Custom Error elements only work in Before Save flows, and they prevent the record from saving—exactly like a validation rule, but with far more complex logic.
Example 2: Case Escalation After 4 Hours
Business Problem: High-priority cases that remain “New” for more than 4 hours need automatic escalation.
Flow Type: Record-Triggered Flow (After Save) with a Scheduled Path
Logic:
- Trigger: Case is created
- Condition: Priority = “High”
- Scheduled Path: Run 4 hours after the record is created
- Decision: Check if Status is still “New”
- If yes → Update Case Owner to the escalation queue, set
IsEscalated = true, send alert to the support manager - If no → Do nothing (the case was already picked up)
Why this is powerful: Scheduled Paths replaced Time-Based Workflow Rules. They’re built directly into Record-Triggered Flows and are far more flexible.
Example 3: Account Health Score Calculation
Business Problem: Management wants an “Account Health Score” calculated from multiple factors: number of open cases, last activity date, total opportunity amount, and NPS survey score.
Flow Type: Record-Triggered Flow (After Save on Case, Opportunity, and Task) + Autolaunched Subflow
Logic:
- Create a reusable Autolaunched Flow called
Calculate Account Health Score - Input: AccountId
- Get Records: Count open cases, sum opportunity amounts, find last activity date
- Assignment: Use formulas to calculate weighted score
- Update Records: Write score to a custom field
Account.Health_Score__c - Call this subflow from Record-Triggered Flows on Case, Opportunity, and Task objects
Key takeaway: Subflows promote reusability. Write the logic once, call it from everywhere.
Example 4: Employee Onboarding Screen Flow
Business Problem: HR needs a guided process to onboard new employees—collect personal info, assign equipment, create training tasks, and notify the manager.
Flow Type: Screen Flow
Logic:
- Screen 1: Collect employee name, department, start date, manager
- Screen 2: Display equipment options (laptop type, phone, badge) based on department
- Screen 3: Review and confirm all details
- Backend: Create Employee record, create 5 Task records (orientation, IT setup, compliance training, etc.), send welcome email to employee and notification to manager
Distribution: Embed this flow on a Lightning page, add it to the HR app, or share it as a direct URL.
Example 5: Invoice Generation and Notification
Business Problem: When a project milestone is marked complete, auto-generate an invoice record and notify the billing team.
Flow Type: Record-Triggered Flow (After Save)
Logic:
- Trigger: Project_Milestone__c is updated
- Condition: Status__c changes to “Complete”
- Create Records: New Invoice__c record with amount, due date (30 days from today), and link to the project
- Action: Send email to billing team with invoice details
- Update Records: Set Milestone’s
Invoice_Generated__ccheckbox to true
Flow vs Workflow Rules vs Process Builder: Comparison Table
Even though Workflow Rules and Process Builder are retired, you’ll encounter them in legacy orgs and in interview questions. Understanding the differences matters.
| Feature | Workflow Rules | Process Builder | Flow Builder |
|---|---|---|---|
| Status in 2026 | ❌ Fully retired | ❌ Fully retired | ✅ Active & recommended |
| Visual interface | No (form-based) | Yes (simple) | Yes (advanced canvas) |
| Screen/UI support | No | No | ✅ Yes |
| Decision/branching logic | No | Limited (one branch) | ✅ Unlimited branching |
| Loops | No | No | ✅ Yes |
| Before Save execution | No | No | ✅ Yes |
| Delete trigger | No | No | ✅ Yes |
| Scheduled paths | Limited (time-based) | Limited (scheduled actions) | ✅ Full scheduled paths |
| Create records | No (only tasks via task action) | Yes | ✅ Yes |
| Update related records | Limited (field update) | Yes | ✅ Yes |
| Call Apex | No | Yes | ✅ Yes |
| Call subflows | No | No | ✅ Yes |
| Custom error messages | No | No | ✅ Yes (Before Save) |
| Transaction control | None | Basic | ✅ Advanced (fault handling) |
| Debugging tools | None | Limited | ✅ Built-in debug mode |
| Performance | Moderate | Poor (known for issues) | ✅ Optimized (especially Before Save) |
Bottom line: If you’re building anything new, Flow Builder is your only option and your best option. If you’re maintaining a legacy org, plan to migrate existing Workflow Rules and Process Builders to Flows.
Best Practices for Salesforce Automation Using Flows
Building a flow that works is step one. Building a flow that works reliably, efficiently, and maintainably is what separates amateurs from professionals. Follow these best practices.
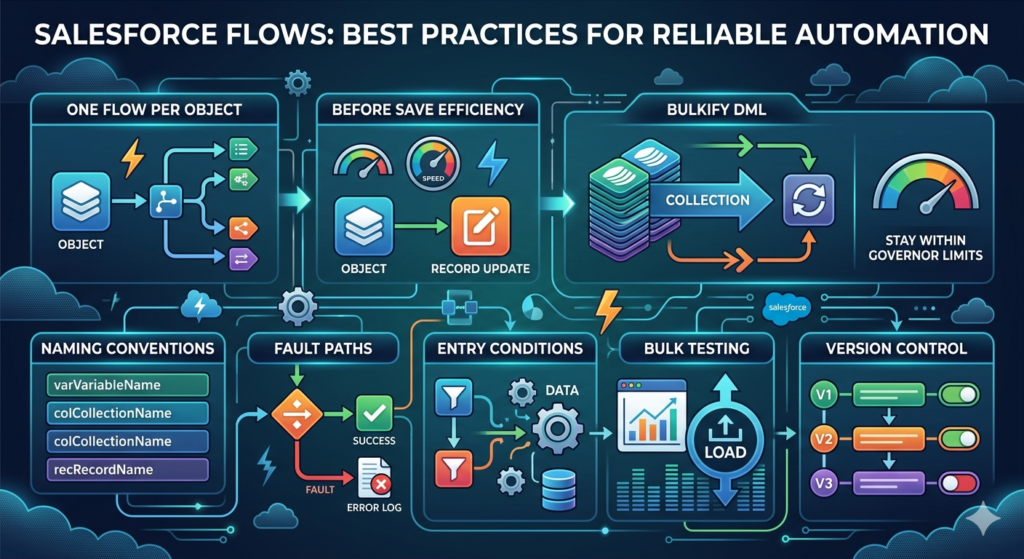
1. One Flow Per Object Per Trigger
Don’t create five separate Record-Triggered Flows on the Lead object for “after create.” Consolidate them into one flow using Decision elements.
Why: Multiple flows on the same object and trigger can cause execution order issues, make debugging a nightmare, and increase governor limit consumption.
2. Use Before Save Flows When Possible
If you’re only updating the triggering record, use a Before Save flow instead of After Save.
Why: Before Save flows don’t consume DML (Data Manipulation Language) operations for the triggering record. They’re faster and more efficient.
3. Bulkify Your Flows
Never put a DML element (Create, Update, Delete, Get Records) inside a Loop.
Bad:
textLoop → Get Records → Update Records (inside loop)
Good:
textLoop → Assignment (add to collection) → [Exit Loop] → Update Records (bulk)
Putting DML inside loops will hit governor limits when processing bulk data (e.g., data imports of 200+ records).
4. Use Naming Conventions
Adopt a consistent naming standard:
- Flow names:
ObjectName — Purpose(e.g.,Lead — Auto Process Web Leads) - Variables:
varVariableName(e.g.,varAccountId) - Collections:
colCollectionName(e.g.,colContactRecords) - Record variables:
recRecordName(e.g.,recCurrentCase) - Formulas:
forFormulaName(e.g.,forDueDatePlus30) - Text templates:
ttTemplateName(e.g.,ttWelcomeEmailBody)
5. Add Fault Paths
Every DML element and Action element can fail. Add fault connectors that lead to error handling—typically a Create Records element that logs the error to a custom Flow_Error_Log__c object, or a notification to an admin.
Without fault paths, your flow fails silently or shows cryptic errors to users.
6. Add Descriptions Everywhere
Every element, every resource, and the flow itself should have a description explaining what it does and why.
Your future self (and your colleagues) will thank you when debugging a flow six months after building it.
7. Use Entry Conditions Wisely
Be as specific as possible with your trigger conditions. The fewer times a flow fires unnecessarily, the better your org’s performance.
Example: Instead of triggering on every Lead update, specify:
LeadSource Equals WebIsConverted Equals False
8. Test with Bulk Data
Don’t just test with one record. Use Data Loader to insert 200 records and verify:
- The flow doesn’t hit governor limits
- All records are processed correctly
- Performance is acceptable
9. Version Control
Flow Builder supports versioning. Before making changes to a production flow:
- Create a new version
- Make changes in the new version
- Test thoroughly
- Activate the new version (automatically deactivates the old one)
Never edit a flow version that’s currently active.
10. Document Your Flows
Maintain a simple spreadsheet or Confluence page listing:
- Flow name and API name
- Object and trigger type
- What it does (business summary)
- Last modified date and by whom
- Dependencies (subflows, custom fields, queues, etc.)
Common Mistakes Beginners Make
Learning from others’ mistakes is the fastest way to improve. Here are the most frequent errors I see beginners make, along with how to avoid them.
Mistake 1: DML Inside Loops
The problem: Creating or updating records one at a time inside a Loop element.
The consequence: Governor limit exception: “Too many DML statements: 151.”
The fix: Use an Assignment element inside the loop to add records to a Collection Variable. After the loop ends, perform a single Create/Update Records operation on the entire collection.
Mistake 2: Not Handling Null Values
The problem: Assuming a field always has a value. For example, referencing {!$Record.Email} in an email action when the Email field might be blank.
The consequence: Flow error, or sending emails to blank addresses.
The fix: Add a Decision element to check if the value is null before using it. Or use the ISBLANK() function in a formula.
Mistake 3: Using the Wrong Flow Type
The problem: Building a Screen Flow when a Record-Triggered Flow is needed, or using After Save when Before Save would suffice.
The consequence: Poor user experience, unnecessary complexity, or performance issues.
The fix: Before building, ask yourself:
- Does a user need to interact with this? → Screen Flow
- Should it run automatically when data changes? → Record-Triggered Flow
- Does it need to run on a schedule? → Scheduled Flow
- Does it only update the triggering record? → Before Save
Mistake 4: Not Testing Negative Scenarios
The problem: Testing only the “happy path” where everything works perfectly.
The consequence: Flows break in production when unexpected data arrives.
The fix: Test with:
- Missing required fields
- Null values
- Bulk records (200+)
- Records that should not trigger the flow
- Users with different profiles and permissions
Mistake 5: Ignoring Governor Limits
The problem: Not understanding Salesforce’s execution limits (100 SOQL queries, 150 DML statements, 50,000 records retrieved per transaction).
The consequence: Flows fail in production when processing real-world data volumes.
The fix: Study Salesforce Governor Limits. Use the Debug Log to monitor limit consumption. Optimize your flows to minimize database operations.
Mistake 6: Building Everything in One Giant Flow
The problem: A single flow with 50+ elements handling every automation for an object.
The consequence: Impossible to debug, maintain, or modify without breaking something.
The fix: Break complex logic into subflows. Each subflow should handle one specific business process. The main flow orchestrates them.
Mistake 7: Forgetting About Record Locking
The problem: Multiple automations trying to update the same record simultaneously.
The consequence: “UNABLE_TO_LOCK_ROW” errors.
The fix: Consolidate automations. If a Record-Triggered Flow on Opportunity and another on Opportunity Line Item both update the parent Opportunity, consider the execution order and use Before Save where possible.
When to Use Flow vs Apex
This is one of the most common questions in every Salesforce tutorial, and the answer in 2026 is clearer than ever.
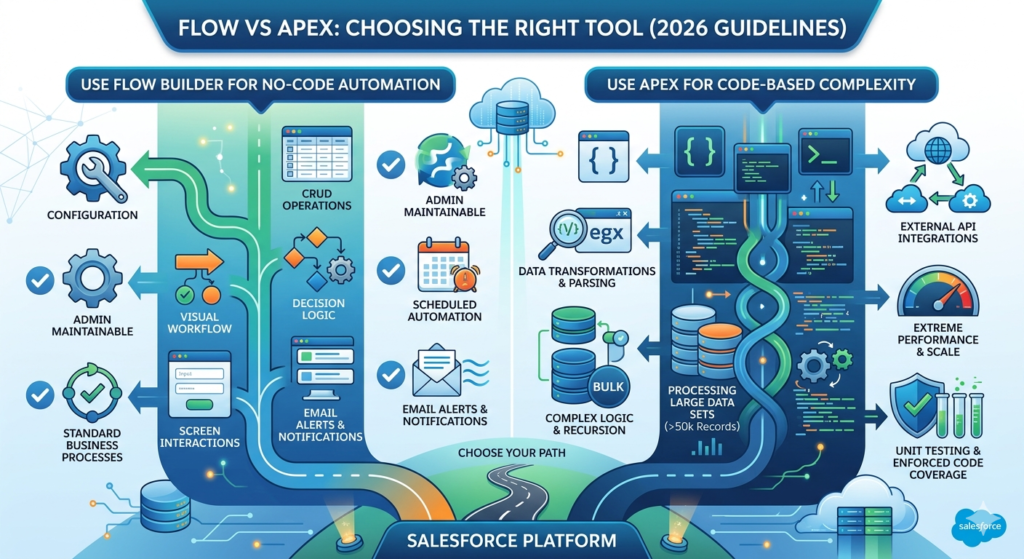
Use Flow Builder When:
- ✅ You need standard CRUD operations (Create, Read, Update, Delete)
- ✅ The logic involves decisions, loops, and assignments
- ✅ You need screen-based user interaction
- ✅ You need scheduled automation
- ✅ You need email alerts and notifications
- ✅ Admins need to maintain and modify the automation
- ✅ The automation doesn’t require complex data transformations
- ✅ Performance requirements are standard (most business processes)
Use Apex When:
- ✅ You need complex string parsing, regex, or data transformations
- ✅ You’re building deep integrations with external APIs requiring custom error handling
- ✅ You need to process more than 50,000 records (Batch Apex)
- ✅ You need extreme performance optimization at scale
- ✅ You’re building custom Lightning components with server-side logic
- ✅ The logic requires recursive processing with fine-grained control
- ✅ You need unit testing with code coverage requirements (Apex enforces this natively)
- ✅ You need to implement interfaces or abstract patterns
The 2026 Rule of Thumb
Start with Flow. Move to Apex only when Flow can’t do it.
In most Salesforce orgs, 90-95% of automation needs are fully met by Flow Builder. Apex should be reserved for edge cases, complex integrations, and high-performance batch processing.
Also worth noting: Flow can call Apex, and Apex can call Flow. They’re not mutually exclusive. Many professional architectures use an Apex class as an Invocable Action inside a flow, giving you the best of both worlds.
Bonus: Flow Builder Keyboard Shortcuts and Productivity Tips
Since you’ll spend significant time in Flow Builder, these tips will make you faster:
- Ctrl + S (Cmd + S on Mac): Save the flow
- Zoom controls: Use the toolbar at the bottom to zoom in/out and fit the canvas
- Auto-Layout mode (default in 2026): Automatically arranges elements. Use it. Don’t switch to Free-Form unless you have a specific reason
- Copy/Paste elements: Select an element → Ctrl+C → Ctrl+V. Saves time when creating similar elements
- Debug mode: Click “Debug” in the toolbar, set input values, and watch the flow execute step by step. Use this every single time before activating.
- Search in flow: Use Ctrl+F to find elements, resources, or text within a complex flow
About RizeX Labs
At RizeX Labs, we help Salesforce professionals and businesses build strong platform expertise through hands-on training, real-world use cases, and practical implementation guidance.
Our focus is on simplifying complex Salesforce concepts like automation, Flow Builder, and process optimization so admins and beginners can confidently design efficient solutions.
Whether you’re just starting your Salesforce journey or looking to master automation tools like Flow Builder, RizeX Labs provides the right guidance to accelerate your learning and career growth.
Internal Links:
- Link to your Salesforce Admin Training page
- Salesforce Shield: Encryption, Event Monitoring and Field Audit Trail Explained
- DevOps Roadmap for Salesforce: Tools, Skills, and Certifications You Need in 2026
- How to Build a Salesforce Portfolio That Gets You Hired (With Project Ideas)
- Salesforce Admin vs Developer: Which Career Path is Right for You in 2026?
- Wealth Management App in Financial Services Cloud
External Links:
- Salesforce Official Website
- Salesforce Flow Builder Documentation
- Salesforce Trailhead (Flow Builder Module)
Quick Summary
Salesforce Flow Builder is one of the most powerful automation tools in Salesforce, enabling users to automate business processes without writing code. It allows admins to create workflows, approvals, and complex logic using a visual, drag-and-drop interface.
For beginners in 2026, learning Flow Builder is essential as it has become the primary automation tool in Salesforce, replacing older tools like Workflow Rules and Process Builder.
By mastering Flow Builder, Salesforce admins can streamline operations, reduce manual work, and build scalable automation solutions that improve efficiency across the organization.
Quick Summary
This comprehensive Salesforce Flow Builder tutorial is designed for absolute beginners starting their Salesforce journey in 2026. Since Salesforce retired Workflow Rules and Process Builder, Flow Builder is now the single recommended declarative automation tool for all business processes. The guide covers five flow types: Screen Flow, Record-Triggered Flow, Scheduled Flow, Platform Event-Triggered Flow, and Autolaunched Flow. It explains core components including Elements (Screen, Decision, Loop, Get/Create/Update/Delete Records), Connectors, and Resources (Variables, Formulas, Text Templates). A detailed step-by-step walkthrough demonstrates building a real-world Lead automation that auto-assigns web leads, creates follow-up tasks, and sends email notifications. The tutorial includes five production-quality flow examples, a comparison table of Flow vs Workflow Rules vs Process Builder, ten best practices for scalable automation, seven common beginner mistakes with fixes, and clear guidance on when to use Flow versus Apex code.