Introduction
SFMC Journey Builder tutorial for beginners starts here. If you’re new to Salesforce Marketing Cloud and feeling overwhelmed by its features, you’re not alone. Journey Builder is one of the most powerful tools for automating customer communication and creating personalized, multi-channel experiences.

In this guide, you’ll learn how to build automated customer journeys, use triggers effectively, and deliver the right message at the right time. Whether you’re a marketing cloud beginner or switching from another automation platform, this tutorial will help you understand Journey Builder step by step.
By the end of this SFMC Journey Builder tutorial, you’ll be able to create, manage, and optimize your own customer journeys with confidence.
What is Salesforce Marketing Cloud Journey Builder?
Journey Builder is a campaign planning tool within Salesforce Marketing Cloud that allows marketers to create automated, personalized customer journeys across multiple channels. Think of it as a visual workflow builder where you can map out every interaction a customer has with your brand—from their first welcome email to post-purchase follow-ups and beyond.
Unlike traditional email marketing tools that send one-off campaigns, Journey Builder enables you to create sophisticated, trigger-based communications that respond to customer behavior in real-time. For instance, if a customer abandons their shopping cart, Journey Builder can automatically send a reminder email after 2 hours, followed by a special discount offer if they still haven’t completed their purchase.
Why Journey Builder Matters for Modern Marketing
In today’s competitive landscape, customers expect personalized experiences. Generic, one-size-fits-all marketing no longer works. Journey Builder helps you:
- Automate repetitive marketing tasks while maintaining personalization
- Create seamless multi-channel experiences across email, SMS, push notifications, and advertising
- Respond to customer behavior in real-time with relevant messages
- Improve conversion rates by delivering the right message at the right time
- Save time by setting up journeys that run automatically
For any marketing cloud beginner, mastering Journey Builder is essential to leveraging the full power of Salesforce Marketing Cloud.
Key Components of Journey Builder
Before diving into our Salesforce Marketing Cloud Journey Builder tutorial, let’s understand the fundamental building blocks that make up any customer journey.
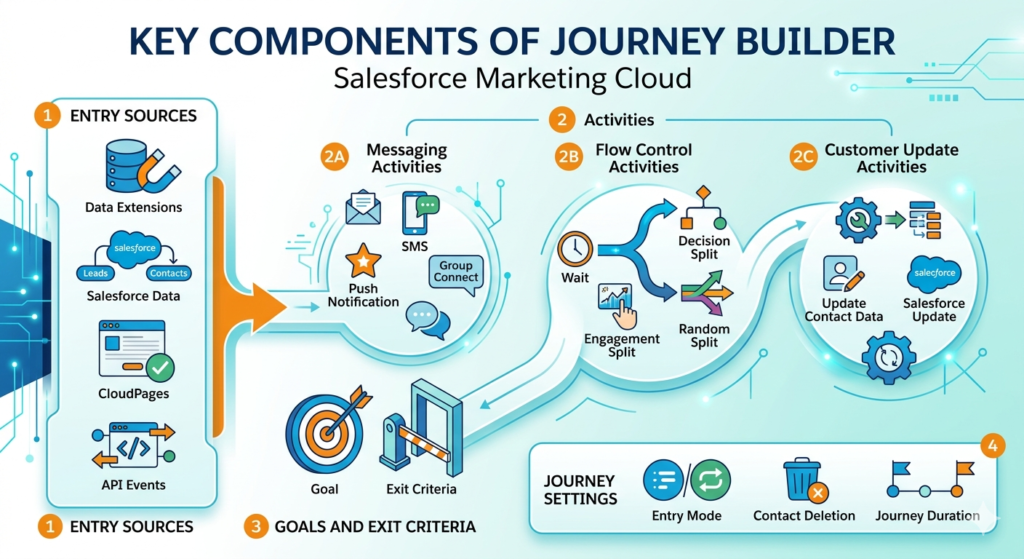
1. Entry Sources
Entry sources define how contacts enter your journey. There are several entry source types:
- Data Extensions: Contacts enter based on data in a specific data extension
- Salesforce Data: Triggers from Salesforce CRM objects like Leads, Contacts, or custom objects
- CloudPages: Contacts enter after submitting a form on a Marketing Cloud landing page
- API Events: Programmatic entry through API calls
2. Activities
Activities are the actions that happen within a journey. They fall into several categories:
Messaging Activities:
- Send Email
- Send SMS
- Send Push Notification
- Send Group Connect Message
Flow Control Activities:
- Wait: Pause the journey for a specified time
- Decision Split: Route contacts based on criteria or data
- Engagement Split: Route based on email engagement (opens, clicks)
- Random Split: Randomly distribute contacts across paths
Customer Update Activities:
- Update Contact Data: Modify contact attributes
- Salesforce Update: Update records in Salesforce CRM
3. Goals and Exit Criteria
Goals help you measure journey success by tracking when contacts complete desired actions (like making a purchase). Exit criteria automatically remove contacts from a journey when certain conditions are met, preventing unnecessary communications.
4. Journey Settings
These control how your journey operates:
- Entry Mode: Single entry (contact can enter once) or re-entry (contact can enter multiple times)
- Contact Deletion: How to handle contacts deleted from entry source
- Journey Duration: How long contacts can remain in the journey
Step-by-Step Salesforce Marketing Cloud Journey Builder Tutorial
Now let’s walk through creating your first journey. This practical Salesforce Marketing Cloud Journey Builder tutorial will help you build a simple welcome journey for new subscribers.
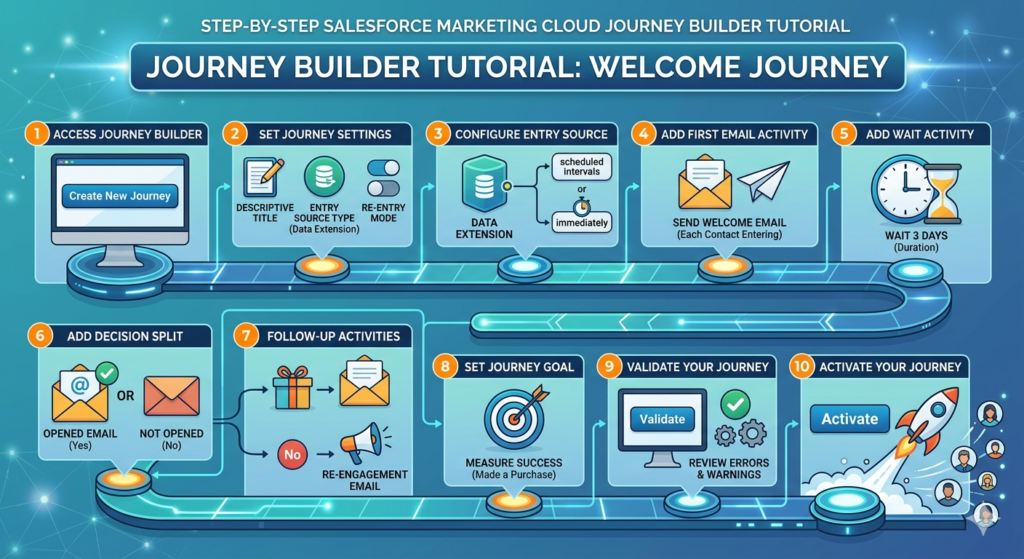
Step 1: Access Journey Builder
- Log into your Marketing Cloud account
- Navigate to Journey Builder from the main navigation menu
- Click Create New Journey button
- Select Multi-Step Journey (for complex flows) or Single Send Journey (for one-time sends)
For this tutorial, we’ll select Multi-Step Journey.
Step 2: Set Up Journey Settings
- Name your journey: Give it a descriptive name like “Welcome Journey – New Subscribers”
- Select entry source type: For our example, choose Data Extension
- Choose entry mode: Select whether contacts can enter once or multiple times
- Set contact deletion behavior: Decide what happens if a contact is removed from your data extension
Click Create to proceed to the journey canvas.
Step 3: Configure Your Entry Source
- In the journey canvas, click on the Entry Source icon
- Select the data extension containing your new subscribers
- Configure the Entry Event Criteria: Choose whether contacts enter immediately when added to the data extension or at scheduled intervals
- Set up Contact Filter if you want to filter which contacts from the data extension actually enter the journey
For beginners, start simple—let contacts enter immediately without additional filters.
Step 4: Add Your First Email Activity
- From the activity palette on the right, drag the Send Email activity onto the canvas
- Connect it to your entry source by dragging a line from the entry source to the email activity
- Click on the email activity to configure it
- Select the welcome email you want to send (you should have created this in Email Studio beforehand)
- Choose your sending method: All at once or Each contact entering
For a welcome journey, select “Each contact entering” so new subscribers receive the email immediately upon joining.
Step 5: Add a Wait Activity
After the welcome email, it’s good practice to wait before sending more content. This prevents overwhelming new subscribers.
- Drag a Wait activity onto the canvas
- Connect it to your email activity
- Click the Wait activity and set the duration (e.g., 3 days)
- Choose wait type: Duration (fixed time) or Date Attribute (wait until a specific date in contact’s data)
Step 6: Add a Decision Split
Decision splits allow you to personalize the journey based on contact behavior or data.
- Drag a Decision Split activity onto the canvas after your wait activity
- Connect it to the wait activity
- Click the decision split to configure it
- Create your decision criteria (e.g., “Opened Welcome Email = True”)
- You’ll see paths created: one for “Yes” and one for “No”
This allows you to send different follow-up messages based on whether the subscriber engaged with your welcome email.
Step 7: Add Follow-Up Activities for Each Path
For subscribers who opened the email:
- Add another Send Email activity
- Select an email showcasing your best content or products
- This rewards engaged subscribers with relevant information
For subscribers who didn’t open:
- Add a different Send Email activity
- Select an email with a different subject line or offer to re-engage them
Step 8: Set a Journey Goal (Optional but Recommended)
Goals help you measure success:
- Click Set Goal in the journey settings
- Define what success looks like (e.g., “Made a purchase”)
- Connect the goal to your Salesforce data or a data extension
- Set the criteria for goal achievement
When a contact meets the goal, Journey Builder can automatically end their journey or continue down a success path.
Step 9: Validate Your Journey
Before activating:
- Click the Validate button at the top of the canvas
- Review any errors or warnings
- Fix any issues identified
- Common validation errors for beginners include:
- Unconnected activities
- Missing email selections
- Invalid data extension references
Step 10: Activate Your Journey
Once validation passes:
- Click Activate button
- Review the activation summary
- Confirm activation
Your journey is now live! Contacts will begin entering based on your entry source configuration.
Real-World SFMC Journey Builder Examples
To make this Salesforce Marketing Cloud Journey Builder tutorial more practical, let’s explore some SFMC journey builder examples you can implement in real business scenarios.
Example 1: Abandoned Cart Recovery Journey
Scenario: An e-commerce company wants to recover lost sales from abandoned shopping carts.
Journey Structure:
- Entry Source: API event triggered when a cart is abandoned
- Wait: 2 hours (giving customer time to return naturally)
- Decision Split: Check if purchase was completed
- If No: Send abandoned cart reminder email
- If Yes: Exit journey
- Wait: 24 hours
- Decision Split: Check if purchase completed
- If No: Send email with 10% discount code
- If Yes: Exit journey
- Wait: 48 hours
- Final Email: Last chance offer with 15% discount
- Goal: Purchase completed
This example demonstrates how SFMC automation can significantly improve conversion rates without manual intervention.
Example 2: Post-Purchase Nurture Journey
Scenario: A SaaS company wants to onboard new customers and ensure product adoption.
Journey Structure:
- Entry Source: Salesforce opportunity status changes to “Closed-Won”
- Send Email: Welcome and thank you email
- Wait: 3 days
- Send Email: Getting started guide
- Wait: 7 days
- Decision Split: Check if user logged into product
- If Yes: Send advanced features email
- If No: Send reminder email with setup assistance
- Wait: 14 days
- Engagement Split: Based on email engagement
- High engagement path: Upsell/cross-sell email
- Low engagement path: Customer success outreach
- Goal: Product feature adoption
Example 3: Birthday Campaign Journey
Scenario: A retail brand wants to celebrate customer birthdays with special offers.
Journey Structure:
- Entry Source: Data extension filtered by contact’s birthday month
- Wait Until: Contact’s exact birthday (using date attribute)
- Send Email: Happy birthday email with special discount code
- Wait: 7 days
- Decision Split: Check if discount code was used
- If No: Send reminder email
- If Yes: Send thank you email
- Exit: Journey ends
These SFMC journey builder examples show how versatile Journey Builder can be across different industries and use cases.
Journey Builder vs. Automation Studio: Understanding the Difference
As a marketing cloud beginner, you might wonder when to use Journey Builder versus Automation Studio. Both tools enable SFMC automation, but they serve different purposes.
Journey Builder
Best for:
- Customer-centric, multi-step campaigns
- Personalized experiences based on individual behavior
- Real-time triggered responses
- Multi-channel communications
- Complex decision logic based on engagement
Examples:
- Welcome series
- Abandoned cart recovery
- Post-purchase nurture
- Re-engagement campaigns
Automation Studio
Best for:
- Data management tasks
- Scheduled batch processes
- File imports and exports
- Data extension operations
- System maintenance activities
Examples:
- Daily import of customer data
- Weekly email sends to entire lists
- Monthly data cleanup processes
- Scheduled report generation
Quick Comparison Table
| Feature | Journey Builder | Automation Studio |
|---|---|---|
| Trigger Type | Individual contact behavior | Scheduled or file-based |
| Execution | Real-time, continuous | Batch, scheduled |
| Personalization | High, individual-level | Limited, segment-level |
| Complexity | Visual, multi-path journeys | Linear workflows |
| Best Use | Customer engagement | Data operations |
Rule of Thumb: Use Journey Builder when focusing on the customer experience and personalization. Use Automation Studio for backend data processes and scheduled bulk operations.
Common Beginner Mistakes to Avoid
Learning from others’ mistakes can accelerate your mastery of this Salesforce Marketing Cloud Journey Builder tutorial. Here are the most common errors beginners make:
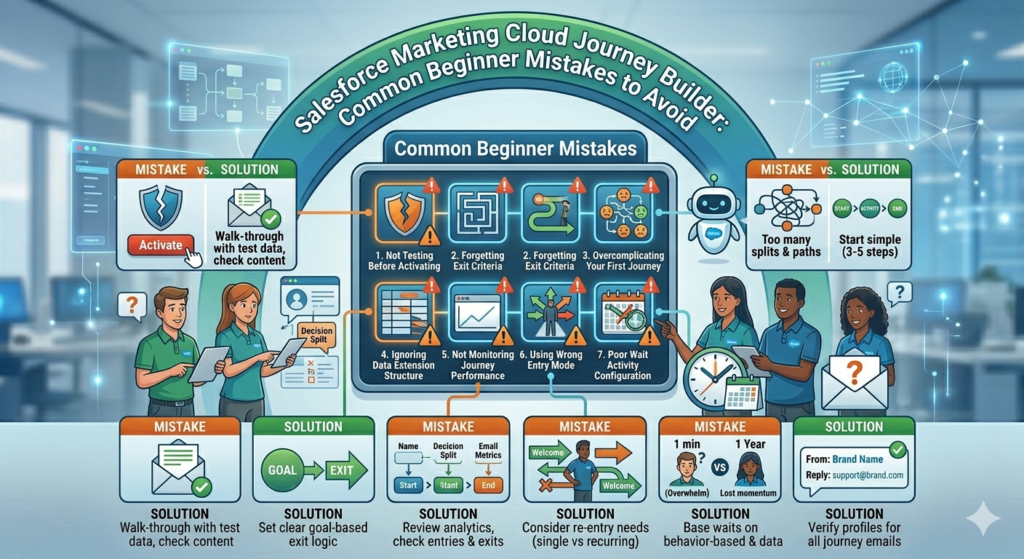
1. Not Testing Before Activating
Mistake: Activating a journey without testing it first.
Solution: Always use a test data extension with your own email address to walk through the entire journey before going live. Check timing, content, and logic.
2. Forgetting Exit Criteria
Mistake: Allowing contacts to remain in journeys indefinitely, even after the goal is achieved.
Solution: Always set appropriate exit criteria. For example, if your journey’s goal is to drive a purchase, contacts should exit once they’ve made that purchase.
3. Overcomplicating Your First Journey
Mistake: Creating an overly complex journey with dozens of decision splits and paths.
Solution: Start simple. A basic journey with 3-5 activities is perfect for learning. You can always add complexity later based on performance data.
4. Ignoring Data Extension Structure
Mistake: Using poorly structured data extensions that lack necessary fields for personalization or decision splits.
Solution: Plan your data extension schema before building journeys. Ensure you have all the data fields you’ll need for personalization, segmentation, and decision logic.
5. Not Monitoring Journey Performance
Mistake: Setting up a journey and never checking how it’s performing.
Solution: Regularly review journey analytics. Look at:
- How many contacts are entering
- Completion rates at each step
- Email performance metrics
- Goal achievement rates
- Where contacts are exiting
6. Using Wrong Entry Mode
Mistake: Allowing contacts to re-enter a welcome journey multiple times, or preventing re-entry for a recurring purchase journey.
Solution: Carefully consider whether contacts should be able to re-enter your journey:
- Welcome journeys: Single entry only
- Abandoned cart: Re-entry allowed
- Birthday campaigns: Re-entry annually
7. Poor Wait Activity Configuration
Mistake: Setting wait times that are too short (overwhelming contacts) or too long (losing momentum).
Solution: Base wait times on your industry benchmarks and customer behavior data. Test different durations and optimize based on engagement metrics.
8. Missing Sender Information
Mistake: Not properly configuring sender profiles for emails within the journey.
Solution: Always verify that your emails have appropriate sender names and reply-to addresses configured before adding them to journeys.
Best Practices for Journey Builder Success
Now that you know what to avoid, let’s cover the best practices that will make you successful with SFMC automation through Journey Builder.
1. Start with Clear Objectives
Before building any journey, define:
- Who is this journey for? (Target audience)
- What action do you want them to take? (Goal)
- Why are you sending these messages? (Value proposition)
- When should they receive communications? (Timing strategy)
2. Map the Journey Before Building
Use a flowchart or whiteboard to sketch your journey logic before opening Journey Builder. This helps you:
- Visualize the entire customer experience
- Identify gaps in your logic
- Plan necessary content and resources
- Get stakeholder approval before building
3. Implement Progressive Profiling
Use journeys to gradually collect more information about contacts rather than asking for everything upfront. Each interaction can gather small amounts of data to build richer profiles.
4. Leverage Personalization
Go beyond using first names. Personalize based on:
- Past purchase behavior
- Browsing history
- Engagement patterns
- Demographic data
- Preference center selections
5. Use Path Optimizer for Large Campaigns
Path Optimizer is an advanced Journey Builder feature that tests different journey paths and automatically sends contacts down the best-performing route. It’s excellent for optimizing conversion rates.
6. Set Up Contact Throttling
For journeys that might send high volumes of messages, configure throttling to:
- Prevent overwhelming your email infrastructure
- Avoid spam filter triggers
- Maintain consistent sending patterns
7. Document Your Journeys
Create documentation that includes:
- Journey purpose and goals
- Entry source details
- Decision split logic
- Expected timing and flow
- Success metrics
This is crucial when multiple team members work on journeys or when you need to troubleshoot issues.
8. Create Modular Content
Build reusable content blocks and email templates that can be used across multiple journeys. This ensures:
- Brand consistency
- Faster journey creation
- Easier updates (change once, update everywhere)
9. Monitor and Optimize Continuously
Set calendar reminders to review journey performance monthly. Look for:
- Drop-off points where contacts exit
- Low-performing decision paths
- Email content that underperforms
- Opportunities to add new touchpoints
10. Respect Frequency Caps
Even though Journey Builder automates sends, respect your subscribers’ inbox. Implement:
- Frequency caps at the contact level
- Suppression lists for recently contacted subscribers
- Preference center options for message frequency
Conclusion
Mastering Journey Builder is a game-changer for any marketer working with Salesforce Marketing Cloud. As we’ve covered in this Salesforce Marketing Cloud Journey Builder tutorial, this powerful automation tool enables you to create personalized, behavior-driven customer experiences that were once impossible without significant manual effort.
Whether you’re just starting as a marketing cloud beginner or looking to refine your SFMC automation skills, the key to success with Journey Builder lies in starting simple and building complexity over time. Begin with straightforward welcome journeys or post-purchase follow-ups, then gradually incorporate more sophisticated elements like decision splits, engagement tracking, and multi-channel touchpoints as your confidence grows.
Remember that Journey Builder is not just about automation—it’s about creating meaningful customer relationships at scale. Every journey you build should serve a clear purpose, provide genuine value to your audience, and align with your broader marketing objectives. By following the best practices outlined in this guide and learning from the SFMC journey builder examples provided, you’ll be well-equipped to design journeys that not only engage customers but also drive measurable business results.
Don’t be discouraged if your first few journeys aren’t perfect. Like any skill, proficiency with Journey Builder comes through practice, testing, and continuous optimization. Use the analytics available within the platform to understand what’s working, identify drop-off points, and refine your approach based on real performance data.
The future of marketing belongs to those who can deliver personalized, timely, and relevant experiences across every customer touchpoint. With Journey Builder in your marketing toolkit, you have everything you need to meet—and exceed—modern customer expectations. Now it’s time to put this knowledge into action. Log into your Marketing Cloud account, create your first journey, and start transforming how you engage with your customers today.
Your journey to becoming a Journey Builder expert starts now—and the possibilities are limitless.
About RizeX Labs
At RizeX Labs, we specialize in delivering cutting-edge Salesforce solutions, including Salesforce Marketing Cloud (SFMC) implementations and automation strategies. Our expertise combines deep technical knowledge, industry best practices, and real-world experience to help businesses create personalized customer journeys and maximize engagement.
We empower organizations to transform their marketing approach—from disconnected campaigns to fully automated, data-driven journeys that improve customer experience and drive measurable growth.
Internal Links:
- Salesforce Admin course page
- Salesforce Flows vs Apex: When Should You Use Code vs No-Code Automation?
- Salesforce Data Cloud Explained — What It Is and Why It Matters
- AI Tools for Salesforce Development in 2026 — Cursor AI, Copilot and More
- Why Your Company Should Invest in Salesforce Developer Training in 2026
- Salesforce Named Credentials: What They Are and How to Use Them Safely
- Prompt Engineering for Salesforce Agentforce — Beginner’s Guide
External Links:
McKinsey Sales Growth Reports
Quick Summary
This comprehensive Salesforce Marketing Cloud Journey Builder tutorial has covered everything a marketing cloud beginner needs to start creating automated, personalized customer journeys. Journey Builder is a powerful tool that transforms how you engage with customers by delivering the right message at the right time across multiple channels. By understanding key components like entry sources, activities, decision splits, and goals, you can create sophisticated SFMC automation that drives real business results. The SFMC journey builder examples provided—from abandoned cart recovery to post-purchase nurture—demonstrate practical applications across various industries. Remember to start simple, avoid common beginner mistakes, follow best practices, and continuously monitor and optimize your journeys. With practice and persistence, you'll soon be creating complex, multi-channel customer journeys that deliver exceptional experiences and measurable ROI for your marketing programs.

