Introduction: Why APIs Matter in the Salesforce Ecosystem
Imagine your Salesforce org as a powerful island filled with valuable business data — customer records, opportunities, support tickets, and more. Now imagine needing to share that data with the outside world: a mobile app, a third-party platform, an ERP system, or a custom web portal. How do you build that bridge?
The answer is APIs — Application Programming Interfaces.
In today’s hyper-connected digital landscape, no business system works in isolation. APIs are the invisible plumbing that allows different software systems to talk to each other, share data, and trigger actions in real time. For Salesforce developers, knowing how to build custom APIs isn’t just a “nice-to-have” skill — it’s an essential capability that unlocks an entirely new level of integration power.
That’s where Salesforce Apex REST Services come in.
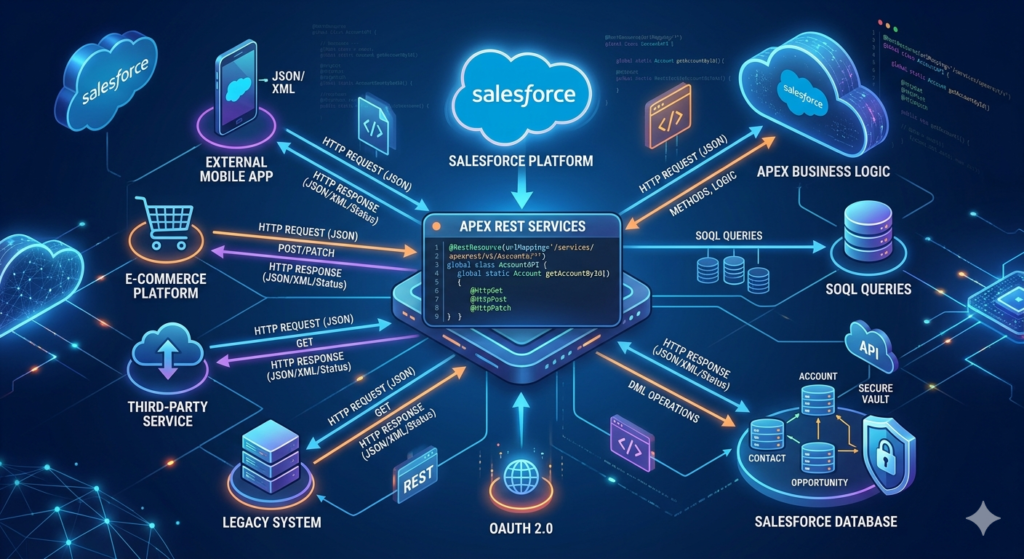
With Apex REST, you can expose your Salesforce business logic as RESTful endpoints that external systems can call using standard HTTP methods. Whether you’re pulling account data for a mobile app or pushing order information from an e-commerce platform into Salesforce, Apex REST gives you full control over how your data is exposed and consumed.
In this comprehensive guide from RizeX Labs, we’ll walk you through everything you need to know — from the foundational concepts to a full, working code example with step-by-step testing instructions. By the end, you’ll have built your first Apex REST endpoint and be ready to tackle real-world integration challenges.
Let’s dive in.
What Are Salesforce Apex REST Services?
Salesforce Apex REST Services allow developers to expose custom Apex classes as RESTful web services. These services follow the REST (Representational State Transfer) architectural style, which means they use standard HTTP methods like GET, POST, PUT, PATCH, and DELETE to perform operations on resources.
In simpler terms: you write an Apex class, decorate it with special annotations, and suddenly that class becomes an API endpoint that external applications can call over the internet.
How Does It Work Under the Hood?
When you create an Apex REST service, Salesforce handles all the heavy lifting:
- Authentication is managed through Salesforce’s OAuth 2.0 framework
- Request routing is handled by the Salesforce platform
- JSON/XML serialization and deserialization happens automatically
- Governor limits apply to keep performance in check
The Salesforce platform exposes your custom API through a URL that follows this pattern:
texthttps://[YourInstance].salesforce.com/services/apexrest/[YourEndpoint]
This URL is accessible to any authorized external system, making it the entry point for your Salesforce custom API.
The Key Annotations You Need to Know
Apex REST relies on a set of special annotations that tell Salesforce what your class and methods do:
| Annotation | Purpose |
|---|---|
@RestResource(urlMapping='/YourPath/*') | Marks the class as a REST resource and defines the URL |
@HttpGet | Handles HTTP GET requests (retrieve data) |
@HttpPost | Handles HTTP POST requests (create data) |
@HttpPut | Handles HTTP PUT requests (replace/upsert data) |
@HttpPatch | Handles HTTP PATCH requests (update data) |
@HttpDelete | Handles HTTP DELETE requests (delete data) |
Each annotation maps directly to a standard REST operation, making your Apex class behave just like any other modern REST API.

Why Use a Salesforce Custom API?
You might be wondering: “Salesforce already has standard REST APIs. Why would I build my own?”
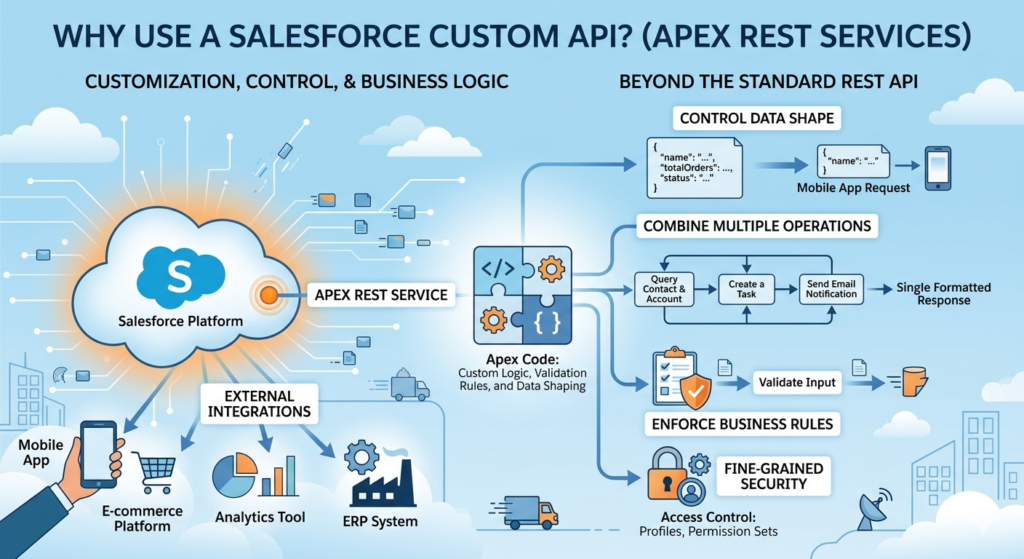
That’s a fair question — and the answer lies in customization, control, and business-specific logic.
1. Standard APIs Have Limitations
Salesforce’s built-in REST API is powerful, but it works at the object level. It lets you query, insert, update, and delete records — but it doesn’t know anything about your unique business rules. A Salesforce custom API built with Apex can enforce those rules, perform complex calculations, call external services, and return data in exactly the format you need.
2. You Control the Data Shape
With a custom Apex REST endpoint, you decide what fields to expose, how to structure the JSON response, and what data to aggregate. Instead of returning an entire Account record with 50+ fields, your API can return only the 5 fields the mobile app actually needs.
3. You Can Combine Multiple Operations
One call to your Apex REST endpoint can trigger multiple operations — query several objects, apply business logic, send an email, create a Task, and return a formatted response. This kind of orchestration is impossible with standard APIs alone.
4. Security and Access Control
Apex REST services respect Salesforce’s permission model. You can control who can access your API using profiles, permission sets, and OAuth scopes — giving you fine-grained security control.
5. Real-World Integration Scenarios
Here are just a few real-world scenarios where a Salesforce custom API shines:
- A mobile app needs to fetch a customer’s account summary, open cases, and recent purchases in a single API call
- An e-commerce platform sends order data to Salesforce when a purchase is completed
- A third-party analytics tool needs to push campaign performance data into custom objects
- An ERP system syncs invoice records with Salesforce opportunities on a nightly basis
Real-World Use Case: Order Management Integration
Before we dive into code, let’s anchor everything in a realistic scenario that will guide our examples throughout this tutorial.
The Business Problem:
RizeX Labs has a client — a mid-sized retail company — that uses Salesforce as their CRM. They’ve recently launched a new e-commerce website, and they need that website to automatically create Order records in Salesforce whenever a customer completes a purchase. Additionally, their customer service team needs to be able to look up order details from Salesforce via a mobile app.
The Solution:
We’ll build a Salesforce Apex REST Service that:
- Accepts POST requests to create new Order records in Salesforce (from the e-commerce site)
- Accepts GET requests to retrieve Order details by Order Number (for the mobile app)
This is a perfect use case for a custom Apex REST endpoint — real business logic, two-way data flow, and integration with an external system.
Prerequisites
Before you start building, make sure you have the following in place:
Technical Requirements
- ✅ A Salesforce Developer org (free at developer.salesforce.com)
- ✅ Basic knowledge of Apex (variables, classes, SOQL queries)
- ✅ Familiarity with JSON format
- ✅ Postman installed (free API testing tool at postman.com) or access to Salesforce Workbench
- ✅ Salesforce CLI or Developer Console access
Salesforce Setup Requirements
- Your user profile must have the “Author Apex” permission enabled
- A Connected App configured in Salesforce for OAuth authentication (if testing with Postman)
- Basic understanding of the Order object in Salesforce (or any custom object you prefer to use)
Tip for Beginners: If working with Orders feels complex, you can substitute the Order object with the standard Account or Contact object for your first practice run. The concepts are identical.
Step-by-Step Guide to Building Your First Apex REST Endpoint
Step 1: Plan Your API Design
Good APIs are designed before they’re coded. Let’s define our API:
Endpoint: /services/apexrest/OrderService/
Supported Methods:
GET /OrderService/?orderNumber=ORD-001→ Returns order detailsPOST /OrderService/→ Creates a new order
Request Format (POST):
JSON{
  "customerName": "John Doe",
  "customerEmail": "john.doe@example.com",
  "orderAmount": 299.99,
  "productName": "Laptop Pro X",
  "quantity": 1
}
Response Format (Success):
JSON{
  "success": true,
  "message": "Order created successfully",
  "orderId": "001xx000003GYkFAAW",
  "orderNumber": "ORD-2024-001"
}
Response Format (Error):
JSON{
  "success": false,
  "message": "Error: Customer email is required",
  "orderId": null,
  "orderNumber": null
}
Step 2: Create the Apex REST Class
Open your Salesforce Developer Console (Setup → Developer Console) or use VS Code with the Salesforce Extension Pack.
Navigate to: File → New → Apex Class
Name your class: OrderRestService
Step 3: Write the Apex Code
Now let’s write the actual code. We’ll go section by section so every piece is crystal clear.
Code Example: Complete Apex REST Service
Here is the complete, production-quality Apex REST class for our Order Management integration:
apex/**
 * @description     Apex REST Service for Order Management
 *                  Exposes endpoints for creating and retrieving Orders
 * @author          RizeX Labs Development Team
 * @version         1.0
 * @date            2024
 *
 * Endpoint Base URL:
 * https://[YourInstance].salesforce.com/services/apexrest/OrderService/
 */
@RestResource(urlMapping='/OrderService/*')
global with sharing class OrderRestService {

    // ============================================================
    // INNER CLASSES — Define request and response data structures
    // ============================================================

    /**
     * Wrapper class for incoming POST request body
     * Salesforce will automatically deserialize the JSON body
     * into this object when a POST request is received
     */
    global class OrderRequest {
        global String customerName;
        global String customerEmail;
        global Decimal orderAmount;
        global String productName;
        global Integer quantity;
    }

    /**
     * Wrapper class for all API responses
     * Provides a consistent response structure for all callers
     */
    global class OrderResponse {
        global Boolean success;
        global String message;
        global String orderId;
        global String orderNumber;

        // Constructor for easy instantiation
        global OrderResponse(Boolean success, String message,
                             String orderId, String orderNumber) {
            this.success     = success;
            this.message     = message;
            this.orderId     = orderId;
            this.orderNumber = orderNumber;
        }
    }

    /**
     * Wrapper class for order detail response (used in GET)
     */
    global class OrderDetail {
        global Boolean success;
        global String message;
        global String orderId;
        global String orderNumber;
        global String customerName;
        global String customerEmail;
        global String status;
        global Decimal totalAmount;
        global String createdDate;
    }

    // ============================================================
    // HTTP GET — Retrieve Order Details
    // URL: GET /services/apexrest/OrderService/?orderNumber=ORD-001
    // ============================================================

    /**
     * @description Retrieves order details based on Order Number
     *              passed as a URL query parameter
     * @return      OrderDetail wrapper with order information
     */
    @HttpGet
    global static OrderDetail getOrderDetails() {

        // Initialize the detail response object
        OrderDetail response = new OrderDetail();

        try {
            // Get the incoming REST request context
            RestRequest req = RestContext.request;

            // Extract the 'orderNumber' query parameter from the URL
            // Example URL: /OrderService/?orderNumber=ORD-2024-001
            String orderNumber = req.params.get('orderNumber');

            // Validate that the order number was provided
            if (String.isBlank(orderNumber)) {
                response.success = false;
                response.message = 'Error: orderNumber query parameter is required.';
                return response;
            }

            // Query Salesforce for the Order record
            // Note: Adjust field names based on your Order object configuration
            List<Order> orders = [
                SELECT Id,
                       OrderNumber,
                       Status,
                       TotalAmount,
                       BillingStreet,
                       CreatedDate,
                       Account.Name,
                       Account.BillingEmail
                FROM   Order
                WHERE  OrderNumber = :orderNumber
                WITH   SECURITY_ENFORCED
                LIMIT  1
            ];

            // Check if order was found
            if (orders.isEmpty()) {
                response.success = false;
                response.message = 'Order not found for Order Number: ' + orderNumber;
                return response;
            }

            // Map the Salesforce Order record to our response object
            Order foundOrder       = orders[0];
            response.success       = true;
            response.message       = 'Order retrieved successfully';
            response.orderId       = foundOrder.Id;
            response.orderNumber   = foundOrder.OrderNumber;
            response.status        = foundOrder.Status;
            response.totalAmount   = foundOrder.TotalAmount;
            response.customerName  = foundOrder.Account.Name;
            response.customerEmail = foundOrder.Account.BillingEmail;
            response.createdDate   = String.valueOf(foundOrder.CreatedDate);

        } catch (QueryException qe) {
            // Handle SOQL query errors
            response.success = false;
            response.message = 'Database query error: ' + qe.getMessage();

        } catch (Exception e) {
            // Catch-all for unexpected errors
            response.success = false;
            response.message = 'Unexpected error: ' + e.getMessage();
        }

        return response;
    }

    // ============================================================
    // HTTP POST — Create a New Order
    // URL: POST /services/apexrest/OrderService/
    // Body: JSON with order details
    // ============================================================

    /**
     * @description Creates a new Order record in Salesforce
     *              based on the JSON request body sent by the caller
     * @return      OrderResponse with success status and new record Id
     */
    @HttpPost
    global static OrderResponse createOrder() {

        OrderResponse response;

        try {
            // Get the incoming REST request
            RestRequest req = RestContext.request;

            // Deserialize the JSON request body into our OrderRequest wrapper
            // Salesforce automatically handles JSON → Apex object conversion
            OrderRequest orderData = (OrderRequest) JSON.deserialize(
                req.requestBody.toString(),
                OrderRequest.class
            );

            // -----------------------------------------------
            // INPUT VALIDATION
            // Always validate inputs before processing
            // -----------------------------------------------

            if (String.isBlank(orderData.customerName)) {
                return new OrderResponse(false,
                    'Validation Error: customerName is required.',
                    null, null);
            }

            if (String.isBlank(orderData.customerEmail)) {
                return new OrderResponse(false,
                    'Validation Error: customerEmail is required.',
                    null, null);
            }

            if (orderData.orderAmount == null || orderData.orderAmount <= 0) {
                return new OrderResponse(false,
                    'Validation Error: orderAmount must be a positive number.',
                    null, null);
            }

            if (String.isBlank(orderData.productName)) {
                return new OrderResponse(false,
                    'Validation Error: productName is required.',
                    null, null);
            }

            if (orderData.quantity == null || orderData.quantity <= 0) {
                return new OrderResponse(false,
                    'Validation Error: quantity must be a positive integer.',
                    null, null);
            }

            // -----------------------------------------------
            // FIND OR CREATE ACCOUNT
            // Look up existing Account by email, or create new one
            // -----------------------------------------------

            Account customerAccount;

            List<Account> existingAccounts = [
                SELECT Id, Name, BillingEmail
                FROM   Account
                WHERE  BillingEmail = :orderData.customerEmail
                WITH   SECURITY_ENFORCED
                LIMIT  1
            ];

            if (!existingAccounts.isEmpty()) {
                // Use existing account
                customerAccount = existingAccounts[0];
            } else {
                // Create a new Account for this customer
                customerAccount = new Account(
                    Name         = orderData.customerName,
                    BillingEmail = orderData.customerEmail,
                    Type         = 'Customer'
                );
                insert customerAccount;
            }

            // -----------------------------------------------
            // CREATE THE ORDER RECORD
            // Map incoming data to Salesforce Order fields
            // -----------------------------------------------

            // Orders require an effective date and status
            Order newOrder = new Order(
                AccountId         = customerAccount.Id,
                Status            = 'Draft',
                EffectiveDate     = Date.today(),
                Description       = 'Online Order: ' + orderData.productName +
                                    ' | Qty: ' + orderData.quantity +
                                    ' | Source: E-Commerce API',
                BillingStreet     = 'N/A',   // Required field — adjust as needed
                BillingCity       = 'N/A',
                BillingState      = 'N/A',
                BillingPostalCode = '00000',
                BillingCountry    = 'US'
            );

            insert newOrder;

            // -----------------------------------------------
            // LOG THE API CALL (Optional but recommended)
            // Create a Task to track the API interaction
            // -----------------------------------------------

            Task apiLog = new Task(
                Subject       = 'Order API Call - ' + orderData.productName,
                WhatId        = newOrder.Id,
                WhoId         = null,
                Status        = 'Completed',
                Priority      = 'Normal',
                Description   = 'Order created via Apex REST API. ' +
                                'Amount: $' + orderData.orderAmount +
                                ' | Product: ' + orderData.productName
            );
            insert apiLog;

            // -----------------------------------------------
            // RETURN SUCCESS RESPONSE
            // -----------------------------------------------

            // Re-query to get the auto-generated OrderNumber
            Order createdOrder = [
                SELECT Id, OrderNumber
                FROM   Order
                WHERE  Id = :newOrder.Id
                LIMIT  1
            ];

            response = new OrderResponse(
                true,
                'Order created successfully for customer: ' + orderData.customerName,
                createdOrder.Id,
                createdOrder.OrderNumber
            );

        } catch (DMLException dmlEx) {
            // Handle database insert/update errors
            response = new OrderResponse(
                false,
                'Database error while creating order: ' + dmlEx.getMessage(),
                null, null
            );

        } catch (JSONException jsonEx) {
            // Handle malformed JSON in request body
            response = new OrderResponse(
                false,
                'Invalid JSON format in request body: ' + jsonEx.getMessage(),
                null, null
            );

        } catch (Exception e) {
            // Catch-all error handler
            response = new OrderResponse(
                false,
                'Unexpected error: ' + e.getMessage(),
                null, null
            );
        }

        return response;
    }
}
Code Walkthrough: What’s Happening Here?
Let’s break down the key parts of this Apex REST class so you understand every decision:
@RestResource(urlMapping='/OrderService/*')
This annotation at the top of the class is what transforms a regular Apex class into a Salesforce Apex REST service. The urlMapping parameter defines the URL path for your endpoint. The /* wildcard at the end allows for flexible URL paths.
The full URL to call this endpoint would be:
texthttps://[YourInstance].salesforce.com/services/apexrest/OrderService/
global with sharing class OrderRestService
global— Required for REST services. Makes the class accessible from outside the Salesforce platformwith sharing— Enforces the running user’s sharing rules (recommended for security)- Using
without sharingis sometimes necessary but should be documented and justified
Inner Wrapper Classes
Rather than returning raw SObject data, we use wrapper classes (OrderRequest, OrderResponse, OrderDetail) to:
- Control exactly what data is exposed
- Provide a clean, predictable API contract
- Separate Salesforce’s internal data model from the public API
RestContext.request
This gives you access to everything about the incoming HTTP request:
RestContext.request.params— URL query parametersRestContext.request.requestBody— The raw request body (for POST)RestContext.request.headers— HTTP headersRestContext.request.httpMethod— The HTTP method used
JSON.deserialize()
This Salesforce method converts the incoming JSON string directly into an Apex object. It’s clean, efficient, and handles nested objects automatically.
WITH SECURITY_ENFORCED
Added to SOQL queries to enforce field-level security. This ensures the API only returns data the running user has permission to see — a critical security practice.
How to Test the API
You’ve written the code — now let’s make sure it actually works. We’ll cover two methods: Salesforce Workbench (easiest for beginners) and Postman (more powerful and realistic).
Method 1: Testing with Salesforce Workbench
Workbench is a free, browser-based Salesforce utility that’s perfect for quick API testing without any setup.
Step 1: Go to workbench.developerforce.com
Step 2: Log in with your Salesforce Developer org credentials
Step 3: Navigate to Utilities → REST Explorer
Step 4: Testing a GET Request:
- Set the HTTP Method to GET
- Enter the URL:
/services/apexrest/OrderService/?orderNumber=ORD-001 - Click Execute
Step 5: Testing a POST Request:
- Set the HTTP Method to POST
- Enter the URL:
/services/apexrest/OrderService/ - In the Request Body field, paste:
JSON{
  "customerName": "Jane Smith",
  "customerEmail": "jane.smith@example.com",
  "orderAmount": 499.99,
  "productName": "Wireless Headphones Pro",
  "quantity": 2
}
- Click Execute
Expected Response:
JSON{
  "success": true,
  "message": "Order created successfully for customer: Jane Smith",
  "orderId": "801xx000003GYkFAAW",
  "orderNumber": "00000101"
}
Method 2: Testing with Postman
Postman gives you a more realistic view of how external systems will call your Apex REST endpoint.
Step 1: Get an OAuth Access Token
Before calling your API, you need a Salesforce access token. Set up a Connected App in Salesforce:
- Go to Setup → App Manager → New Connected App
- Enable OAuth Settings
- Add the callback URL:
https://login.salesforce.com/services/oauth2/success - Select OAuth scopes: Full access (full) and Perform requests at any time (refresh_token)
- Save and note your Consumer Key and Consumer Secret
Step 2: Authenticate in Postman
Create a new request in Postman:
- Method: POST
- URL:
https://login.salesforce.com/services/oauth2/token - Body (x-www-form-urlencoded):
| Key | Value |
|---|---|
| grant_type | password |
| client_id | [Your Consumer Key] |
| client_secret | [Your Consumer Secret] |
| username | [Your Salesforce Username] |
| password | [Your Password + Security Token] |
Execute the request. You’ll receive a response containing an access_token — save this value.
Step 3: Call Your Apex REST Endpoint
Create a new request:
- Method: POST
- URL:
https://[YourInstance].salesforce.com/services/apexrest/OrderService/
Headers:
textAuthorization: Bearer [Your Access Token]
Content-Type: application/json
Body (raw JSON):
JSON{
  "customerName": "Robert Johnson",
  "customerEmail": "robert.j@techcorp.com",
  "orderAmount": 1299.00,
  "productName": "Enterprise Software License",
  "quantity": 5
}
Click Send and watch the magic happen!
Pro Tip: Save your Postman requests in a Collection. As your API grows, having organized test cases becomes invaluable for regression testing and team collaboration.
Best Practices for Apex REST Development
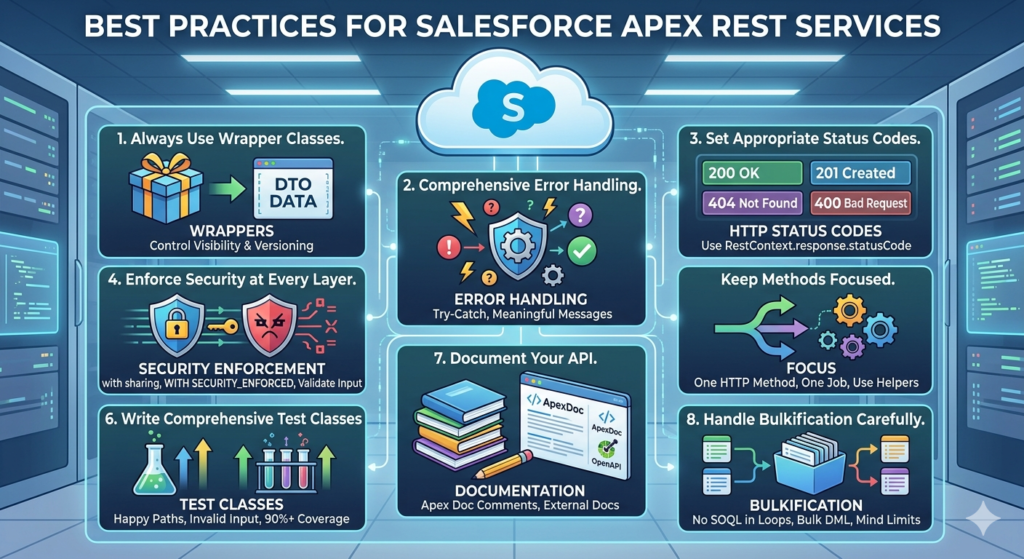
Now that you’ve built your first Salesforce Apex REST service, let’s talk about how to do it the right way. These best practices separate professional-grade APIs from fragile ones.
1. Always Use Wrapper Classes
Never expose raw SObject data directly from your API. Always use wrapper/DTO (Data Transfer Object) classes to:
- Control what fields are visible
- Version your API without breaking changes
- Provide clear documentation through code structure
2. Implement Comprehensive Error Handling
Every method should be wrapped in a try-catch block. Catch specific exception types (DMLException, QueryException, JSONException) before using a generic Exception catch-all. Return meaningful, actionable error messages — not cryptic Salesforce error codes.
3. Set Appropriate HTTP Status Codes
Use RestContext.response.statusCode to set proper HTTP status codes:
apex// In your GET method, when a record isn't found:
RestContext.response.statusCode = 404;

// For successful creation:
RestContext.response.statusCode = 201;

// For validation errors:
RestContext.response.statusCode = 400;

// For server errors:
RestContext.response.statusCode = 500;
4. Enforce Security at Every Layer
- Use
with sharingon your class - Add
WITH SECURITY_ENFORCEDto all SOQL queries - Validate and sanitize all incoming inputs
- Never trust data from external systems without validation
- Use Salesforce permission sets to control who can call your API
5. Keep Methods Focused
Each HTTP method (@HttpGet, @HttpPost, etc.) should do one thing well. If your POST method is doing 200 lines of work, extract the logic into private helper methods. This improves readability, testability, and maintainability.
6. Write Comprehensive Test Classes
Salesforce requires 75% code coverage for deployment, but you should aim for 90%+. Test:
- Happy path (successful requests)
- Invalid input scenarios
- Empty results
- Exception conditions
apex@isTest
private class OrderRestServiceTest {

    @isTest
    static void testCreateOrderSuccess() {
        // Set up test data
        RestRequest req = new RestRequest();
        RestResponse res = new RestResponse();

        req.requestURI = '/services/apexrest/OrderService/';
        req.httpMethod = 'POST';
        req.requestBody = Blob.valueOf(JSON.serialize(new Map<String, Object>{
            'customerName'  => 'Test Customer',
            'customerEmail' => 'test@example.com',
            'orderAmount'   => 100.00,
            'productName'   => 'Test Product',
            'quantity'      => 1
        }));

        RestContext.request  = req;
        RestContext.response = res;

        Test.startTest();
        OrderRestService.OrderResponse response = OrderRestService.createOrder();
        Test.stopTest();

        System.assertEquals(true, response.success, 'Order creation should succeed');
        System.assertNotEquals(null, response.orderId, 'Order ID should not be null');
    }

    @isTest
    static void testCreateOrderMissingEmail() {
        RestRequest req = new RestRequest();
        RestResponse res = new RestResponse();

        req.requestURI = '/services/apexrest/OrderService/';
        req.httpMethod = 'POST';
        req.requestBody = Blob.valueOf(JSON.serialize(new Map<String, Object>{
            'customerName'  => 'Test Customer',
            'customerEmail' => '',    // Missing email
            'orderAmount'   => 100.00,
            'productName'   => 'Test Product',
            'quantity'      => 1
        }));

        RestContext.request  = req;
        RestContext.response = res;

        Test.startTest();
        OrderRestService.OrderResponse response = OrderRestService.createOrder();
        Test.stopTest();

        System.assertEquals(false, response.success, 'Should fail without email');
        System.assert(response.message.contains('customerEmail'),
                      'Error message should mention missing field');
    }
}
7. Document Your API
Add Apex doc comments (/** */) to every class and method. Consider maintaining an external API documentation page (using tools like Swagger/OpenAPI or Confluence) that describes your endpoints, request formats, and responses.
8. Handle Bulkification Carefully
While REST calls are typically single-record operations, design your code to avoid hitting governor limits. Be mindful of:
- SOQL queries inside loops (never do this!)
- DML operations inside loops (always collect and bulk insert/update)
- Total heap size limits
Common Mistakes to Avoid
Even experienced developers make these mistakes when building Salesforce Apex REST services. Learn from them now so you don’t have to learn the hard way later.
❌ Mistake 1: Forgetting the global Keyword
Your REST class and all REST-facing methods must use the global access modifier. Using public won’t make the class accessible as a web service.
apex// ❌ WRONG — Won't work as a REST service
public class MyService { }

// ✅ CORRECT
global class MyService { }
❌ Mistake 2: Using Instance Methods Instead of Static
All HTTP-annotated methods must be static. Instance methods won’t work.
apex// ❌ WRONG — Salesforce will throw an error
@HttpGet
global OrderDetail getOrder() { }

// ✅ CORRECT
@HttpGet
global static OrderDetail getOrder() { }
❌ Mistake 3: Defining Multiple Methods with the Same HTTP Annotation
You can only have one method per HTTP verb in a single REST resource class. If you need to handle two different GET operations, use query parameters or path parameters to differentiate them.
apex// ❌ WRONG — Can't have two @HttpGet methods in one class
@HttpGet
global static OrderDetail getOrderByNumber() { }

@HttpGet
global static OrderDetail getOrderById() { }
❌ Mistake 4: Not Validating Input Data
External systems can send anything in their request body. Never assume the data is clean, complete, or in the right format. Always validate before processing.
❌ Mistake 5: Exposing Sensitive Data
Be extremely careful about what data your API returns. Don’t expose:
- Internal Salesforce IDs you don’t want external systems to know about
- Sensitive personal information unnecessarily
- System fields or metadata
❌ Mistake 6: Ignoring Governor Limits
Each API call runs within Salesforce’s governor limits. A single Apex transaction is limited to:
- 100 SOQL queries
- 150 DML statements
- 6MB heap size
Design your API methods to be lean and efficient.
❌ Mistake 7: Skipping the Test Class
Apex REST classes need test coverage just like any other Apex code. Use RestContext.request and RestContext.response in your test methods to simulate HTTP requests properly.
Conclusion: Your Journey to Salesforce API Mastery Starts Here
Building Salesforce Apex REST Services is one of the most powerful skills you can add to your Salesforce developer toolkit. In this guide, we’ve covered the complete journey from understanding what Apex REST is, to designing a real-world API, writing production-quality code, testing it thoroughly, and following the best practices that senior developers live by.
Here’s what you’ve accomplished today:
- ✅ Understood what Salesforce Apex REST Services are and how they work
- ✅ Learned when and why to use a Salesforce custom API
- ✅ Built a complete, working Apex REST endpoint with GET and POST methods
- ✅ Implemented proper error handling, validation, and security
- ✅ Learned how to test your API using Workbench and Postman
- ✅ Mastered best practices and common pitfalls to avoid
But this is just the beginning. As you grow more comfortable with Apex REST, you can explore:
- Apex Callouts — Making HTTP requests from Salesforce to external APIs
- Named Credentials — Securely storing API credentials for external calls
- Platform Events — Real-time event-driven integrations
- Salesforce Connect — Connecting external data sources without copying data
- Experience Cloud — Building customer-facing portals powered by Apex REST
Ready to Build Something Amazing?
At RizeX Labs, we specialize in transforming complex Salesforce integration challenges into elegant, scalable solutions. Whether you’re a developer looking to sharpen your Apex skills, a business needing to connect Salesforce with your existing systems, or a team looking for expert guidance on your digital transformation journey — we’re here to help.
Here’s how RizeX Labs can accelerate your Salesforce success:
🚀 Custom Salesforce Development — Tailored Apex REST APIs, triggers, and Lightning components built to your exact specifications
🔗 Integration Architecture — Seamless connections between Salesforce and any third-party platform, ERP, or e-commerce system
📚 Developer Training & Mentorship — Hands-on workshops and guided learning paths for Salesforce developers at every level
🛡️ Code Reviews & Technical Audits — Expert review of your existing Apex code for security, performance, and best practices
About RizeX Labs
We’re Pune’s leading IT training institute specializing in emerging technologies like Salesforce and data analytics. At RizeX Labs, we help professionals master tools like Salesforce Apex REST Services through hands-on training, real-world projects, and expert mentorship. Our programs are designed to transform learners into job-ready Salesforce professionals with strong integration and development skills.
Internal Links:
- Salesforce Admin & Development Training
- Salesforce Apex Triggers: Beginner’s Guide with Real-Time Examples
- Salesforce Lightning Web Components (LWC) vs Aura: Which Should You Learn First
External Links:
- Salesforce official website
- MuleSoft Integration overview
- Trailhead learning platform
- Salesforce Help Docs (Apex REST)
Quick Summary
Understanding how to build Salesforce Apex REST Services is essential for creating a connected business ecosystem. While standard APIs offer basic record access, custom Apex endpoints allow developers to enforce unique business rules, perform complex multi-object operations, and control exactly how data is shaped. For most organizations, the best approach is using standard APIs for simple data syncs and Apex REST for high-performance, logic-heavy integrations. This ensures both architectural efficiency and the flexibility to meet evolving business demands.

