If you’ve ever spent hours manually migrating Apex classes, custom fields, or workflow rules between Salesforce orgs — only to discover that something broke in production — you already know why deployment automation matters.
Modern Salesforce development teams are under constant pressure to ship faster, reduce errors, and maintain consistency across multiple environments. That’s where Salesforce Metadata API deployment becomes not just useful, but absolutely essential.
In this guide, we’ll walk you through everything you need to know about using the Salesforce Metadata API to automate your deployments — from foundational concepts to real-world implementation using the Ant Migration Tool and beyond. Whether you’re a developer just getting started with metadata deployments or a DevOps engineer looking to build robust CI/CD pipelines, this guide has something for you.
Let’s dive in.
1. What is Salesforce Metadata?
Before we talk about the API, let’s make sure we’re aligned on a foundational concept: what exactly is Salesforce metadata?
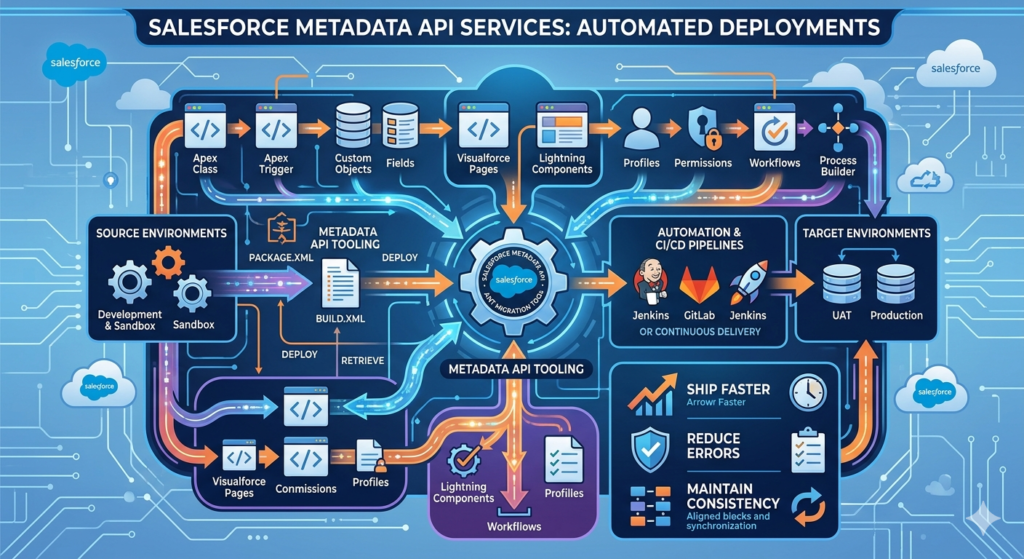
In simple terms, Salesforce metadata refers to everything that defines how your Salesforce org is configured and customized — not the actual data your users enter, but the structure and logic that governs it.
Here’s a quick breakdown of what falls under the metadata umbrella:
- Apex classes and triggers – Your custom business logic
- Visualforce pages and Lightning components – Your UI customizations
- Custom objects and fields – Your data model
- Workflows, process builders, and flows – Your automation rules
- Profiles and permission sets – Your security model
- Reports, dashboards, and list views – Your analytics configuration
- Email templates and layouts – Your communication templates
Think of metadata as the blueprint of your Salesforce org. When you want to move a customization from a sandbox to production, you’re not moving data — you’re moving metadata.

Why Does This Matter?
Manual management of this metadata — especially across multiple environments like Dev, QA, UAT, and Production — is error-prone, time-consuming, and difficult to audit. That’s the core problem that the Salesforce Metadata API is designed to solve.
2. What is the Salesforce Metadata API?
The Salesforce Metadata API is a web service API that allows you to programmatically retrieve, deploy, create, update, and delete customizations in a Salesforce org. It treats your org’s configuration as files that can be managed just like source code.
Officially defined by Salesforce, the Metadata API is designed for:
“Managing customizations and building tools that can manage the metadata model, not the data itself.”
Key Capabilities of the Salesforce Metadata API
| Capability | Description |
|---|---|
| Retrieve | Pull metadata from one org into a local file structure |
| Deploy | Push metadata from local files into a target org |
| Describe | List all metadata types available in an org |
| List | Enumerate specific metadata components |
| CRUD Operations | Create, read, update, delete individual components |
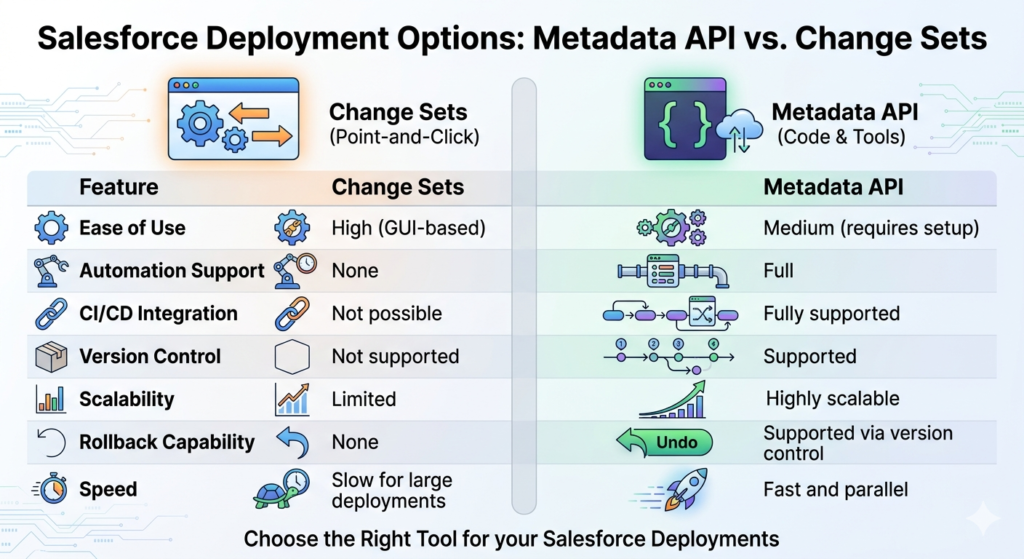
Metadata API vs. Change Sets: What’s the Difference?
Many Salesforce admins are familiar with Change Sets — the point-and-click method for moving metadata between orgs. Here’s how the two compare:
| Feature | Change Sets | Metadata API |
|---|---|---|
| Ease of use | High (GUI-based) | Medium (requires setup) |
| Automation support | None | Full |
| CI/CD integration | Not possible | Fully supported |
| Version control | Not supported | Supported |
| Scalability | Limited | Highly scalable |
| Dependency resolution | Manual | Can be automated |
| Rollback capability | None | Supported via version control |
| Speed | Slow for large deployments | Fast and parallel |
The bottom line: Change Sets are fine for small, infrequent deployments by admins. But for any serious development team doing regular releases, the Metadata API is the way to go.
3. Why Automate Salesforce Deployments?
Let’s address the elephant in the room: automation requires upfront investment. So why bother?
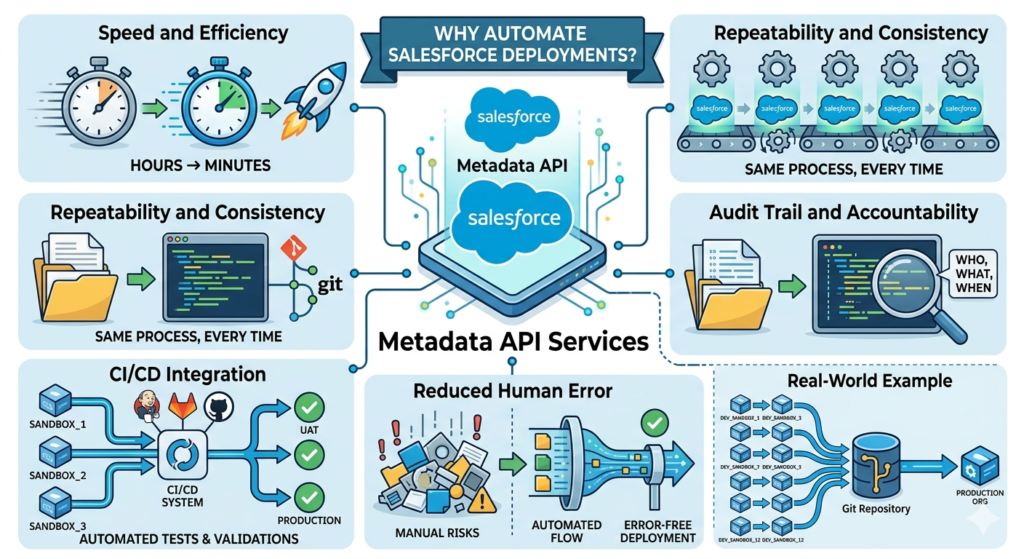
Here’s why teams that invest in Salesforce deploy metadata automation consistently outperform those that don’t:
Speed and Efficiency
Manual deployments that take hours can be reduced to minutes. Once your deployment scripts are set up, running a deployment is as simple as executing a single command. No more clicking through menus, no more waiting for Change Sets to upload.
Repeatability and Consistency
Every automated deployment follows the exact same process, every single time. This eliminates the “it worked in sandbox but not in production” problem that plagues manual deployments.
Audit Trail and Accountability
When your metadata lives in version control (Git, for example), every change is tracked. You know who changed what, when, and why. This is invaluable for compliance and debugging.
CI/CD Integration
Automation unlocks the ability to integrate Salesforce deployments into modern Continuous Integration/Continuous Deployment (CI/CD) pipelines. You can automatically run tests, validate deployments, and promote code through environments without any manual intervention.
Reduced Human Error
Manual deployments are inherently risky. Forgetting to include a dependent component, clicking the wrong option, or skipping a validation step can break production. Automation eliminates these risks.
Real-World Example
Imagine a company with 12 developers all working on different features in separate sandboxes. Every two weeks, they need to merge all changes and deploy to production. Without automation, this is a multi-day effort involving manual conflict resolution and error-prone Change Set creation.
With Metadata API automation, this becomes a streamlined process where changes are integrated into a Git repository, validated automatically, and deployed through a CI/CD pipeline — all within hours.
4. Tools for Salesforce Metadata Deployment
There are several tools available for working with the Salesforce Metadata API. Each has its strengths, and choosing the right one depends on your team’s needs and maturity.
4.1 The Ant Migration Tool
The Ant Migration Tool is a Java-based command-line utility provided by Salesforce that wraps the Metadata API. It uses Apache Ant as its build framework, making it highly configurable through XML files.
Best for:
- Teams already familiar with Ant
- Legacy projects with established Ant workflows
- Environments where Salesforce CLI isn’t an option
Key Files:
build.xml— Defines deployment tasks and targetsbuild.properties— Stores connection credentials and configurationpackage.xml— Declares which metadata components to include
Note: While the Ant Migration Tool is still widely used, Salesforce has shifted its focus toward the Salesforce CLI. However, the Ant tool remains relevant for many enterprise teams.
4.2 Salesforce CLI (sf / sfdx)
The Salesforce CLI is the modern, recommended tool for interacting with Salesforce programmatically. It supports source-driven development with the DX project format and integrates seamlessly with CI/CD platforms.
Best for:
- Modern development workflows
- Salesforce DX projects
- Integration with GitHub Actions, Jenkins, Azure DevOps, etc.
Sample Command:
Bashsf project deploy start --source-dir force-app --target-org production
4.3 CI/CD Platform Integrations
Tools like Jenkins, GitHub Actions, Azure DevOps, CircleCI, and Bitbucket Pipelines can be configured to trigger Metadata API deployments automatically based on events like code commits or pull request merges.
Best for:
- Enterprise teams with established DevOps practices
- Fully automated deployment pipelines
- Multi-org deployment strategies
4.4 Third-Party Tools
- Copado — Enterprise DevOps platform built natively on Salesforce
- Gearset — Popular deployment and comparison tool with a user-friendly interface
- AutoRABIT — End-to-end DevOps platform for Salesforce
These tools abstract much of the complexity away and are excellent for teams that want power without the configuration overhead.
When to Use Each Tool
textScenario                          Recommended Tool
─────────────────────────────────────────────────────────────────
Legacy project, Ant familiarity   Ant Migration Tool
Modern DX project                 Salesforce CLI
Full CI/CD automation             Salesforce CLI + CI/CD Platform
Low-code DevOps                   Gearset or Copado
Enterprise DevOps                 AutoRABIT or Copado
5. Step-by-Step Guide: Automating Deployment with the Ant Migration Tool
Let’s get practical. In this section, we’ll walk through a complete setup of the Ant Migration Tool to automate a Salesforce Metadata API deployment.
Prerequisites
Before you begin, make sure you have the following:
- Java JDK (version 8 or higher) installed
- Apache Ant (version 1.6 or higher) installed
- Ant Migration Tool downloaded from Salesforce
- A Salesforce org with API access enabled
- Basic familiarity with command-line tools
Verify your Java installation:
Bashjava -version
# Expected output: java version "11.0.x" or similar
Verify your Ant installation:
Bashant -version
# Expected output: Apache Ant(TM) version 1.10.x
Step 1: Download and Install the Ant Migration Tool
- Log in to your Salesforce org
- Navigate to Setup → Develop → Tools
- Download the Force.com Migration Tool ZIP file
- Extract the ZIP to a directory, e.g.,
/tools/ant-salesforce/
The extracted folder should contain:
textant-salesforce/
├── ant-salesforce.jar        ← The Salesforce Ant tasks
├── lib/
│   └── (dependency JARs)
└── sample/
    ├── build.xml
    ├── build.properties
    └── codepkg/
        └── package.xml
Step 2: Configure build.properties
The build.properties file stores your org credentials and connection settings. Create or edit this file:
properties# build.properties — Salesforce Connection Configuration

# Source org (where you're pulling FROM)
sf.username = your.email@example.com
sf.password = YourPassword + SecurityToken
sf.serverurl = https://login.salesforce.com

# For sandbox orgs, use:
# sf.serverurl = https://test.salesforce.com

# API version to use
sf.apiVersion = 59.0

# Deployment timeout (in milliseconds)
sf.maxPoll = 20
sf.pollWaitMillis = 10000

# Path to the salesforce ant jar
sf.antJar = /tools/ant-salesforce/ant-salesforce.jar
Security Tip: Never commit
build.propertieswith real credentials to version control. Use environment variables or a secrets manager in CI/CD pipelines.
Using environment variables instead:
propertiessf.username = ${SF_USERNAME}
sf.password = ${SF_PASSWORD}
sf.serverurl = ${SF_SERVER_URL}
Step 3: Define Your package.xml
The package.xml file is the manifest that tells Salesforce which metadata components to include in your deployment. Think of it as your deployment inventory list.
XML<?xml version="1.0" encoding="UTF-8"?>
<Package xmlns="http://soap.sforce.com/2006/04/metadata">

    <!-- Apex Classes -->
    <types>
        <members>AccountHelper</members>
        <members>OpportunityTriggerHandler</members>
        <members>EmailService</members>
        <name>ApexClass</name>
    </types>

    <!-- Apex Triggers -->
    <types>
        <members>OpportunityTrigger</members>
        <name>ApexTrigger</name>
    </types>

    <!-- Custom Objects -->
    <types>
        <members>Project__c</members>
        <members>Task_Item__c</members>
        <name>CustomObject</name>
    </types>

    <!-- Custom Fields on Standard Objects -->
    <types>
        <members>Account.Region__c</members>
        <members>Opportunity.Expected_Close_Date__c</members>
        <name>CustomField</name>
    </types>

    <!-- Flows -->
    <types>
        <members>Account_Onboarding_Flow</members>
        <name>Flow</name>
    </types>

    <!-- Profiles -->
    <types>
        <members>Custom: Sales Profile</members>
        <name>Profile</name>
    </types>

    <!-- Lightning Web Components -->
    <types>
        <members>accountDashboard</members>
        <members>opportunityCard</members>
        <name>LightningComponentBundle</name>
    </types>

    <version>59.0</version>
</Package>
Pro Tip: To retrieve ALL components of a specific type, use the wildcard *:
XML<types>
    <members>*</members>
    <name>ApexClass</name>
</types>
Step 4: Configure build.xml
The build.xml file is the heart of your Ant deployment setup. It defines all the tasks you can run.
XML<?xml version="1.0" encoding="UTF-8"?>
<project name="SalesforceDeployment" default="deployMetadata" basedir=".">

    <!-- Load properties file -->
    <property file="build.properties"/>

    <!-- Define the Salesforce Ant tasks -->
    <taskdef
        resource="com/salesforce/ant/antlib.xml"
        classpath="${sf.antJar}"/>

    <!-- ============================================
         RETRIEVE: Pull metadata from source org
         ============================================ -->
    <target name="retrieveMetadata" description="Retrieve metadata from Salesforce">
        <mkdir dir="src"/>
        <sf:retrieve
            username="${sf.username}"
            password="${sf.password}"
            serverurl="${sf.serverurl}"
            maxPoll="${sf.maxPoll}"
            retrieveTarget="src"
            unpackaged="src/package.xml"
            apiVersion="${sf.apiVersion}"/>
        <echo message="✅ Metadata successfully retrieved to /src directory"/>
    </target>

    <!-- ============================================
         VALIDATE: Check deployment without committing
         ============================================ -->
    <target name="validateDeployment" description="Validate without deploying">
        <sf:deploy
            username="${sf.username}"
            password="${sf.password}"
            serverurl="${sf.serverurl}"
            maxPoll="${sf.maxPoll}"
            deployRoot="src"
            checkOnly="true"
            runAllTests="true"
            logType="Detail"
            apiVersion="${sf.apiVersion}">
        </sf:deploy>
        <echo message="✅ Validation complete — no changes deployed"/>
    </target>

    <!-- ============================================
         DEPLOY: Full deployment to target org
         ============================================ -->
    <target name="deployMetadata" description="Deploy metadata to Salesforce">
        <sf:deploy
            username="${sf.username}"
            password="${sf.password}"
            serverurl="${sf.serverurl}"
            maxPoll="${sf.maxPoll}"
            deployRoot="src"
            checkOnly="false"
            runAllTests="true"
            logType="Detail"
            rollbackOnError="true"
            apiVersion="${sf.apiVersion}">
        </sf:deploy>
        <echo message="✅ Deployment successful!"/>
    </target>

    <!-- ============================================
         QUICK DEPLOY: Deploy without running all tests
         (Only valid after a successful validation)
         ============================================ -->
    <target name="quickDeploy" description="Quick deploy after validation">
        <sf:deploy
            username="${sf.username}"
            password="${sf.password}"
            serverurl="${sf.serverurl}"
            maxPoll="${sf.maxPoll}"
            deployRoot="src"
            checkOnly="false"
            runAllTests="false"
            rollbackOnError="true"
            apiVersion="${sf.apiVersion}">
        </sf:deploy>
        <echo message="✅ Quick deployment complete!"/>
    </target>

    <!-- ============================================
         DESTRUCTIVE: Remove metadata from org
         ============================================ -->
    <target name="destructiveDeploy" description="Delete metadata from Salesforce">
        <sf:deploy
            username="${sf.username}"
            password="${sf.password}"
            serverurl="${sf.serverurl}"
            maxPoll="${sf.maxPoll}"
            deployRoot="destructive"
            checkOnly="false"
            rollbackOnError="true"
            apiVersion="${sf.apiVersion}">
        </sf:deploy>
        <echo message="✅ Destructive deployment complete — components removed"/>
    </target>

</project>
Step 5: Run Your Deployment Tasks
Now that everything is configured, here’s how to execute each task:
Retrieve metadata from source org:
Bashant retrieveMetadata
Validate deployment (dry run — no changes made):
Bashant validateDeployment
Deploy metadata to target org:
Bashant deployMetadata
Expected output for a successful deployment:
textBuildfile: /path/to/your/project/build.xml

deployMetadata:
  [sf:deploy] Request for a deploy submitted successfully.
  [sf:deploy] Request ID for the current deploy task: 0Af5g00000xxxxxAAA
  [sf:deploy] Waiting for server to finish processing the request...
  [sf:deploy] Request Status: Pending
  [sf:deploy] Request Status: InProgress
  [sf:deploy] Request Status: Succeeded
  [sf:deploy] *********** DEPLOYMENT SUCCEEDED ***********
  [sf:deploy] Finished request 0Af5g00000xxxxxAAA successfully.
      [echo] ✅ Deployment successful!

BUILD SUCCESSFUL
Total time: 2 minutes 34 seconds
Step 6: Handle Destructive Changes
When you need to remove components from an org, you need a destructiveChanges.xml file alongside an empty package.xml.
Create a /destructive/ folder:
textdestructive/
├── package.xml              ← Empty package (required)
└── destructiveChanges.xml   ← Components to delete
destructive/package.xml:
XML<?xml version="1.0" encoding="UTF-8"?>
<Package xmlns="http://soap.sforce.com/2006/04/metadata">
    <version>59.0</version>
</Package>
destructive/destructiveChanges.xml:
XML<?xml version="1.0" encoding="UTF-8"?>
<Package xmlns="http://soap.sforce.com/2006/04/metadata">
    <types>
        <members>OldApexClass</members>
        <members>AnotherLegacyClass</members>
        <name>ApexClass</name>
    </types>
    <types>
        <members>ObsoleteCustomObject__c</members>
        <name>CustomObject</name>
    </types>
    <version>59.0</version>
</Package>
6. Best Practices for Safe and Reliable Deployments
Automating deployments is powerful, but with great power comes great responsibility. Here are the best practices that experienced Salesforce DevOps teams follow:
6.1 Always Use Version Control
Every metadata component should live in a Git repository. This gives you:
- Full history of every change
- Ability to roll back to any previous state
- Collaboration through pull requests and code reviews
- Branching strategies for parallel development
Recommended branching model:
textmain (production)
├── release/sprint-23
│   ├── feature/account-automation
│   ├── feature/opportunity-dashboard
│   └── bugfix/email-template-fix
└── hotfix/critical-profile-fix
6.2 Always Validate Before You Deploy
Never skip the validation step, especially for production deployments. Validation (checkOnly="true") runs all the checks without making any actual changes. If it passes, you can then do a quick deploy.
Bash# Step 1: Validate
ant validateDeployment

# Step 2: Only if validation passes, deploy
ant quickDeploy
6.3 Test Coverage Requirements
Salesforce requires a minimum of 75% code coverage for production deployments. Best practices suggest:
- Aim for 85%+ code coverage across all Apex classes
- Write meaningful tests that test behavior, not just coverage
- Include both positive and negative test scenarios
- Test bulk operations (200+ records)
6.4 Environment Management
Maintain a clear hierarchy of environments and enforce a promotion path:
textDeveloper Sandbox → Integration Sandbox → UAT Sandbox → Production
        ↓                    ↓                  ↓              ↓
    Feature Dev          Merge & Test       User Acceptance  Live
Never deploy directly to production without passing through lower environments.
6.5 Use .gitignore Wisely
Exclude sensitive and generated files from version control:
gitignore# .gitignore for Salesforce Metadata projects

# Credentials — NEVER commit these
build.properties

# Salesforce generated files
*.dup
package.xml.bak

# OS files
.DS_Store
Thumbs.db

# IDE files
.vscode/
.idea/
*.swp

# Temp files
tmp/
.tmp/
6.6 Automate Test Runs
Configure your deployment to always run relevant tests:
XML<!-- Run specific tests only (faster, targeted) -->
<sf:deploy runTests="AccountHelperTest, OpportunityTriggerTest" .../>

<!-- Run all local tests (recommended for production) -->
<sf:deploy runAllTests="true" .../>
6.7 Document Your Package.xml
Add comments to explain why specific components are included. This helps your team understand deployment scope.
XML<!-- SPRINT 23 - Account Management Enhancements
     Includes: New Account fields, updated trigger, revised flow
     Author: John Smith | Date: 2024-01-15 -->
<Package xmlns="http://soap.sforce.com/2006/04/metadata">
    ...
</Package>
7. Common Issues and How to Troubleshoot Them
Even well-configured deployments can hit snags. Here’s how to handle the most common problems.
Issue 1: Authentication Errors
Symptoms:
text[sf:deploy] ERROR: INVALID_LOGIN: Invalid username, password, security token;
or user locked out.
Solutions:
✅ Check your credentials — Username, password, and security token must be correct
✅ Concatenate security token to password — sf.password = YourPassword + YourSecurityToken
✅ Reset your security token — Go to Settings → Reset My Security Token
✅ Check the server URL — Use https://test.salesforce.com for sandboxes, https://login.salesforce.com for production
✅ Check IP restrictions — Your org may have IP whitelisting enabled. Either whitelist your IP or use a connected app with OAuth
Issue 2: Missing Dependent Components
Symptoms:
text[sf:deploy] Error: Cannot find referenced custom field 'Account.NewField__c'
Solution: Your package.xml is missing a dependent component. Ensure all dependencies are included:
XML<!-- Include the parent object when deploying custom fields -->
<types>
    <members>Account.NewField__c</members>
    <name>CustomField</name>
</types>

<!-- Also include related validation rules, page layouts if changed -->
<types>
    <members>Account-Account Layout</members>
    <name>Layout</name>
</types>
Issue 3: Test Failure During Deployment
Symptoms:
text[sf:deploy] Test failures:
  Class: AccountHelperTest | Method: testBulkUpdate | Status: Failed
  Message: System.AssertException: Assertion Failed: Expected 5, got 0
Solutions:
✅ Run the failing test locally first to identify the root cause
✅ Check if the test depends on existing data (it shouldn’t — use @isTest and Test.startTest())
✅ Verify the test uses @TestSetup or creates its own data
✅ Check for hardcoded IDs in test classes
Issue 4: Timeout Errors
Symptoms:
text[sf:deploy] Request timed out. Check deployment status in Setup.
Solutions:
Increase the poll settings in your build.properties:
propertiessf.maxPoll = 50
sf.pollWaitMillis = 30000
Issue 5: Deployment Partially Succeeds
Symptoms: Some components deploy successfully while others fail.
Solution: Enable rollbackOnError to ensure all-or-nothing deployments:
XML<sf:deploy rollbackOnError="true" .../>
Debugging Tips
Enable detailed logging:
XML<sf:deploy logType="Detail" .../>
Log levels available:
None— Minimal informationDebugonly— Debug logDb— Database interactionsProfiling— Performance detailsCallout— HTTP calloutsDetail— Maximum detail (recommended for troubleshooting)
Check deployment status in Salesforce:
Navigate to Setup → Deployment Status to see detailed deployment results, including component-level success/failure and test execution results.
8. Real-World Use Cases
Use Case 1: CI/CD Pipeline with GitHub Actions
Here’s how a Salesforce Metadata API deployment fits into a GitHub Actions pipeline:
YAML# .github/workflows/salesforce-deploy.yml

name: Salesforce Deployment Pipeline

on:
  push:
    branches: [ main ]
  pull_request:
    branches: [ main ]

jobs:
  validate:
    name: Validate Deployment
    runs-on: ubuntu-latest

    steps:
      - name: Checkout code
        uses: actions/checkout@v3

      - name: Set up Java
        uses: actions/setup-java@v3
        with:
          java-version: '11'

      - name: Install Ant
        run: |
          sudo apt-get install -y ant

      - name: Download Salesforce Ant Tool
        run: |
          wget -q https://your-storage/ant-salesforce.jar -O ant-salesforce.jar

      - name: Validate deployment
        env:
          SF_USERNAME: ${{ secrets.SF_USERNAME }}
          SF_PASSWORD: ${{ secrets.SF_PASSWORD }}
          SF_SERVER_URL: ${{ secrets.SF_SERVER_URL }}
        run: |
          ant validateDeployment

  deploy:
    name: Deploy to Production
    runs-on: ubuntu-latest
    needs: validate
    if: github.ref == 'refs/heads/main'

    steps:
      - name: Checkout code
        uses: actions/checkout@v3

      - name: Deploy to Salesforce
        env:
          SF_USERNAME: ${{ secrets.SF_USERNAME }}
          SF_PASSWORD: ${{ secrets.SF_PASSWORD }}
          SF_SERVER_URL: ${{ secrets.SF_SERVER_URL }}
        run: |
          ant deployMetadata
How this works:
- A developer pushes code to a feature branch
- A pull request triggers the validation job
- If validation passes, the PR can be merged
- When merged to
main, the deploy job runs automatically
Use Case 2: Multi-Org Deployment Strategy
For companies with multiple Salesforce orgs (e.g., multiple business units or regional orgs), you can parameterize your build to target different environments:
Bash# Deploy to US Production
ant deployMetadata -Dsf.username=${US_SF_USERNAME} -Dsf.password=${US_SF_PASSWORD} \
  -Dsf.serverurl=https://login.salesforce.com

# Deploy to EU Production
ant deployMetadata -Dsf.username=${EU_SF_USERNAME} -Dsf.password=${EU_SF_PASSWORD} \
  -Dsf.serverurl=https://eu12.salesforce.com
Use Case 3: Scheduled Automated Releases
For teams following sprint-based release cycles, you can schedule deployments using cron jobs or CI/CD platform schedulers:
YAML# GitHub Actions scheduled deployment (every Friday at 6 PM UTC)
on:
  schedule:
    - cron: '0 18 * * 5'
This ensures that every sprint’s changes are automatically promoted to production at a consistent, predictable time.
Use Case 4: Sandbox Refreshes
When a sandbox is refreshed, its metadata goes back to production state. Automation helps you quickly restore the sandbox to the correct development state:
Bash# After sandbox refresh — restore dev metadata
ant deployMetadata \
  -Dsf.serverurl=https://test.salesforce.com \
  -Dsf.username=${DEV_SANDBOX_USERNAME} \
  -Dsf.password=${DEV_SANDBOX_PASSWORD}
9. Sample End-to-End Deployment Workflow
Here’s a complete deployment workflow that brings everything together:
text┌─────────────────────────────────────────────────────────────────┐
│              SALESFORCE METADATA DEPLOYMENT WORKFLOW             │
└─────────────────────────────────────────────────────────────────┘

Developer Workstation                 Git Repository
        │                                    │
        │ 1. Develop feature in sandbox      │
        │    (Apex, LWC, Config)             │
        │                                    │
        │ 2. Retrieve metadata               │
        │    ant retrieveMetadata            │
        │                                    │
        │ 3. Commit & Push to feature branch │────────────────────→│
        │                                    │                     │
        │                                    │  4. Pull Request    │
        │                                    │     created        │
        │                                    │                     │
        │                                    │  5. Auto-trigger    │
        │                                    │     CI Pipeline    │
        │                                    │          │          │
        │                                    │          ▼          │
        │                              ┌─────────────────────┐    │
        │                              │ CI/CD PIPELINE       │    │
        │                              │                      │    │
        │                              │ Step 1: Validate     │    │
        │                              │ (checkOnly=true,     │    │
        │                              │  runAllTests=true)   │    │
        │                              │                      │    │
        │                              │ Step 2: Code Review  │    │
        │                              │ (Human approval)     │    │
        │                              │                      │    │
        │                              │ Step 3: Merge to     │    │
        │                              │ main branch          │    │
        │                              │                      │    │
        │                              │ Step 4: Deploy to    │    │
        │                              │ UAT Sandbox          │    │
        │                              │                      │    │
        │                              │ Step 5: UAT Sign-off │    │
        │                              │ (Human approval)     │    │
        │                              │                      │    │
        │                              │ Step 6: Deploy to    │    │
        │                              │ PRODUCTION           │    │
        │                              │                      │    │
        │                              │ Step 7: Post-deploy  │    │
        │                              │ verification         │    │
        │                              └─────────────────────┘    │
        │                                                          │
        │◄─────────────── 8. Notification (Success/Failure) ──────│

Status Notifications:
✅ Success → Slack/Email: "Deployment to Production completed"
❌ Failure → Slack/Email: "Deployment failed — see logs"
Project Directory Structure
Here’s the recommended project structure for a well-organized Salesforce Metadata project:
textsalesforce-project/
├── src/                          ← Your metadata lives here
│   ├── classes/
│   │   ├── AccountHelper.cls
│   │   ├── AccountHelper.cls-meta.xml
│   │   ├── AccountHelperTest.cls
│   │   └── AccountHelperTest.cls-meta.xml
│   ├── triggers/
│   │   ├── OpportunityTrigger.trigger
│   │   └── OpportunityTrigger.trigger-meta.xml
│   ├── objects/
│   │   └── Project__c/
│   │       ├── fields/
│   │       └── Project__c.object
│   ├── flows/
│   │   └── Account_Onboarding_Flow.flow
│   ├── lwc/
│   │   └── accountDashboard/
│   └── package.xml
│
├── destructive/                  ← Components to delete
│   ├── destructiveChanges.xml
│   └── package.xml
│
├── build.xml                     ← Ant task definitions
├── build.properties              ← Credentials (NOT in git)
├── build.properties.example      ← Template (safe to commit)
├── .gitignore
└── README.md
10. Conclusion
Deploying Salesforce metadata manually is like writing emails with a typewriter — technically possible, but needlessly painful when better tools exist.
The Salesforce Metadata API fundamentally changes how teams approach deployment. By treating your org’s configuration as code — something that can be versioned, reviewed, tested, and automated — you unlock a whole new level of reliability, speed, and confidence in your release process.
Here’s what we covered in this guide:
- What Salesforce Metadata is and why it matters
- What the Salesforce Metadata API offers and how it differs from Change Sets
- Why automating Salesforce deployments is critical for modern development teams
- The Ant Migration Tool and how to configure it end-to-end
- Practical code examples for retrieving, validating, and deploying metadata
- Best practices that keep deployments safe and auditable
- Common issues and how to fix them quickly
- Real-world use cases including CI/CD pipelines and multi-org deployments
Your Next Steps
- Start small — Pick one metadata type (like Apex classes) and automate its deployment first
- Version control first — Get your metadata into Git before anything else
- Build your pipeline — Start with validation automation, then add full deployment
- Expand gradually — Add more metadata types and environments as you gain confidence
Whether you’re a solo developer managing a single org or a DevOps engineer orchestrating releases across dozens of Salesforce environments, Salesforce Metadata API deployment automation is the foundation upon which reliable, scalable Salesforce DevOps is built.
The investment you make today in setting up proper deployment automation will pay dividends in hundreds of hours saved, production incidents avoided, and developer frustration eliminated.
Start automating. Your future self will thank you.
About RizeX Labs
We’re Pune’s leading IT training institute specializing in emerging technologies like Salesforce and data analytics. At RizeX Labs, we help professionals master tools like Salesforce Tableau CRM through on-training, real-world projects, and expert mentorship. Our programs are designed to transform learners into job-ready Salesforce professionals with strong analytical and reporting skills.
Internal Links:
- Salesforce Admin & Development Training
- Salesforce Apex Triggers: Beginner’s Guide with Real-Time Examples
- Salesforce Lightning Web Components (LWC) vs Aura: Which Should You Learn First

